Quantcast
Channel: Microsoft Dynamics Ax
Viewing all 181 articles
Browse latest View live

Executing external x++ code

$
0
0

runbuf() executes x++ code passed to it. The code must be defined as a function and can return a value. Parameters passed to runbuf() will be forwarded, but default parameters won’t work. To show how it works, I am going to use this function to execute code read from an external file. Not very useful and you probably wouldn’t want to allow it, it’s just to show that it can be done (easily).
static void ExecuteCodeFromFile(Args _args)
{
#File
AsciiIo asciiIo = new AsciiIo(“c:\\temp\\findCustomer.xpp”,#io_read);
XppCompiler xppCompiler = new XppCompiler();
Source source;
str line;
CustTable custTable;
;
if (asciiIo)
{
asciiIo.inFieldDelimiter(#delimiterEnter);
[line] = asciiIo.read();
while (asciiIo.status() == IO_Status::Ok)
{
source += #delimiterEnter;
source += line;
[line] = asciiIo.read();
}
if (!xppCompiler.compile(source))
error (xppCompiler.errorText());
custTable = runbuf(source,’4000′);
print CustTable.Name;
}
else
print “Could not open file”;
pause;
}
The external file c:\temp\findCustomer.xpp:
CustTable findCustomer(CustAccount _accountNum)
{
return CustTable::find(_accountNum);
}
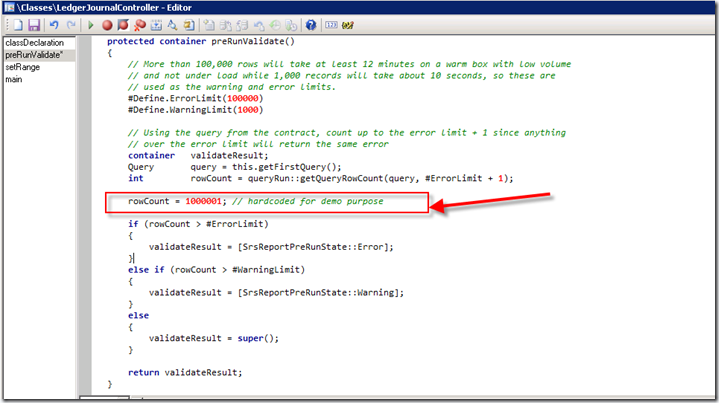
First the file c:\temp\findCustomer.xpp is read into source. Source is then compiled and if that goes okay it is executed. As you can see ‘4000’ is passed as a parameter simply by adding it to the runbuf() call. You can also see runbuf returns the function’s return value.
I had trouble getting code compiled that I had written using notepad. As it turns out, the compiler does not accept the tab character. So if you are going to try this out, watch out for that.

Execute External X++ File

$
0
0


static void ExecuteExternalX++File(Args _args)
{
    TextBuffer  textBuffer;
    XppCompiler xppCompiler = new XppCompiler();
    Source source;
    textBuffer  = new TextBuffer();
    textBuffer.fromFile(@"C:\\Users\\toto\\Desktop\\codeX++file.txt");
    source  = textBuffer.getText();  
    if (!xppCompiler.compile(source))
    error (xppCompiler.errorText());
    runbuf(source);
}

How to read text files that have line feed and carriage return intermixed using X++?

$
0
0


I am trying to read a text file using Dynamics AX. However, the following code replaces any spaces in the lines with commas:
// Open file for read access
myFile = new TextIo(fileName , 'R');

myFile.inFieldDelimiter('\n');

fileRecord = myFile.read();
while (fileRecord)
{
line = con2str(fileRecord);
info(line);

I have tried various combinations of the above code, including specifying a blank '' field delimiter, but with the same behaviour.
The following code works, but seems like there should be a better way to do this:
// Open file for read access
myFile = new TextIo(fileName , 'R');

myFile.inRecordDelimiter('\n');
myFile.inFieldDelimiter('_stringnotinfile_');

fileRecord = myFile.read();
while (fileRecord)
{
line = con2str(fileRecord);
info(line);
The format of the file is field format. For example:
DATAFIELD1    DATAFIELD2  DATAFIELD3
DATAFIELD1 DATAFIELD3
DATAFIELD1 DATAFIELD2 DATAFIELD3
So what I end up with unless I use the workaround above is something like:
line=DATAFIELD1,DATAFIELD2,DATAFIELD3
The underlying problem here is that I have mixed input formats. Some of the files just have line feeds {LF} and others have {CR}{LF}. Using my workaround above seems to work for both. Is there a way to deal with both, or to strip \r from the file?
share|improve this question

Con2Str:

Con2Str will retrieve a list of values from a container and by default uses comma (,) to separate the values.
client server public static str Con2Str(container c, [str sep])
If no value for the sep parameter is specified, the comma character will be inserted between elements in the returned string.

Possible options:

  1. If you would like the space to be the default separator, you can pass space as the second parameter to the method Con2Str.
  2. One other option is that you can also loop through the container fileRecord to fetch the individual elements.

Code snippet 1:

Below code snippet loads the file contents into textbuffer and replace the carriage returns (\r) with new line (\n) character. The condition if (strlen(line) > 1) will help to skip empty strings due to the possible occurrence of consecutive newline characters.
TextBuffer  textBuffer;
str textString;
str clearText;
int newLinePos;
str line;
str field1;
str field2;
str field3;
counter row;
;

textBuffer = new TextBuffer();
textBuffer.fromFile(@"C:\temp\Input.txt");
textString = textBuffer.getText();
clearText = strreplace(textString, '\r', '\n');

row = 0;
while (strlen(clearText) > 0 )
{
row++;
newLinePos = strfind(clearText, '\n', 1, strlen(clearText));
line = (newLinePos == 0 ? clearText : substr(clearText, 1, newLinePos));

if (strlen(line) > 1)
{
field1 = substr(line, 1, 14);
field2 = substr(line, 15, 12);
field3 = substr(line, 27, 10);

info('Row ' + int2str(row) + ', Column 1: ' + field1);
info('Row ' + int2str(row) + ', Column 2: ' + field2);
info('Row ' + int2str(row) + ', Column 3: ' + field3);
}

clearText = (newLinePos == 0 ? '' : substr(clearText, newLinePos + 1, strlen(clearText) - newLinePos));
}

Code snippet 2:

You could use File macro instead of hard coding the values \r\n and R that denotes the read mode.
TextIo      inputFile;
container fileRecord;
str line;
str field1;
str field2;
str field3;
counter row;
;

inputFile = new TextIo(@"c:\temp\Input.txt", 'R');

inputFile.inFieldDelimiter("\r\n");

row = 0;
while (inputFile.status() == IO_Status::Ok)
{
row++;
fileRecord = inputFile.read();
line = con2str(fileRecord);

if (line != '')
{
field1 = substr(line, 1, 14);
field2 = substr(line, 15, 12);
field3 = substr(line, 27, 10);

info('Row ' + int2str(row) + ', Column 1: ' + field1);
info('Row ' + int2str(row) + ', Column 2: ' + field2);
info('Row ' + int2str(row) + ', Column 3: ' + field3);
}
}
Dynamics AX job output


Split big text files in smaller ones in X++

$
0
0

Below is a job I found useful many times, so don’t want to loose it.
Nothing special, but maybe you’ll find it useful too.
It splits an input text file into smaller files.
As there is one comment line for every line of code (almost), I’m sure you’ll figure it out :-).
static void KlForSplitFile(Args _args)
{
    #File
    AsciiIO             inFile, outFile;
    container           rec;
    int                 cnt = 0, fileNum    = 0;
    FileName            outFileName;
    FileIOPermission    filePermissionOrig, outFilePermission;
    Set                 permissionSet = new set(types::Class);

    // settings begin
    // input file
    str                 _inFileName = @"C:\temp\testsplit\testsplit.csv";
    // max number of lines
    int                 _maxrec = 20000;
    //settings end
    ;

    //
    // first loop to create the permission set
    //

    // assert permission for read
    new FileIOPermission(_inFileName, #io_read).assert();

    // create new asciiIo for the file we are reading in
    inFile  = new AsciiIo(_inFileName,#io_read);

    // read file to check how many files will be created
    while(inFile.read())
    {
        if(cnt == _maxrec || cnt == 0)
        {
            // 1 more file
            filenum++;
            // create filename
            outFileName = strfmt('%1_%2.csv',
            substr(_inFileName,1,strlen(_inFileName) - 4), fileNum);
            // create permission
            outFilePermission = new FileIOPermission(outFileName,#io_write);
            // add permission to set
            permissionset.add(outFilePermission);
            // reset line counter
            cnt = 0;
        }
        // 1 more line
        cnt++;
    }

    // also add fileIn permission to set
    filePermissionOrig =  new FileIOPermission(_inFileName, #io_read);
    permissionset.add(filePermissionOrig);
    // revert permission assertion
    CodeAccessPermission::revertAssert();

    // assert permissions for set
    CodeAccessPermission::assertMultiple(permissionset);

    //
    // loop file again and split
    //

    // reset counters
    fileNum = 0;
    cnt     = 0;

    // create new asciiIo for the file we are reading in
    inFile  = new AsciiIo(_inFileName,#io_read);

    // read file to check how many files will be created
    // read ahead
    rec = inFile.read();
    while(rec)
    {
        if(cnt == _maxrec || cnt == 0)
        {
            // 1 more file
            filenum++;
            // create filename
            outFileName = strfmt('%1_%2.csv',
            substr(_inFileName,1,strlen(_inFileName) - 4), fileNum);
            outFile = new AsciiIO(outFileName,#io_write);
            // reset line counter
            cnt = 0;
        }
        // 1 more line
        cnt++;
        // write to split file
        outFile.writeExp(rec);
        // read next line
        rec = inFile.read();
    }

    // revert permission assertion
    CodeAccessPermission::revertAssert();

    info('done');
}

read text file in axapta

$
0
0
TextBuffer is used to read the whole text file. Load file using textBuffer.fromFile and fetch the whole file string from the .getText

TextBuffer textBuffer;

textBuffer = new TextBuffer();
textBuffer.fromFile(@"C:\sohail.txt");
print textBuffer.getText();
pause;

Misc.Charge Keep Check Box in Sales Order

$
0
0

The Keep Check Box option in the Sales Order Misc.Charge line has effect after posting the invoice as the following:-
  • If it is marked the Microsoft Dynamics AX 2009 will keep the Misc.Charge Line after Post the Invoice (Recommended to mark it all the time)
  • If it is un-marked the Microsoft Dynamics AX 2009 will remove the Misc.Charge line after Post the Invoice (Do not worry it is stored in another table, and could be inquired from another form)Keep Check Box Sales Order


Modifying posted Purchase or Sales Trade agreements in MS Dynamics AX 2012

$
0
0

 Hi All,

        We are going to discuss about the process as how to modify the Sales or Purchase trade agreements which are posted.

        Here we are going to discuss how to modify the line discount highlighted in the below screenshot which is already created and posted. For example there are chances the management suggests to change or modify the trade agreements which were posted already by mistake.
         The below screenshot displays the existing and posted Line discount trade  agreement  for the item discount group ‘expline1’.
clip_image002[7]

·         Navigate to Item discount Group (Sales and Marketing à Setup à Price/Discount à Item Discount Groups) and select ‘expline1’ Discount group.

·         Click on ‘Trade agreements’ button and select ‘Create Trade agreements’ as shown in the below screenshot.

clip_image003[6]

·         A new trade agreement journal is opened with an empty Header.

·         Select a Journal Name from the drop down and click on ‘Lines’ button.

·         In the Journal Lines form, do not create a new line as we are not creating a new trade agreement.

·         To fetch the Line discount select the line click on ‘Select’ button. Please refer to the below screenshot.

clip_image005[7] 
·          In the new Select form, please do as following:

o   Relation- Select the relations you wish to modify. In our case we are modifying a Line discount so we have selected only Line discount.(Note: selecting many options will fetch unwanted lines, so it is advisable to select only the relations which you require)

o   Currencies are Optional.(selecting this will filter the lines being fetched)

o   Date interval is also optional. (selecting this will filter the lines being fetched)

o   Parties, in the account code select table if you want to select for a particular customer and select ‘Group’ to select a customer discount group and select all for all customers. Same applies for vendors also.

o   Uncheck ‘Include additional relations’ check box as it will fetch all the lines for other relation.

o   In the Items field group, select item code as ‘Group’ as we are going to modify a line discount for an Item discount group.

o   Select the relation field as ‘expline1’ from the drop down.

o   Click on select button.

clip_image007[6]

·         All the lines are fetched in the Journal Lines form as per the selection we made in the select form as shown in the below screenshot.  

clip_image009[10] 

·         In the lines that were fetched, identify the line you intend to modify.

·         In our case, first line is the line which we wanted to modify.

·         In the line make the changes that you want to do, we can change all the fields except for the relation field.

·         Delete other lines that are fetched

·         In our case we are changing the Amount in currency field. Change the value from 15 to 25 as shown in the below screenshot.

clip_image011[6]

·         After changing the required fields, click on ‘Post’ button.

·         Now we can verify that the value is changed in the Line discount form.(Please refer to the below screenshot) Navigate through Item master select the item line à click “Sell” tab à select “Line discount”à Line disc (Purch) form is opened à view the update in the discount field highlighted below

clip_image013[6]

AX 2012 Trade Agreements

$
0
0

Trade agreements in AX 2012 will be setup using journals. These journals will now “post” new agreements, changes to existing agreements, and remove agreements. 

Activate Trade AgreementsTo use trade agreements, you must first activate them for the types you plan to use.
To activate trade agreements go to each of the following forms in AX.
Sales Order Agreements – Sales and Marketing > Setup > Price/Discount > Activate Price/Discount
Purchase Order Agreements – Procurement and Sourcing > Setup > Price/Discount > Activate Price/Discount
Activate price/discount
Mark the checkbox for each type of agreement across each tab that you want to use to define the price of sold for purchased items.
Define GroupsGroups are defined to make allocating items to a customer or vendor faster and easier. Customer or Vendor Groups can be assigned to a customer/vendor and then linked to an item or group of items through the trade agreement.
The groups can be defined through the Inventory and Warehouse Management module under Setup>Price/Discount. Or through the Setup section of either Sales and Marketing or Procurement and Sourcing module.
The groups are associated to a vendor, customer, or item through the particular record.
Price groups are for creating prices for items or groups of items which line, multiline, and total discount groups are used for applying discounts to orders.
Customer price/discount groups 
Customer Price/Discount Groups

Another feature of Customer Price Groups is that the can be used to print a “price list”. The price list will contain every trade agreement that is associated with the selected customer group. This can be initiated through the Send button on the Customer Price/Discount Group form.
Create Trade AgreementsCreating a trade agreement can be done through any of the “groups” forms. The Trade Agreement button on these forms will allow the user to create a trade agreement of any type and relation.
Under the Trade Agreements button, select the Create Trade Agreements option to open the form where Price/Discount Agreement Journals are created.
Price/Discount agreement journal
Price/Discount Agreement Journal
 
Create a new journal entry and press the Lines button to add lines.
Price/discount agreement journal lines
Price/Discount Agreement Journal Lines
 
 
New trade agreement lines can be created by pressing CTRL+N, or you can import existing journal lines by using the Select Button and entering information about what you want to add in the dialog box.
The adjustment can be used to call a dialog that will allow adjustments to be made to the existing journal lines. The adjustments can be percentage adjustments or dollar value adjustments based on the current price, cost price, default price or zero. Or the adjustments can be to the discount specified.
Journal lines can be copied using the Copy Lines button, or copied and revised through a dialog using the Copy and Revise button. The clear journal button will remove any added entries to the journal. The Select all Agreements to Delete button will allow the user to specify which journal entries they want to be deleted and therefore no longer used. Once all items have been marked for deletion, they can be restored by using the Restore Lines button.
When entering a trade agreement, the Relation field allows the user to specify the type of agreement the want to create. A single journal can contain multiple types of agreements, including both purchasing and sales agreements. The account code and item code will define the customer or vendor, and item relation. The options are either table (a specific customer/vendor/item), group (one of the created groups of customers/vendors/items) or All customers/vendors/items.
The From and To field will allow the user to specify the quantity range for which the agreement will be applicable. And in the section below the grid, discounts, date ranges, and lead times can be added to each line of the journal.
Clicking the Post button will post all the entries in the journal.
Once posted, the entries can be view in the Group form under the trade agreement button by selecting the agreement types to view.
customer price discount groups
Customer Price/Discount Groups

WMS in Microsoft Dynamics® AX 2009. Shipping Process Overview

$
0
0

Introduction

The WMS (Warehouse Managements System) encompasses the core components within average Microsoft Dynamics AX installations that are implemented to manage and run world class warehouses.
The WMS functionality is enabled by the configuration keys LogisticsAdvanced, WMSBasic, and WMSAdvanced. Formal training is available with the courses “Trade and Logistics I in Microsoft Dynamics® AX 2009” and “Trade and Logistics II in Microsoft Dynamics® AX 2009”. The training material covers main flows and processes, but there is still plenty of room for discussions on this exiting subject.
Please welcome the first post of a WMS series on this blog.

Why should I continue reading this post?

This post describes core Microsoft Dynamics AX 2009 outbound shipping process components, such as output order and shipment, and it provides an overview of the outbound process in general. We would definitely recommend that you continue reading this post to:
·         Get a clear overview of outbound shipping processes with WMS in AX2009
·         Learn more about new features in the shipping process, such as consolidated picking
Let’s get started.

Outbound process

In Microsoft Dynamics AX 2009 outbound shipping via warehouse management is processesed through a shipment [Inventory management > Common Forms > Shipments].
A shipment is a collection of items that are packed in the same container for transport by, for example, ship, rail, truck, or plane. A shipment includes an entire order, a part of an order, or a consolidation of multiple orders.
Based on the contents of the shipment, one or more picking routes, one or more pallet transports, or both are created.
An output order is a request for a picking requirements and it forms the basis of a shipment. From the shipment you can activate a pallet transport, a picking route, or both. The shipment status is based on the lowest denominator of the shipment lines’ status.
When, for example, a sales order line is created in Microsoft Dynamics AX 2009 an inventory transaction is created with a negative quantity to control an expected issue of inventory. To control the process of issuing the physical inventory, an output order is used in the warehouse management area. The output order [Inventory management > Inquiries > Output orders] is created when the reference order is released (Posting of the picking list).
The output orders are associated with a shipment, and in that process Microsoft Dynamics AX 2009 creates shipment lines. When shipment reservation is run, the program creates picking routes and/or output pallet transports based on predefined settings. The following activation of the picking process makes it possible to pick and deliver picked inventory to the shipment staging areas where the shipment is staged and loaded before it is sent.
 
As shown below, the outbound process can be set up to include only part of the existing stages.

Output orders

In Microsoft Dynamics AX 2009, the warehouse management outbound processes use output orders [Inventory Management > Inquiries > Output orders].
 
The output order [Inventory management > Inquiries > Output orders] is created when the reference order is released (Posting of the picking list), or when a manual output is requested from the issue reference line.
The output order holds information about the status of the outbound process and it is linked to the detailed information of the issue reference line.


Relation to inventory transactions

When the output order is created, it takes “ownership” of corresponding issue inventory transactions. This relationship is maintained by two dedicated fields on the InventTrans table (TransChildType and TransChildTypeRef). All related inventory transactions are marked consistently against an output order. Consider the following code example of output order creation.
AOT/Classes/WMSOrderCreate/updateCreateWmsOrder()
inventTrans.TransChildType  = InventTransChildType::WMSOrder;
inventTrans.TransChildRefId = wmsOrder.OrderId;

Shipment

A shipment consists of a shipment header and lines, and the information relates to output orders which, again, relate to the different reference order lines. Note, that when using advanced warehouse management in AX, a shipment can contain references to multiple issue orders, and these orders can even be of different order types.
The shipment status is based on the lowest denominator of the shipment lines’ status. A shipment can be in one of the following statuses:
Status
Description
Registered
The shipment has been created but not yet reserved or, if just one shipment line exists, without being part of a route.
Reserved
The shipment has been reserved and picking routes and/or pallet transports have been generated, but they have not yet been released for picking.
Activated
Both picking routes and pallet transports have been released, but not all of them have been completed.
Note that picking can start even when all items for the shipment cannot be reserved.
Picked
At least one line of the shipment line is still at the picked stage.
Staged
At least one line of the shipment line is still at the staged stage.
Loaded
At least one line of the shipment line is still at the loaded stage.
Sent
The shipment has been sent and the shipment has been fully expedited.
Canceled
The shipment has been canceled.

Shipment template

A Shipment template available from Inventory management > Setup > Distribution > Shipment templates, is used as the basis of a shipment.
A shipment template is required only if features such as automatic shipment creation, automatic creation of output orders, or creation of shipments via a wizard are applied, otherwise a shipment can be created manually. When a shipment template is applied, output orders can automatically be assigned to a shipment – and then a shipment need not be created manually.

Picking

Microsoft Dynamics AX 2009 supports three outbound picking processes:
·         Consolidated picking
·         Order picking
·         Inventory transaction picking (for example, Accounts receivable > Common Forms > Sales Order Details (Lines) > Inventory > Pick)
The order picking and consolidated picking processes use the same framework, called output orders, but the consolidated picking method has much more functionality and it requires a license to Advanced Warehouse Management.
If consolidated picking is not applied, Microsoft Dynamics AX 2009 automatically creates a shipment and a picking route when, for example, a picking list is posted from the Sales orders form.
We do not recommend using inventory transaction picking in combination with one of the other picking methods since inventory transaction picking does not update output order related information.
The following example illustrates the possibilities of controlling the outbound warehouse management processes utilizing output orders in Microsoft Dynamics AX.
Consolidated picking implies that multiple orders can be combined into one picking list. The orders can potentially be of different types, for example sales orders or transfer orders.
Consolidated picking uses advanced shipment functionality such as reservation via shipment, activate picking, activate pallet transport, and guided picking routes.
For flexibility of use, the consolidated picking method can be set up in a hierarchy of levels:
-          Inventory model group
-          Warehouses
-          Warehouse items
-          Picking list posting

Unpick and cancelation of pick

In Microsoft Dynamics AX 2009 inventory can be unpicked and returned to a different inventory dimension as, for example, a location and/or pallet. The inventory transactions are returned to the original status after an unpick operation has been performed. The reference to the output order still exists, and the picking line can be updated to Picked again right after unpicking. When a picking line is canceled, the output order reference is moved to the issue reference line and the output order, therefore, needs to be released again from the issue order. Alternatively, the reference line or the ��deliver remainder” quantity on the issue reference line can be canceled.
The unpicking and cancelation methods can be found on the picking list registration [Inventory management > Periodic > Picking list registration], lines – Functions. All the picking lines can also be canceled in one operation via Functions on the picking route header.
 
 Note that after the unpick action it is still possible to pick the same inventory again and again. Since the historical information is not stored in the system, the final inventory transactions are marked against the latest selected picking route, and the original reference using inventory transactions (TransChildType, TransChildTypeRef) is not valid anymore which means that these fields are empty on related inventory transactions. This aspect should be considered by every partner, who is planning to customize functionality in this area.

Data model

Please look at the following data model which represents the relationships between all entities in the scope of this blog post.
  
Per Lykke Lynnerup & Ievgenii Korovin, Inventory Management, Microsoft Dynamics AX. 

Change management for purchase orders [AX 2012]

$
0
0

Updated: January 25, 2012
Applies To: Microsoft Dynamics AX 2012 R2, Microsoft Dynamics AX 2012 Feature Pack, Microsoft Dynamics AX 2012
You can use change management to control the changes that you make to purchase orders in your organization. Change management introduces a managed workflow that makes sure that purchase orders are locked when they have been approved. The purchase orders cannot be changed until you start the change request workflow. When the workflow starts, all changes are stored in a history log, so that you can review the changes and compare purchase order versions.
To understand the change management process, you must understand how the change process fits into the life cycle of the purchase order. There are six approval statuses that the purchase order travels through, fromDraft to Finalized. Change requests can be raised in only two of the approval statuses.
NoteNote
A change request cannot be canceled. It must always be submitted and approved through the workflow.
Approval status
Description
Change requests allowed
Draft
The purchase order is a draft and has not been submitted for approval in the purchase order workflow.
No
In review
The purchase order was submitted for approval in the purchase order workflow. Approval is pending.
No
Rejected
The purchase order was rejected during the approval process.
No
Approved
The purchase order was approved.
Yes
Confirmed
The purchase order was confirmed. A purchase order cannot be confirmed until it has been approved.
Yes
Finalized
The purchase order was made final. It is financially closed and can no longer be changed.
No
Purchase order statuses cannot be increased for intercompany trading partners when change management is enabled. Also, purchase orders that have been created by firming planned orders from master planning are always set to Approved, regardless of the change management settings.
Click these links to find more information about the concepts that are discussed in this topic.
  1. Click Procurement and sourcing > Setup > Procurement and sourcing parameters.
  2. In the General area, select the Activate change management check box to enable change management for purchase orders in the current legal entity.
  3. Select the Allow override of settings per vendor check box if you want to be able to override the default settings for each vendor. This means that you can enable or disable the change management process for each vendor, regardless of the settings for the current legal entity.
    NoteNote
    To override the change management settings for a vendor, select the Override settings check box on the Purchase order defaults FastTab in the Vendors form.
A purchase order must have an Approved status before you can request that a change be made to the purchase order. A purchase order can have this status only if it is processed through a workflow. Therefore, when you enable change management, you must also set up a purchase order workflow. You do this on the Procurement and sourcing workflows list page. When you have set up the workflow, you must also enable it. For information about how to set up workflows, see Create a workflow and Set up Procurement and sourcing workflows.
A workflow represents a business process. It defines how a document flows through the system and indicates who must complete a task or approve a document. There are several benefits of using the workflow system in your organization:
  • Consistent processes — You can define the approval process for specific documents, such as purchase requisitions and expense reports. Using the workflow system helps to ensure that documents are processed and approved in a consistent and efficient manner.
  • Process visibility — You can track the status, history, and performance metrics of a specific workflow instance. This helps you determine whether changes should be made to the workflow to improve efficiency.
  • Centralized work list — Users can view a centralized work list to view the workflow tasks and approvals assigned to them. This work list is available from the Role Center pages in the Microsoft Dynamics AX client and Enterprise Portal.
For an overview of workflow in Microsoft Dynamics AX, see Overview of the workflow system andWorkflow concepts.
  1. Click Procurement and sourcing > Setup > Procurement and sourcing workflows.
  2. On the Action Pane, click New.
  3. Select the type of workflow to create, and then click Create workflow.
  4. In the workflow editor, design the workflow by dragging workflow elements onto the canvas.
  5. Configure each element of the workflow. For more information, see Configuring the workflow system.
  6. Repeat steps 2 through 5 to create additional workflows for Procurement and sourcing.
  1. Click Procurement and sourcing > Common > Purchase orders > All purchase orders.
    –or–
    Click Accounts payable > Common > Purchase orders > All purchase orders.
  2. Select the purchase order. On the Action Pane, on the Purchase order tab, in the Maintaingroup, click Request change.
    NoteNote
    The selected purchase order can be changed only if it has been approved. If change management has not been enabled, a purchase order can be approved when it is created. If change management has been enabled, the purchase order can be approved through a workflow.
  3. Enter the required changes on the purchase order. The approval status is set to Draft, and the purchase order must be approved again by all approvers before the purchase order can be processed.
When you change a purchase order, a copy of the changes is saved. All changes that you make at the header level and at the line level are saved. You can then view the difference between the approved purchase order and the changes that were made, and you can compare the purchase order versions.
  1. Click Procurement and sourcing > Common > Purchase orders > All purchase orders.
    –or–
    Click Accounts payable > Common > Purchase orders > All purchase orders.
  2. Select the purchase order.
  3. On the Action Pane, on the Manage tab, in the History group, click Compare purchase order versions.
  4. In the Compare purchase order versions form, review the changes that were made to the selected purchase order. All changes to individual fields are listed on the Changed fields FastTab. These values apply on the purchase order lines:
    • Exclamation point – One or more changes were made to the existing data.
    • Check mark – No changes were made to the existing data.
    • Plus sign – A new purchase order line was added.
    • Red X – The line was deleted.
  5. Click Close to return to the All purchase orders list page.
  6. On the Action Pane, on the Manage tab, in the History group, click View purchase order versions.
  7. In the Purchase order versions form, view a list of the available versions of the selected purchase order. You can sort the list by change date or approval status.

Configuration Key Status Using X++ Code

$
0
0

As we are aware, Configuration key controls access to specific feature. To know about the status of a configuration key, the user has to traverse Administration->Setup->System-> Configuration.
Instead with the following job, a user can know the status of all the configuration keys that is being used in the system.

//Configuration key names and their enable state.
static void ConfigurationKey(Args _args)
{
    ConfigurationKeySet   configKeySet;
    DictConfigurationKey  dictConfigKey;
    Object                         formRun ;
    Map                             mapConfigKey;
    str                                strOutput;
    int                                i;
    ;

    mapConfigKey = new Map(Types::Integer, Types::String);
    configKeySet = new ConfigurationKeySet();
    configKeySet.loadSystemSetup();

    for (i=1; i <= configKeySet.cnt(); i++)
    {
        dictConfigKey = new DictConfigurationKey(configKeySet.cnt2Id(i));
        strOutput     = dictConfigKey.enabled() ? "enabled:" : "disabled:";
        strOutput    += " " + " " + dictConfigKey.name();
        mapConfigKey.insert(i, stroutput);
    }

    _args = new Args(formstr(SysPick));
    _args.parmObject(mapConfigKey);

    formRun = classfactory.formRunClass(_args);
    formRun.init();
    formRun.run();

    formRun.setCaption('ConfigurationKey Status');
    formRun.wait();
}
20851015.jpg
On executing this job, the output will be displayed in a SysPick form

How to check configuration key in X++

$
0
0
Query:
How can i check if the configuration key is enabled through x++?

Answer:
if (isConfigurationKeyEnabled(configurationkeynum(keyname)))
{
//insert code here
}

Solving issue with first long starting report on SSRS 2008

$
0
0

As I wrote in my previous blog post First report and report after specific time interval starts a long time on MS SQL 2008 Reporting Services, a first report after specific time takes very long to start.
The issue is caused by the way how SSRS works and SSRS regularly restarts application domain after specific time period. After the application domain is restarted, then upon first request to the SSRS it needs to load all the settings and it takes quite a long time.
There is no real solving to the issue except increasing the interval between the application domain restarts from default 720 minutes to other value which meets your business needs more closer.
However even after increasing the value, then after the period is reached, the application domain is restarted and again the first request will take a long time. It could be ideal to optimize the interval so the app domain restart is done out of business hours. however even then fist report will take a long time.
Here is a possible workaround solution. It rests on the scheduler and execution of a PowerShell script, which stops and starts the SSRS service (which has the same effect as the application domain restart) and after the restart it makes a request to the report manager URL which forces the reporting services to load all the configurations etc. Then all the subsequent request to SSRS are immediate.
So if we set the RecycleTime in the rsreportserver.config to a value which is over one day let’s say 1500 minutes (it is 25 hours) and schedule the execution of the PowerShell script out of the business hours, each morning we will have SSRS ready without any delays. For details about modifying the RecycleTime take a look on my previous post mentioned above.
So here is the PowerShell script:
1
2
3
4
5
6
Stop-Service"SQL Server Reporting Services (MSSQLSERVER)"
Start-Service"SQL Server Reporting Services (MSSQLSERVER)"
$wc= New-Objectsystem.net.webClient
$cred= [System.Net.CredentialCache]::DefaultNetworkCredentials
$wc.Credentials = $cred
$src= $wc.DownloadString("http://localhost/Reports/Pages/Folder.aspx")
The script above first stops the SQL Server Reporting Service of the default (MSSQLSERVER) instance and immediately starts it again (stopping and starting the service has the same effect as application domain recycling). Then an webClient object is created which is used to fetch the Report Manager page which causes the reporting services to load all the settings. The page is read as string (it doesn’t matter how we read the page. Important is to make a request to initialize the reporting services) and it will take a longer time (like the first report start).
It is also important to get the DefaultNetworkCredentials of the user account under which the script will be executed. It is necessary to assign those credentials to the web client so it can authenticate to the reporting services.
Also it is important to mention that it is necessary to execute the script with elevated administrative privileges to be able to stop and start the service.
You can create a scheduled task using the Scheduled Tasks GUI or execute a below command to create the scheduled task from within a command prompt. The command prompt needs to be running with elevated administrative privileges.
1
schtasks /create /tn "SSRS Recycle" /ru UserName /rl highest /np /sc daily /sd 08/01/2011 /st 02:00 /tr "powershell.exe -noprofile -executionpolicy RemoteSigned -file c:\scripts\SSRSRecycle.ps1"
This command creates a new scheduled task named “SSRS Recycle”, which will be run non interactively with elevated rights as UserName. The task will be executed daily at 02:00 am starting from 1st of August 2011 and will execute a PowerShell script SSRSRecycle.ps1 located in folder C:\scripts.
For details about schtasks you can take a look on MSDN Schtasks.exe.
As mentioned in the beginning, it is not real solution to the problem with recycled application domains, however it provides an acceptable work around and you will have every day reporting services ready and available without any delays.
QR Code - Take this post Mobile!
Use this unique QR (Quick Response) code with your smart device. The code will save the url of this webpage to the device for mobile sharing and storage

 45 Responses to “Solving issue with first long starting report on SSRS 2008”

  1. Thanks Pavel, This is a very clever fix for this. Since my last question to you, I’ve set the recycle time to 3 days and started using some scheduled reports that run at 7am and I haven’t seen the problem again.
  2. Great work Pavel – you have the only elegant solution I was able to find that to this issue.
  3. Thanks a lot Pavel! This is working great and is the only real solution out there.
  4. Hi Pavel, first off thanks for this article it really helped me out.
    I had to go down a different route though for two reasons.
    1) This method required giving permissions to start and stop a service to a user whose password didn’t expire.
    2) The Recycle time is not the only reason SSRS recycles: see http://msdn.microsoft.com/en-us/library/bb934330.aspx
    Therefore I took the following approach:
    A) Find an event that is triggered when SSRS is recycled and make the scheduled task event driven. This eliminates the need to Stop and Start the service and caters for all other Recycle causes. Note, there is not clear event for this but I noted that the temp DB of SSRS has its compatibility level changed to 100 on recycle (this may be different per version but I’m sure the principle remains).
    B) Create custom XML for the event trigger. See below. It may be worth trying your custom XML in the windows event viewer first to make sure it works.
    C) Removed the stop/ start powershell from you script.
    D) I called the Powershell script from a .cmd batch (see below) and out put powershell results to a file to help in debugging as some users/ environments UAC conditions you can’t get task scheduler to call powershell directly.
    ***CODE***
    Put the following files into your scripts directory as mentioned in the code. I used C:\DBA\SCRIPTS\SSRSRecycle
    ***Powershell script “SSRSRecycle.ps1″ copy code below ***
    1
    2
    3
    4
    5
    6
    echo"starting pre-cache of SSRS site"
    $wc= New-Objectsystem.net.webClient
    $cred= [System.Net.CredentialCache]::DefaultNetworkCredentials
    $wc.Credentials = $cred
    $src= $wc.DownloadString("http://localhost/Reports/Pages/Folder.aspx")
    echo"finished pre-cache of SSRS site"
    ***code ends above***
    ***batch file ssrs_master.cmd calls .ps1 and outputs to file***
    powershell.exe -noprofile -executionpolicy RemoteSigned -file c:\dba\scripts\SSRSRecycle\SSRSRecycle.ps1 > C:\DBA\Scripts\SSRSRecycle\output.txt
    ***code ends above***
    ***SSRSRecyle.xml, import this to create an event driven scheduled task***
    ***Note ‘ReportServerTempDB’ & ”MSSQL$UAT’ will be different you can find these from the event log or work them out quite easily***
    2012-03-09T14:26:20
    YourLogin
    true
    <QueryList><Query Id=”0″ Path=”Application”><Select Path=”Application”>*[System[Provider[@Name='MSSQL$UAT'] and (EventID=5084)]] and *[EventData[Data and (Data='COMPATIBILITY_LEVEL')]] and *[EventData[Data and (Data='ReportServerTempDB')]]</Select></Query></QueryList>
    domain\user
    S4U
    HighestAvailable
    IgnoreNew
    true
    true
    true
    false
    false
    true
    false
    true
    true
    false
    false
    false
    P3D
    7
    c:\dba\scripts\SSRSRecycle\ssrs_master.cmd
    ***Code ends above***
    ***Custom XML event filter as used by the task above***
    ***Note ‘ReportServerTempDB’ & ”MSSQL$UAT’ will be different you can find these from the event log or work them out quite easily***
    *[System[Provider[@Name='MSSQL$UAT'] and (EventID=5084)]] and *[EventData[Data and (Data='COMPATIBILITY_LEVEL')]] and *[EventData[Data and (Data='ReportServerTempDB')]]
    ***Code ends above***
    • Hi, you are rigth abou the Application Domain recycling. however the situation related to configuraiton changes can be predicted and you can schedule the changes or immediatelly query the RS service.
      The situation of hi memory presure and resources outage it not possible always predict but can be avoided with prooper reports design etc.
      Only the recycling after the specified period of time is regular and this is the issue if there is heavy use of the RS during business hours than the timer start since last recycle and next recycle can occure anytime during the business hours. Thi can cause that som euser will comlain about long runnning report even it is handled by triggered event.
      So the only way how to avoid regular recycling during business hours is to recycle and query the RS service out of bussiness hours so it is reqdy when the business day starts.
      Related to the premissions to start/stop the service. I do not see the issue as any administrative scripts you launch on the machine, launch under some higher priviledged account, so the script for the RS recycling can be launched under higher priviledged service account as other task. Also it is possible to grant stop/start only this particular service.
      Anyway, your approach is also good approach and each solution has it’s pros an cons.
  5. Hmm didn’t like my XML! Let me know how and it I can output it.
  6. [...] Rozwiązanie 1: wydłużyć czas recyklingu oraz automat odpalany w nocy, który za nas będzie udawał pierwszego użytkownika: http://www.pawlowski.cz/2011/07/solving-issue-long-starting-report-ssrs-2008/ [...]
  7. Pavel, I’ve used this on a Native Mode Reporting Services instance and it works great. I’m having the same problem however in a Sharepoint Integrated Mode environment and I can seem to get the script to work with this mode. Does it work for Sharepoint Integrated Mode?
    Thanks!
    Ryan
    • Hi,
      I didn’t tested this with service in SharePoint integrated mode, but I don’t see any problem using it even i SharePoint integrated mode.
      The only thing you will have to modify is the URL to be queried. Don’t know whether it is enough to query eg. URL of some SharePoint library with reports, or whether it will be necessary to open some kind of report.
      First I would try to query a library.
      1
      2
      3
      4
      5
      6
      Stop-Service"SQL Server Reporting Services (MSSQLSERVER)"
      Start-Service"SQL Server Reporting Services (MSSQLSERVER)"
      $wc= New-Objectsystem.net.webClient
      $cred= [System.Net.CredentialCache]::DefaultNetworkCredentials
      $wc.Credentials = $cred
      $src= $wc.DownloadString("http//mysharepointsite.com/Tests/ReportServerTest/Reports/Forms/current.aspx")
      If this will not be enough, the I would create a simple report with eg. single text box or query any of existing reports in any library.
      If I will have a little more time I will test this directly on some SharePoint site.
  8. Thanks Pavel. You’ve solved a long standing problem. Many thanks.
  9. Thank you Pavel, this is an interesting issue we’ve run into lately.


  10. Hi,
    Any idea why I get this error? It does work anyway, the reports page opens quickly after this has run but there is this timeout:
    PS C:\Windows\System32> $wc = New-Object system.net.webClient
    PS C:\Windows\System32> $cred = [System.Net.CredentialCache]::DefaultNetworkCred
    entials
    PS C:\Windows\System32> $wc.Credentials = $cred
    PS C:\Windows\System32> $src = $wc.DownloadString(“http://localhost/reports_ssrs
    jt/Pages/Folder.aspx”)
    Exception calling “DownloadString” with “1″ argument(s): “The operation has tim
    ed out”
    At line:1 char:26
    + $src = $wc.DownloadString( <<<< "http://localhost/reports_ssrsjt/Pages/Folder
    .aspx")
    • solved: Microsoft.ReportingServices.UI.FolderPage+InsufficientPermissionsToRoot: User ‘TESTDOMAIN\SSRS’ does not have required permissions. Verify that sufficient permissions have been granted and Windows User Account Control (UAC) restrictions have been addressed.
  11. Fantastic! At long last you gave me a neat solution for a problem I had for a long time…
  12. I have it like this so I don’t have to worry about first requests as my script does that for me. Whenever the SSRS service recycles, it will do the warmup:
    1. Open powershell and run
    Set-ExecutionPolicy RemoteSigned
    Get-ExecutionPolicy
    Should return “RemoteSigned”. After this you can run powershell scripts locally
    2. Create a folder c:\ssrs for example
    3. Create a file ssrswakeup.ps1 with these Pawel’s lines in it
    $wc = New-Object system.net.webClient
    $cred = [System.Net.CredentialCache]::DefaultNetworkCredentials
    $wc.Credentials = $cred
    $src = $wc.DownloadString(“http://localhost/reports/Pages/Folder.aspx”)
    Check the $src http address from SSRS Configuration Manager
    4. Create wakeup.cmd with this:
    powershell -command “& ‘c:\ssrs\ssrswakeup.ps1′ ”
    5. Open Task Scheduler and create new:
    Name: SSRS Wakeup
    Account: add an account with permission to open url in $src
    Trigger:
    On an event -> Custom -> Edit Event Filter-> XML (@Name is your service name)
    1
    2
    3
    4
    5
    <QueryList>
      <QueryId="0"Path="Application">
        <SelectPath="Application">*[System[Provider[@Name='SQL Server Reporting Services'] and Task = 0]]</Select>
      </Query>
    </QueryList>
    Task = 0 means startup.
    Actions Start a program:
    c:\ssrs\wakeup.cmd
    Other helpful:
    - SSRS Recycle time is in minutes (1440 min = 24h)
    C:\Program Files\Microsoft SQL Server\MSRS10_50.SSRSJT\Reporting Services\ReportServer\rsreportserver.config
    <RecycleTime>1440</RecycleTime>
    - SSRS Logfile C:\Program Files\Microsoft SQL Server\MSRS10_50.SSRSJT\Reporting Services\LogFiles
    • Step 5:
      5. Open Task Scheduler and create new:
      Name: SSRS Wakeup
      Account: add an account with permission to open url in $src
      Trigger:
      On an event -> Custom -> Edit Event Filter-> XML (@Name is your service name)
      *[System[Provider[@Name='SQL Server Reporting Services'] and Task = 0]]
      Task = 0 means startup.
  13. Damn,
    <blockquote cite"
    *[System[Provider[@Name='SQL Server Reporting Services'] and Task = 0]]
    “>
  14. Damn,
    <blockquote cite="
    *[System[Provider[@Name='SQL Server Reporting Services'] and Task = 0]]
    “>
  15. I cant use it :(
    <blockquote cite ="
    *[System[Provider[@Name='SQL Server Reporting Services'] and Task = 0]]
    “>
  16. Dear Pavel, Dear Everyone,
    Quick question for you guys. Does this problem occur for each individual user of SSRS, hence leading to fine-tune the solution for each user (sounds unlikely to me) or is it just a ‘global’ warm up that needs to performed with one single user (which is what I do believe).
    Thank you for your time and answers,
    Don
    • Hi,
      as you thought, the issue is related to the global warm up after the application domain is recycled. So it is necessary to do at least one request to the SSRS service. During the first request SSRS initializes all internal structures and caches and this takes the time.
  17. Hi Pavel,
    i used your script, but i get this error, could you help me please with this?
    Windows PowerShell
    Copyright (C) 2009 Microsoft Corporation. All rights reserved.
    PS C:\Windows\System32\WindowsPowerShell\v1.0> C:\Admin\SSRSrecycle\SSRSrecycle.
    ps1
    WARNING: Waiting for service 'SQL Server Reporting Services (MSSQLSERVER)
    (ReportServer)' to finish starting...
    WARNING: Waiting for service 'SQL Server Reporting Services (MSSQLSERVER)
    (ReportServer)' to finish starting...
    Exception calling "DownloadString" with "1" argument(s): "The operation has tim
    ed out"
    At C:\Admin\SSRSrecycle\SSRSrecycle.ps1:6 char:26
    + $src = $wc.DownloadString <<<< ("http://server/Reports/Pages/Folder.aspx&quot ;)
    + CategoryInfo : NotSpecified: (:) [], MethodInvocationException
    + FullyQualifiedErrorId : DotNetMethodException
    • Hi,
      The issue is that the Report Manager didnt’ start withing the timeout which the WebClient has. Unfortuantelly it is not possbile to set longer timeout for the WebClient without creating a new class and overide parent methods. But even this error has been thrown the initialization of SSRS started and after some while the the report response should be normal.
      To avoid this error it could be possible to handle the errors inside the PowerShell script, or use theHttpWebRequest class GetResponse instead of WebClient. The HttpWebRequest class has the possibility to setup the timeout. You can take a look on samples on MSDN –HttpWebRequest.GetResponse Method and HttpWebRequest.Timeout Property.
  18. I tried your solution, but I get:
    Task Scheduler failed to launch action “powershell.exe -noprofile -executionpolicy RemoteSigned -file c:\dnm\RestartSSRS.ps1″ in instance “{f9449b39-316a-4c3a-b9b7-e1e8cdbdfec7}” of task “\SSRS Recycle”. Additional Data: Error Value: 2147942523.
    Running the “powershell.exe …..” using the ‘run’ command works.
    Any idea?
    Thanks in advance!
    • Has the user under which you are trying to launch the scheduled task administrative rights? The powershell in the example is running with elevated administrative rights, so the account uner which it is executed has to have administrative rights on the computer.
      • Yes, I am using the domain admin account which has full admin rights on the server. I also checked the ‘Run with highest privileges’.
        • Can you post all the details from the Event Log related to this problem?
          • First I get:
            Task category: Action failed to start
            Description: Task Scheduler failed to launch action “powershell.exe -noprofile -executionpolicy RemoteSigned -file c:\dnm\RestartSSRS.ps1″ in instance “{46caf0b2-50df-49ad-90d6-0f4f9fd203ae}” of task “\SSRS Recycle”. Additional Data: Error Value: 2147942523.
            Then I get:
            Task category: Action start failed
            Description: Task Scheduler failed to start instance “{46caf0b2-50df-49ad-90d6-0f4f9fd203ae}” of “\SSRS Recycle” task for user “customerdomain\Administrator” . Additional Data: Error Value: 2147942523.
          • Hi Pavel,
            Do you have any idea in which direction I have to look to solve this problem?
            Thanks,
            Rob
            • Hi, sorry for late answer, but the only thing I have found it seems to be related to the user credentials and/or UAC.
              Your account under which you are launching the script is local account or domain account? If it is a domain administrator You could try to add this account directly to the local administrators group.
              Other option could be granting the user to start/stop the SSRS service even without elevating administrative rights.
              For this you can ceck this techned thread Using AD to allow a user to start/stop a service
  19. Hi Pavel i have tried your solution but cant get it to work on my server the script runs fine and restarts reporting services no errors when opening the reports folder, i have scheduled the recycle time to 1500 and have the job running at 2 in the morning everyday. But still the first report of the day takes nearly 6 minutes and then reports after less than a minute. Any ideas i have tried subscribing to a report in the reports folder which fires every 20 mins but that doesn’t make a difference either.
    • Does it make a difference that the report is embedded into a web site and we are not running the reports direct from SSRS?
    • Hi, I would try instead of querying the report manager, the report itself directly. If this will help, than your problem will not be related only to the SSRS application domain restart, but can be related also to the caching on the source database side etc.
      You can also review the [dbo].[ExecutionLogStorage] to check execution details of the report processing like Data Retrieval Time, Processing or Rendering times.
      • I have queried the [dbo].[ExecutionLogStorage] and noticed that the TimeDateRetrieval is very high when running the first report of the day, processing time is about the same all the time and time rendering is sometimes higher on the first run.
        • So it seems to be the report query issue. Once queried, the data are being cached and following executions are fetched from the DB engine case. When not used for longer period of time, the data are flushed from the DB engine cache.
          You should take a look on the query execution plan and try to fine tune the query to lower the execution time.
          If it is not possible, then depending on the report you can try to utilize report caching or report snapshots. See MS TechNet Performance, Snapshots, Caching (Reporting Services) for details.
          • Could i run the query’s which populate the reports via a sql job in the mornings thus caching them so when users run the reports they shouldn’t get the wait?
            • Better to use the Caching mentioned in previous answer (this will do the job of executing the query and cache the data so sub sequential execution will use the cache) and of course.. if possible, fine-tune the query.
              • As the reports use parameters where the values change is caching still an option?
              • Yes, it is possible to cache parameterized reports but it depends on the report. See the link I’ve posted in previous answers.
                Anyway first I suggest to focus on optimizing the query whenever possible.

How to handle SSRS reports which will take long time

$
0
0

How to handle SSRS reports which will take long time

We know that there are/will be some reports which will take more time to render due to the many rows/transactions. This post will help you to show appropriate warning/error messages to the end user while running the report. 

The number of records that are processed by report might be large and the user experience will be affected, because the client will be locked up if printing to the screen. 

In this case, you might want to return a warning message to the user that indicates that time to process the report might be long and confirm that they want to run the report. 

Another case could be where the number of records being processed is very large and a time-out might occur in report processing and clearly we should not run this report.
In this case, we should not run the report and therefore, should return anSrsReportPreRunState::Error enumeration value with the error message. 
In AX 2012, SSRS reports , through SrsReportRunController we can easily let the user know that the report will take more time with warnings or error messages through preRunValidatemethod. 

Example : General Journals report 

Take the standard example of Print journal from General Ledger >> Reports >> Journal >> Print journal. 

Use standard LedgerJournalController class to help you understand preRunValidate method: this validates container before running the report. Override this method to do custom pre-validation for any report. Typical use of this method will be to validate if the time taken to run the report is acceptable. 
In this standard example: If the query is going to retrieve more than 1000 rows, a confirmation Box will be displayed to the user as shown below. 

To get the confirmation box and for the sake of the demo/understanding: I have hardcoded the rows count to 1001 as shown below. There is a new static method in QueryRun::getQueryRowCount that will get the row Count of the query. 

Please note: Remove hardcoded values later. This is hardcoded only for the sake of demo/Walk through 
Clearly in the below standard example : warning limit is 1000 and error limit is 100000. 

image

Run this report as shown below...

image

Here comes the confirmation Box: 
If your report is long running, it may time-out. Do you want to continue? 

Note: In order to resolve/by pass this confirmation Box, a developer can change the macro #define.warningLimit to greater value 
Example : #define.warningLimit(2000); 

image

you can increase the row count : to 1000001. 

image

Let us run the report One more time as shown below. 

image 

Here comes the error message: Running the report has been cancelled due to the time it will take to run. Adjust the parameters of the report and retry
In order to resolve this problem, Increase the ErrorLimit macro value in thepreRunValidatemethod. 
Please note, it is not recommended to increase as it will take more time and your box cannot handle load. 

Example : #define.ErrorLimit(150000); 

image 

Faster start Reporting Services

$
0
0

In the morning, your users complain about slow reports. There is often a bad habit of saying that this is due to the first launch and it will get better eventually.
Obviously, users are entitled to expect a more suitable as a resolution of this issue, for example response.
In SSRS 2005, the problem was with IIS (which turned the reports) that "off" process after a while. The default is 20 minutes, including the latency to start the first call. To solve the problem, you just need to configure the Application Pool.
In SSRS 2008, there is more useless to the IIS incrimer. However, Reporting Services implements the same logic. So just set the recycle time. This happens in the file rsreportserver.config (c: \ program files \ microsoft sql server \ <instance> \ Reporting Services \ ReportServer \).
The parameter RecycleTime , just put 0 to indicate that the SSRS instance should not be extinguished.
1
2
3
< Service >
  < RecycleTime > 0 </ RecycleTime >
</ services >
Next topic: the pre-load reports to start faster Smile.

Microsoft Dynamics Ax Macros

$
0
0
In MorphX macros are not commonly used. A few places make use of macros such as keeping track of the list of fields stored when using dialogs. It is recommended only to use macros to define constants. Also supports code, but is not recommended as reusing code from macros is not flexible.

The main difference between a macro and a method is that a macro has no variable declaration part, and the code in a macro is not validated for errors before executed from a method. This is another reasons for not putting code in macros.

When using macros in your code, the macros must be declared after the variable declaration. And the common place to put the definition is in the ClassDeclaration of a class, form or a report. This will make the macro definition available for all parts of the object.

 
Macro commands:

For writing macros a set of simple macro commands are used. Below are few examples.

Command
Description
#define
Used to define a constant.

AxExample: See macro HRMConstants.

Syntax: #define.myConstant100('100')

#if.empty

Will return true if the macro has not been called with the parameter validated in the statement.

#if.notempty

Will return true if the macro has been called with the parameter validated in the statement.

AxExample: See macro InventDimJoin

Syntax: #if.notempty(%3)
print %3;
#endif

#endif

Ends a #if.empty or a #if.notempty statement.

AxExample: See macro InventDimJoin

Syntax: #endif (following any if statement)

#globalmacro

No difference whether declaring the start of a macro with #localmacro or #globalmacro. #globalmacro is not used in the standard package, consider using #localmacro instead.

#localmacro

Specify the start of a local macro.

AxExample: See macro BOM

Syntax: #localmacro.BOMDateSelect (((BOM.fromDate <= %1 || ! BOM.fromDate) && (BOM.toDate >= %1  || ! BOM.toDate))  || ! %1 )
#endmacro

#endmacro

Ends a #LOCALMACRO or a #GLOBALMACRO.

#linenumber

Returns the current line number of the macro. Can be used while debugging, but not of must use.

#macrolib

Used to load an AOT macro from code.

AxExample: See class method BOMHierarchy.searchDownBOM()

Syntax: #macrolib.MyMacro

#undef

Undefine a constant declared with #DEFINE. A defined constant cannot be used if #undef is called with the define name.

Syntax: #define.MyConstant(100)
print #MyConstant;
#undef.MyConstant
print #MyConstant; // will fail, as #MyConstant is not defined.

 
Defining Constants:
Instead of using text in your code it is strongly recommend defining your text as constants. Often you will need an integer or a text for setting a value. If you are going to set RGB color it is not easy to read the following:
            myStringColor(255, 255, 255)
Instead you should consider defining a constant with a descriptive name:
myStringColor(#RBGColorWhite)

Using a macro as a constant rather than entering the value in code makes it easier tomaintain. A good way to organize the constants used in your modifications is by creating a macro in the AOT for keeping all your constants in one place, one good example is HRMConstants.
 
Creating Macros:

Macros are either created directly in the code, or put in an AOT macro and then the AOT macro is declared in the code.

Example(1): #localmacro created in the code
static void Macros_LocalMacro(Args _args)
{
CustTable custTable;
;
#localmacro.selectCustTable  //Macro definition starts here
#ifnot.empty(%1)
while select %1
#ifnot.empty(%3)
order by %3
#endif
{
info(queryValue(%1.%2));
}
#endif
#if.empty(%1)
info("No table specified.");
#endif
#endmacro  //Macro definition ends here
#selectCustTable(CustTable, accountNum)  //Calling Macro with valid parameters
#selectCustTable  //Calling Macro with no parameters – output will be text “No table specified” as per the validation.
}
The macro will select records from a table ‘CustTable’ and print a field from the same as the table to be fetched, and the fields (%1, %2, %3) to be printed are specified in the parameters for the first Macro call.
In the second Macro call, the table has not been specified so text will be printed to the Infolog.
As you cannot declare variables in a macro, integer values prefixed with a percentage sign such as %1 are used instead. This is the common way of using the macros. The validations must be before calling the macro. Notice that you can call a macro without entering the parentheses after the macro name.
 
Example(2): Create and use an AOT Macro
If your macro is going to be used in several places it would make sense creating the macro in the AOT as you will then be able to reuse the macro.
To create a new macro in the AOT:
1.       Unfold the Macro node, right-click and choose New Macro.
2.      A new empty macro node will be created. You can rename the new macro by opening the property sheet to “MyFirstMacro”
3.      Now paste the code of the #localmacro (from above) to your new macro.
4.      Save the Macro, and it is ready to use. 

To use the macro created in the AOT the macro command #macrolib is used. Here the AOT macro is name MyFirstMacro, and it can be used in the code as shown below.
static void Macros_MacroLib(Args _args)
{
CustTable custTable;
;
#macrolib.MyFirstMacro
#selectCustTable(CustTable, accountNum)
#selectCustTable
}
Even this will result in the same output as explained above, the only difference is that we are calling a Macro created in AOT using #macrolib command.

Ax2012 Get the Dimension values for the Main Account

$
0
0
Get the Dimension Values for the Main Account

static void krishh_dimensionCombValuesforMainAccount(Args _args)
{
    DimensionAttributeValueCombination  dimAttrValueComb;

    DimensionStorage        dimensionStorage;

    DimensionStorageSegment segment;
    int                     segmentCount, segmentIndex;
    int                     hierarchyCount, hierarchyIndex;
    str                     segmentName, segmentDescription;
    SysDim                  segmentValue;

    DimensionHierarchyLevel  dimensionHierarchyLevel;
    RefRecId recordvalue;
    DimensionAttributeValueCombination dimCombination;
    MainAccount  mainAccount;
    ;

   mainAccount=       
 MainAccount::findByMainAccountId('20901',false,LedgerChartOfAccounts::findByName(curext()).RecId);
    recordvalue=DimensionHierarchy::getAccountStructure(mainAccount.RecId);

    select  recid from dimCombination where  dimCombination.MainAccount==mainAccount.RecId
               && dimCombination.AccountStructure==recordvalue;

    dimAttrValueComb = DimensionAttributeValueCombination::find(dimCombination.RecId);
    setPrefix("Breakup for " + dimAttrValueComb.DisplayValue);

    dimensionStorage = DimensionStorage::findById(dimAttrValueComb.RecId);
    if (dimensionStorage == null)
    {
        throw error("No dimension Specified for the Main Account");
    }
    hierarchyCount = dimensionStorage.hierarchyCount();
    for(hierarchyIndex = 1; hierarchyIndex <= hierarchyCount; hierarchyIndex++)
    {
        setPrefix(strFmt("Hierarchy: %1", DimensionHierarchy::find(dimensionStorage.getHierarchyId(hierarchyIndex)).Name));

        segmentCount =dimensionStorage.segmentCountForHierarchy(hierarchyIndex);
        //Loop through segments and display required values
        for (segmentIndex = 1; segmentIndex <= segmentCount; segmentIndex++)
        {
            segment = dimensionStorage.getSegmentForHierarchy(hierarchyIndex, segmentIndex);
            if (segment.parmDimensionAttributeValueId() != 0)
            {
               // Dimension Name
                segmentName = DimensionAttribute::find(DimensionAttributeValue::find(segment.parmDimensionAttributeValueId()).DimensionAttribute).Name;
          
                 // segment value- Dimension Value
                segmentValue        = segment.parmDisplayValue();

                //Description for dimension)
                segmentDescription  = segment.getName();
                info(strFmt("DimensionName:%1: Value:%2,Description: %3", segmentName, segmentValue, segmentDescription));
            }
        }
    }
}

AX2012 Import Chart of Accounts from CSV

$
0
0
/ Assumes a file structure with:
// Account number;Account name;Account type (based on the enum DimensionLedgerAccountType)
static void Krishh_ImportChartOfAccounts(Args _args)
{
    ChartOfAccountsService      chartOfAccountsService;
    MainAccountContract         mainAccountContract;
    CommaTextIo                 file;
    container                   rec;
    Name                        ledgerChartOfAccountsName;
    MainAccountNum              mainAccountId;
    DimensionLedgerAccountType  dimensionledgerAccountType;

    MainAccount                                 MainAccount;
    DimensionAttribute                          mainAccountDimAttribute;
    DimensionAttributeValue                     dimensionAttributeValue;
    DimensionAttributeValueTotallingCriteria    totalCriteria;

    str                 strOfAccounts, fromA, toA;
    int                 sep;
    Dialog              d;
    DialogField         df1, df2;
    ;
    d = new Dialog("Import chart of accounts (main accounts)");
    df1 = d.addField(ExtendedTypeStr("FilenameOpen"));
    df2 = d.addField(extendedTypeStr("Name"), "Chart of account name");

    if (d.run())
    {
        file = new CommaTextIo(df1.value(), 'r');
        file.inFieldDelimiter(';');
        ledgerChartOfAccountsName = df2.value();
        ttsBegin;
        while (file.status() == IO_Status::Ok)
        {
            rec = file.read();
             mainAccountId = strlrTrim(conPeek(rec, 1));
            dimensionledgerAccountType = conPeek(rec, 3);

            if (!mainAccount::findByMainAccountId( mainAccountId , false, LedgerChartOfAccounts::findByName(ledgerChartOfAccountsName).RecId))
            {
                mainAccountContract = new MainAccountContract();
                mainAccountContract.parmMainAccountId( mainAccountId );
                mainAccountContract.parmName(conPeek(rec, 2));
               mainAccountContract.parmLedgerChartOfAccounts(ledgerChartOfAccountsName);
                mainAccountContract.parmType(dimensionledgerAccountType);

                chartOfAccountsService = new ChartOfAccountsService();
                chartOfAccountsService.createMainAccount(mainAccountContract);

                if (dimensionledgerAccountType == DimensionledgerAccountType::Total)
                {
                    strOfAccounts = conPeek(rec, 4);

                    sep = strScan(strOfAccounts, '..', 1, strLen(strOfAccounts));

                    if (sep)
                    {
                        fromA = subStr(strOfAccounts, 1, sep - 1);
                        toA   = subStr(strOfAccounts, sep + 2, strLen(strOfAccounts));
                    }

                    select recid from MainAccount where mainAccount.MainAccountId ==  mainAccountId  ;

                    mainAccountDimAttribute.RecId = DimensionAttribute::getMainAccountDimensionAttribute();

                    dimensionAttributeValue = DimensionAttributeValue::findByDimensionAttributeAndEntityInst(mainAccountDimAttribute.RecIdmainAccount.RecId, true, true);

                    totalCriteria.DimensionAttributeValue =dimensionAttributeValue.RecId;
                    totalCriteria.FromValue = fromA;
                    totalCriteria.ToValue   = toA;
                    totalCriteria.insert();
                }
            }
        }

        ttsCommit;
    }

}

GlobalCache (alternative to GlobalVariables in X++)

$
0
0
Many times because of flawed implementation designs, we often need global variables. We may use a table with a key field and a container field for this purpose, but the simplest way of doing this will be using a Global Cache.
A global cache is an instance of class - SysGlobalCache, which is nothing but a Map containing Maps with Userid as Key. These Maps contain the actual value and a key. 
In Ax, we have three(infact 4) Global Caches - Infolog.globalCache(), Appl.globalCache(), ClassFactory.GlobalCache().

How to use:
To Set a Value:
static void GlobalCacheSet(Args _args)
{
SysGlobalCache globalCache;
;
globalCache = ClassFactory.globalCache();
globalCache.set(curuserid(), 1, "One");

To Get the Value:
static void GlobalCacheGet(Args _args)
{
SysGlobalCache globalCache;
;
globalCache = ClassFactory.globalCache();
print globalCache.get(curuserid(), 1);
globalcache.remove(curuserid(), 1);
pause;
}

In the above the example, we can also use Infolog.globalCache() or Appl.globalCache().

Why do we have three Caches?

Its simple, the term "Caching" comes when there is something to do with Performance. 

Infolog Object resides in Client and Application Object resides in Server. 
To share your global variable across the network and accept the performance penalty of a client/server call, use the infolog variable (Info class) or appl variable (Application class) instead of ClassFactory. 

ClassFactory is a special class, which has instances residing at both server and client. At run time, two instances of the ClassFactory class exist, and they share name classFactory. However confusing the implementation details might sound, this is a powerful concept. When you call a method on classFactory from code running on the client, you are calling the classFactory object on the client tier; when you call a method on classFactory from code running on the server, you are calling the classFactory object on the server tier. Remember this when debugging the ClassFactory class.

SysGlobalObjectCache class in AX 2012 [x++]

$
0
0

Friends,
There is a new class SysGlobalObjectCache that has been introduced in AX 2012, which will help for Global object caching with the help of scope,  Key and values.
Three important parameters are:
Scope: A string type that specifies the scope or the owner of the cached object.
Key :  A container type that specifies the key to the cached object.
value: A container type that has the object to cache.
Let us work with a class example to help you better understand.
For this post, we will create a class by name SR_CurrentWorkerDetails with a simple public method that will get the current worker
class SR_CurrentWorkerDetails
{
}
Create a new public method getCurrentWorker() as shown below.
This method uses scope as “CurrentWorker”, Key as curUserId() and value as “WorkerId” to be cached.
Some important methods:
insert – insert the values in to cache if it’s not already cached/inserted
find – used find method by passing scope and key to get the cached values
remove : sysGlobalObjectCache.remove(scope, key);
In order to clear the cached values based on scope – use
classfactory.globalObjectCache().clear(#CURRENT_WORKER_ID); // scope to be passed as per below example
To clear all caches – we can use
SysGlobalObjectCache::clearAllCaches(); // You can call this method on client/server to clear caches on client or server
Refer to SysFlushAOD class methods to clear caches on client and server:
clearGlobalObjectCaches() – client
clearServerGlobalObjectCaches() – server
public HcmWorkerRecId getCurrentWorker()
{
    // We can easily get current worker from Global::currentWorker() method as well. Below logic is same.
   
    SysGlobalObjectCache    sgoc;
    container               result;
    userId                  currentUserId = curUserId(); // Key
    recId                   workerId;
    HcmWorker               hcmWorker;
    DirPersonUser           dirPersonUser;
   
    // scope
    #define.CURRENT_WORKER_ID("CurrentWorker")

    #DEFINE.Values(workerId) // Caching only Worker Id

    //Try put pull from cache first
    if (classfactory)
    {
        sgoc = classfactory.globalObjectCache();
    }
    else
    {
        // Workaround for SysQueryRangeUtil usage under IL
        // the class factory is not initialized in the interpreter
        // when called from IL.This is OK as the global cache is a kernel
        // singleton
        sgoc =  new SysGlobalObjectCache();
    }
    result = sgoc.find(#CURRENT_WORKER_ID, [currentUserId]); // use scope and key to find the value cached
    if(result != conNull())
    {
        [#Values] = result;
        return workerId;
       
    }

    //Calculate current worker value
    select firstonly RecId from hcmWorker
        join PersonParty, User from dirPersonUser
            where (hcmWorker.Person == dirPersonUser.PersonParty) &&
            (dirPersonUser.User == currentUserId);

    //Cache current worker value
    workerId = hcmWorker.RecId;
    sgoc.insert(#CURRENT_WORKER_ID, [currentUserId], [#Values]);

    return workerId;

}
PriceDisc class uses the same concept – to find the prices and discounts in AX 2012. Refer to priceDisc class for more details.
Happy Dax6ng,
Sreenath
Viewing all 181 articles
Browse latest View live


<script src="https://jsc.adskeeper.com/r/s/rssing.com.1596347.js" async> </script>