Quantcast
Channel: Microsoft Dynamics Ax
Viewing all 181 articles
Browse latest View live

Using SysGlobalObjectCache (SGOC) and understanding it’s performance implications

$
0
0

The SGOC is a kernel-managed cache. This is a new type of cache available in Dynamics AX 2012.  Unlike the SysGlobalCache in AX2009 and older versions which has the session scope, SysGlobalObjectCache is truly global in nature. The data stored from one user connection is available for all the users.
SGOC stores Key-Value pairs. Both Key and Value in the SGOC must be containers. This is because containers are passed by value and the content stored in them is not influenced by the changes happen to the variables externally.
There are some basic behavior differences between SGOC and the other caches.
  • Unlike kernel data caching, application must manage updating/flushing the cache. The kernel has no way of knowing when some cached data is no longer valid, so it is the application’s responsibility to manage this and clear at the appropriate times.
  • Unlike kernel data caching, checking to see if something exists in the cache when it doesn’t will notcause an RPC to query the data from the server. With normal caching on a table there was no way to avoid this extra call on a cache miss. The SGOC will not cause any extra calls. The clearing of data is piggy-backed on other existing RPC calls between machines
  • Unlike the SysGlobalCache, the SGOC will propagate “clear” calls to all clients and other AOS instances. So if the application clears data from a cache scope on one client, all other clients and AOS’s will be cleared. The same happens if the application clear it on an AOS. This is useful when a user performs an operation which invalidates some data in the cache.
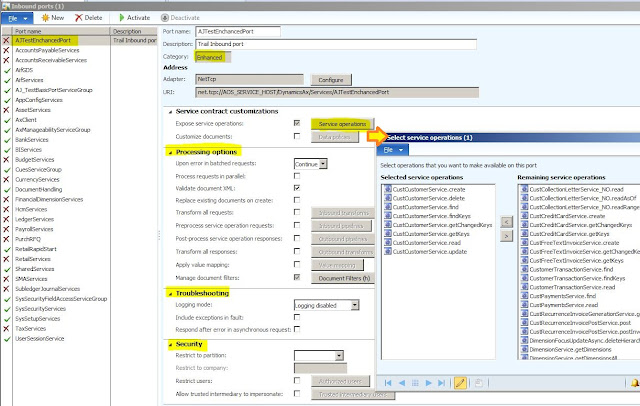
SGOC is an LRU cache. When the cache is full, the least recently used element will be removed to accommodate newer element. Sizing the SGOC correctly will pay significant performance improvement over poorly sized SGOC setting. The number of elements Global Object cache can hold is defined in Server Configuration form under performance Optimization fast tab.
clip_image002

Simple Code Example

Here is a simple code example to illustrate the behavior/usage of SGOC. Use always an application class to abstract the access and manipulation of SGOC for specific scopes. Example ‘DimensionCache’ or ‘PriceDisc’ Class.
public static int64 GetCustOpenSalesOrderCounts(str 20 _myCustId)
{
    SalesTable salesTable;
    container conSGOC;
    int64  salesOrderCounts;
    // Create a new instance of the SGOC class. Note that this will "connect to" the current instance of the global cache, so values pushed in with one instance will be available with other instances.     SysGlobalobjectCache sgoc = new SysGlobalObjectCache();
    //get the value from cache for the (Scope, Key) combination     conSGOC = sgoc.find('CustOpenSalesOrderCounts', [_myCustId]);
   //Check the return value of the container for conNull, if the container is null, there is no value exist for that scope,key combination     if(conSGOC == conNull())
    {
        //Do the business process here         select count(RecId) from salesTable where salesTable.CustAccount == _myCustId &&
            salesTable.DocumentStatus == DocumentStatus::None;
            salesOrderCounts = salesTable.RecId;
        // Push an element into the cache. The first parameter is the scope, which identifies the cache. The second parameter is the key for looking up and the third parameter is the value. Both Key and values are containers by type.
            sgoc.insert('CustOpenSalesOrderCounts', [_myCustId], [salesOrderCounts]);
        }
    else
    {
        salesOrderCounts = conPeek( conSGOC, 1);
    }
    return salesOrderCounts;
}
 
public static void main(Args _args)
{
int counter;
str 20 myCustId;
int64  salesOrderCounts;
    for (counter = 1; counter <= 25; counter++)
    {
        myCustId = 'E'+int2str(10000+counter);
        salesOrderCounts = DemoSGOCServer::GetCustOpenSalesOrderCounts(myCustId);
        info(myCustId+' : '+int642str(salesOrderCounts));
    }

Example from Product


DimensionDefaultingService:

server private static LedgerDimensionAccount serverCreateLedgerDimension(
    RecId            _ledgerDimensionId,
    DimensionDefault _dimensionDefault1 = 0,
    DimensionDefault _dimensionDefault2 = 0,
    DimensionDefault _dimensionDefault3 = 0)
{
    container               cachedResult;
    XppILExecutePermission  xppILExecutePermission;

    // get the value from cache for the (Scope, Key) combination
        cachedResult = DimensionCache::getValue(
            DimensionCacheScope::DefaultingCreateLedgerDimension,
            [_ledgerDimensionId, _dimensionDefault1, _dimensionDefault2, _dimensionDefault3]);
    // Check the return value of the container for conNull,  if the container is null, there is no value exist for that scope,key combination     if (cachedResult == connull())
    {
        // Main API should have already short-circuited
            Debug::assert(_ledgerDimensionId != 0);
            xppILExecutePermission = new XppILExecutePermission();             
            xppILExecutePermission.assert();
        // Do the business process.
            cachedResult = runClassMethodIL(
            classStr(DimensionDefaultingService),
            staticMethodStr(DimensionDefaultingService, createLedgerDimension),
            [_ledgerDimensionId, _dimensionDefault1, _dimensionDefault2, _dimensionDefault3]);
            CodeAccessPermission::revertAssert();
        // Push an element into the cache.
            DimensionCache::insertValue(
                DimensionCacheScope::DefaultingCreateLedgerDimension,
                [_ledgerDimensionId, _dimensionDefault1, _dimensionDefault2, _dimensionDefault3],
                cachedResult);
    }
    return conpeek(cachedResult, 1);
}

DimensionCache:

public static container getValue(DimensionCacheScope _scope, container _key)
{
    SysGlobalObjectCache c;
    if(classfactory)
    {
            c = classfactory.globalObjectCache();
    }
    else
    {
        c = new SysGlobalObjectCache();
    }
    return c.find(DimensionCache::getCacheScopeStr(_scope), _key);
}
public static void insertValue(DimensionCacheScope _scope, container _key, container _value)
{
    SysGlobalObjectCache c;
    if(classfactory)
    {
        c = classfactory.globalObjectCache();
    }
    else
    {
        c = new SysGlobalObjectCache();
    }
    c.insert(DimensionCache::getCacheScopeStr(_scope), _key, _value);
}

Performance impact and memory usage:

Here is a small test which stores or access elements from 10000 to 200000. The table compares 2 sets of tests, one when cache size is set to 10000 while on the other it is increased to 200,000.
Number of ElementsCacheSize = 10KCacheSize = 200K
First Time *Second time or latter **First TimeSecond time or later
milliSecondsmilliSecondsmilliSecondsmilliSeconds
10000387166395172
2500010141025797441
50000225421971598938
1000004743480334192049
2000009088913284245023
* ‘First Time’ - The Key does not exist in the cache for this scope. Business process is executed to find the value and ‘Key, Values’ are inserted into the SGOC.
** ’Second time or Latter’ – The key for this scope is checked either second time or more. When the SGOC is sized correctly it should find it in the cache. If it is not sized correctly, the element might have been removed by the LRU. If it does not find it in the cache business process is executed again to find the value and ‘key, values’ are inserted back into the cache.
When the cache is undersized elements are removed from the cache to accommodate new elements. The above test does not really justify the usage of SGOC as the performance gain is smaller, unless this is very frequently used or reduces lot of chattiness or Database calls.
When you try to cache the result of complex business logic which is relatively static in nature, you get a significant performance gain you find the values in the cache. The following test result exhibits the importance of sizing the cache adequately.
Number of ElementsCacheSize = 10KCacheSize = 200K
First TimeSecond time or latterFirst TimeSecond time or latter
milliSecondsmilliSecondsmilliSecondsmilliSeconds
10000227118178235184177
25000568833563738482203437
Other frequent question often comes up is how does SGOC affects the memory footprint. It purely depends on the size of the element you are storing in the cache and number of elements. Storing few integer fields and date fields in SGOC, it used up about 28MB to store 100,000 elements. Whereas when a packed SalesTable buffer is stored, SGOC used little over 200MB.

Best Practices

The SGOC is a very useful tool in some situations, but may not be the appropriate tool in many cases.

DOs

  • Size the SGOC correctly. When it is undersized, frequently elements will be removed and added to SGOC. Removing of the elements has higher overhead.
  • Use SGOC in cases where caching will reduce intensive calculations, RPCs, database calls.
  • Use the SGOC in cases where the same inputs to a method will always return the same result
  • Provide a wrapper around SGOC when a subsystem uses it for similar areas. Example: DimensionCache class.

DON’Ts

  • Do not use the SGOC if simple kernel data caching will cover your scenario.
  • Do not cache results/data that will be frequently changed or updated.
  • Do not check if a value exists in cache before retrieving it. Instead try to retrieve it, then check if the result was connull() or not. It will improve performance and may avoid race condition.
  • Do not aggressively use the remove() method of the SGOC. Using this frequently will quickly become a performance bottleneck.

Ledger Accounts and Financial Dimensions

$
0
0

From past couple of weeks, I have been on a mission to decode the complexity of Ledger accounts and Financial dimensions in Ax 2012. I have been able to understand some of it that I am going to share here.
The concept of Ledger accounts and Financial Dimensions has been completely overhauled in Ax 2012. There is no more LedgerTable and LedgerTrans or Dimensions table.
MS has now introduced a concept of Segmented controls which is an integral part of Ledger accounts and dimensions now.
Ledger accounts in Ax 2012 have become Main accounts.
Now you will not be having  a ledger account alone, it will always be a combination of Main account and financial dimensions.
So for have your company books of accounts, you need to setup following:
  • Main accounts (base accounts that will hold all the books of accounts that can be applicable across the entire application (Table: MainAccounts that is company independent)
image
  • After creating Main accounts go ahead and create Financial Dimensions from GL –> Setup –> Financial dimensions –> Financial dimensions. The beauty here is that you can create as many financial dimensions that you need. No hassles of running the wizard and stuff. But technically handling these is a challenge at least in the beginning is what I feel. There has been introduction of whole lot of tables to handle dimensions. You can check the tables with names DimensionAttribute*. I will try and explain some of the tables as and when we come across them
image
  • After creating Financial dimensions, go ahead and create account structures. These account structures contain the rules and combinations for Main accounts and dimensions. These account structures are then later used to define Chart of Accounts. You can create them from GL –> Setup –> Chart of accounts –> Configure account structures. An example account structure is shown below: Note that each account structure here defines the accounts applicable, and the dimensions applicable to them
image
  • After the basic setup is done, you then need to go ahead and create Chart of Accounts. The chart of accounts includes the main accounts that are used for a particular chart of account, and the structure of combinations of main accounts and dimension values. The main accounts contain the financial data about the activity of the legal entity. You can set this up from GL –> Setup –> Chart of Accounts –> Chart of Accounts. These chart of accounts define the main accounts and dimensions applicable to a particular book of ledger for a company
image
  • Then go ahead and create a Ledger from GL –> Setup –> Ledger. A ledger is attached to one legal entity (Company in Ax 2009).
image
Now if you want to find out all the main accounts in a company (Legal entity in Ax 2012 parlance), then a developer needs to do following:
1. Find the Ledger record attached to a legal entity (Table: Ledger)
2. Then go ahead and find the Chart Of Account attached to a Ledger (Table: LedgerChartOfAccounts)
3. After that we need to traverse through main accounts using LedgerChartOfAccounts record (Table: MainAccounts)
That’s a bit of a work for developers.
Note: I have noticed that you will not be able to see the balances on chart of accounts after you post some transactions (at least I was not able to see). Then I did following and was able to see the transactions.
1. Go to GL –> Setup –> Financial dimensions –> Financial dimension sets.
2. Select the set with only Main account as the active dimension
3. Click on Rebuild balances / Update balances as applicable.
I will continue more on the chart of accounts in my other blogs.

Ledger account combinations - Part 1 (Dimensions)

$
0
0

Introduction

In Dynamics AX 2009, dimensions were limited to a minimum of three and a maximum of ten, and entered in a set order that required code customizations and database synchronization for each dimension added. In Dynamics AX 2012, the dimension framework was expanded to allow unlimited dimensions which can be dynamically created by the user, and entered in any order. The unlimited nature of the new model, coupled with taking advantage of relational database design as well as optimizing for performance requirements has led to a more complex data model than existed in the past.  In this series of blog posts, we will discuss the various areas of the dimension framework, and how they work together to give a better understanding of “What happens when I create a ledger account combination?”
The model below in figure 1 shows the various areas within the dimension framework.
Figure 1: Dimensions in framework
This initial blog post covers the Dimensions, Dimension Values, Categorizations and Backing Entities regions highlighted in figure 1 above in pale yellow.
Subsequent blog posts will cover:

Dimension Attributes

A dimension attribute, which will be referred to as a dimension, simply represents an additional piece of classifying information that a user would like to associate with a ledger account combination. It represents classes of things, not specific instances. Examples of things that can be used to create a dimension are Department, Cost Center, Expense Purpose, Customer, Vendor, Item – which are all classes of entities that already exist in the system; or custom entities that are specific to a particular installation such as license plate number or event name or ticket number.
When a dimension is created, the user chooses to use values for it from either an existing entity in the system such as Customers or Departments, or to create a custom list. The dimension framework keeps track of a reference for this dimension to a table in the system.  For existing entities such as Customers, a reference to the CustTable table is used.  For custom entities that are defined by the user, a reference to the DimensionFinancialTag table is used.  This metadata about what a dimension represents is stored in the DimensionAttribute table for each dimension defined. 
The following form shows an example of two dimensions, one to represent customers that already exist in the application, and another that represents a new custom list.
Figure 2: Financial dimensions form
The data is stored in the DimensionAttribute table. The SQL query below in figure 3 shows some of the basic information associated with each dimension.
Figure 3: DimensionAttribute storage query results
The Type determines whether the dimension is backed by an existing entity in the system or a custom list.  It is also important to note that the dimension framework does not directly reference the existing entity backing table such as CustTable. Instead, a custom view is created to make an entity available in the system for use in the dimension framework. As of Dynamics AX 2012 R2, 36 existing entities have been enabled to be used as dimensions in the system.  
It is possible for a user to create more than one dimension based on the same entity. There may be instances where an entity in the system is used for multiple different purposes when classifying transaction activity in the system.  In this case, multiple dimensions can be defined for it, one for each of its purposes.  A common example would be a cost center backing entity used to represent the primary cost center (e.g. selling) and the cost center the transaction is being traded against (e.g. purchasing).
Internally, special dimensions exist that are automatically created to support key functionality of the dimension framework. A primary example is the Main Account dimension. This allows a main account to be treated as a dimension by the dimension framework, but also prevents it from being used by a user to create a dimension. The other types of special dimensions are system generated ones that are used by the dimension framework for internal purposes.

Dimension Attribute Values

A dimension attribute value is a specific instance of a dimension used within the dimension framework. The values for a dimension are determined by the ViewName specified on the DimensionAttribute record. In the case of an existing entity, such as CustTable, values consist of the records in that table. In the case of a custom list, it is a specific set of records within the DimensionFinancialTag table.  Values that are available for a particular dimension are viewable by clicking the “Financial dimension values” button on the Dimension details form as shown in figure 2 above. When the list is provided by an existing entity, such as CustTable, it is not editable from this form. To create a new dimension value for Customer, the user would go directly to the Customer form and create a new customer.  Once created, the new customer will become available for use in the dimension framework. When the list is provided by the user as a custom list, the user will be able to modify the list directly on this form.
Example of a list of values provided by CustTable (with no values stored in the dimension framework):
Figure 4: Financial dimensions values form (existing list)
 Example when provided by a custom list (with values stored in the dimension framework):
  Figure 5: Financial dimensions form (custom list)
Figure 6: Dimension setup tables query results
In both of these cases, the Financial dimension values form is displaying what values exist for the entity, not what values have actually been used within the dimension framework.  The dimension framework representation of these values is not created until it is used within the framework requiring it to hold a reference to it. This allows for the ability for values to be deleted that have not yet been used, and for storage size and performance optimization.
Once a dimension value is referenced requiring it to be saved by the dimension framework, it is stored in the DimensionAttributeValue table.  This table is the link between the DimensionAttribute and the specific RecId of the record in the ViewName view or table referenced on the DimensionAttribute. Both the DimensionAttribute and DimensionAttributeValue records are needed to navigate back to the originating value that the user has entered.
In a system where nothing has been referenced by the dimension framework, there will be no records in the DimensionAttributeValue table.
In the next blog post, the storage of dimensions as dimension enumerations and of dimension values as default dimensions will be explained.

Ledger account combinations - Part 3 (Structures and constraints)

$
0
0

Introduction

Continuing this series of blog posts, we will cover the Structures and Constraints regions highlighted in pale yellow in the model below in figure 1.
As previously stated, the Dynamics AX 2012 dimension framework expanded on the previous release by allowing unlimited dimensions. Along with this change was the new ability for the user to specify which dimensions to include in which order when entering a ledger account combination and to constrain the values that can be entered for each segment in that ledger account combination.
 
Figure 1: Structures and constraints in framework

Account structures

An example of an account structure appears below in figure 2:
Figure 2: Account structure configuration form
 This account structure, stored in the database in the DimensionHierarchy table, is set up to require the entry of a Main account as the first segment of a ledger account combination, followed by a customer and license plate number as subsequent segments. This is the hierarchical order definition and is stored in the database in the DimensionHierarchyLevel table.
 
Figure 3: Structure query results
Along with the order is the definition of constraints or the criteria that defines the valid combinations of values. In this example, all segments must have a value for the combination to be considered valid.  Any existing value (already existing in the backing entity) may be entered and there are no specific restrictions on the combinations of values that are valid.  This criterion is stored in the DimensionConstraintTree, DimensionConstraintNode and DimensionConstraintNodeCriteria tables.
 
Figure 4: Simple constraints query results
The above example in figure 4 shows the most basic constraint tree. Each of the 3 constraint nodes have a * (any existing value) constraint criteria (stored as % in SQL and shown as "<all values>" in the UI) associated with them. These constraints are used to both show what values may be entered for each segment using a lookup, and validate values entered in the segment. These constraints will eventually result in validation errors if improper values are entered for a ledger account combination.
The dimension framework allows for significantly more complex constraint trees where the value entered in on one segment drives the valid values allowed in the subsequent segment. An example of the versatility is shown below in figure 5: 
 
Figure 5: Constraint builder form
Thus, a more complex constraint tree is shown in the following example:
Figure 6: Advanced constraint tree expanded on form
Resulting in the following constraint definition:
Figure 7: Advanced constraint tree query results
Note that in the case of entering [ 150 - B ] for a main account and customer, that the user must enter a specific license plate number as well. However, if the user enters [ 150 - W ] for a main account and customer, then no license plate number is required. In both cases however, the user will always see 3 segments in the ledger account combination, even if one of them is left blank. Examples of the effects of these structures, segments and constraints on the entry of a ledger dimension account will be provided in a subsequent blog post where we will discuss entry of ledger account combinations and their storage.
In case the user would like to only show trailing segments when they are required to be entered, then advanced rules can be combined with the account structure to provide the additional versatility. Advanced rules will be explained in the next blog post.

Ledger account combinations - Part 6 (Ledger dimensions (B))

$
0
0

Introduction

Continuing this series of blog posts, we continue the discussion on the LedgerDimensions region highlighted in pale yellow in the model below in figure 1.
 
Figure 1: Ledger dimension storage in framework
Ledger dimension storage with rules
Building on the ledger dimension storage example started in the previous blog post, we will add to the scenario and assume the user will go back and change the values from [ 150 - A ] to [ 145 - Q ]. As we know from the advanced rules previously set up, this will trigger a third segment to be added to the account structure.
 
Figure 2: In-edit ledger account segment (before tab)
When the user tabs from the second segment, a third segment is added to the control and focus placed in it:
 
Figure 3: In-edit ledger account segment (after tab)
Now, the user can enter a license number:
 
Figure 4: Completed ledger account field
As soon as the third field is entered and the user tabs out of the control, it will trigger the validation of the combination.  If it is valid, the combination will be saved as a LedgerDimension.
The following is known about the new combination:
  • The account structure is "MyAccountStructure"
  • The first segment is the "MainAccount" dimension with a value of 145.
  • The second segment is the "Customer" dimension with a value of Q.
  • 1 additional segment was added due to an account rule structure "MyRuleStructure1" being added due to the values matching the rule for the first two segments.
  • The third segment is the "LicensePlate" dimension with a value of AAA 111.

 
Figure 5: Ledger dimension storage query results
For this combination, a total of 8 rows were inserted across the 4 tables storing the ledger dimension. The difference between the first ledger account combination, discussed in the previous post, and this one is that multiple structures are being used to drive the dimensions that make up the ledger account combination. There are 2 records stored in the DimensionAttributeValueGroupCombination and DimensionAttributeValueGroup tables, each one representing a structure used and joined to the full combination.
Notice that each record has a new RecID assigned to it.  The combination of the previous values is not updated, but rather a new combination is created making the LedgerDimensions immutable.  This was done because there is no reference counting maintained on the use of the combination. The same [ 150 - Q ] combination originally entered may have been referenced from multiple tables within the application before the user decided to change an instance to [ 145 - Q - AAA 111].  Therefore, a new combination must be created and the reference changed to it only from the table that the ledger account combination is being changed on.
Because a user may change the combination on a record by adding or removing segment values and a new LedgerDimension created, it is possible to end up with unreferenced or orphaned LedgerDimensions over time. Allowing orphaned combinations improves performance of the overall dimension framework to not issue deletes across the tables in question when combination is changed.  It is also likely after a combination is used once that it will be reused again and removing it instantly on removal of the last reference may only result it in being recreated again.  Orphaned LedgerDimensions are still structurally valid and can be reused in the future if the combination of values in relation to the structures and rules are entered again.  If a combination is ever entered a subsequent time, no records are inserted and the existing reference is reused providing greater performance.
Optimizations are also made for storage size and insert cost when advanced rules are used.  Consider the following example as a new account combination is entered:
 
Figure 6: Changed ledger account field
In this case, the only difference between the new combination and the previous is that the license plate number (provided by the advanced rule) was changed. The data storage of the combination will appear as follows (new records in white):
 
Figure 7: Additional ledger dimension storage query results
In the creation of the new combination, the 5 records highlighted in white were inserted:
  • 1 in DimensionAttributeValueCombination
  • 2 in DimensionAttributeValueGroupCombination
  • 1 in DimensionAttributeValueGroup (instead of 2)
  • 1 in DimensionAttributeLevelValue (instead of 3)
This is because the values stored as part of the account structure 'group' are the same between the previous combination (DAVC2) and this combination (DAVC3).  Those DimensionAttributeValueGroup and DimensionAttributeLevelValue records did not need to be recreated. Instead, we were able to reuse 3 records and save their insertion cost.
Alternately, had the structure associated with the account rule allowed blanks for the license plate number, and a combination of just [ 145 - Q ] was created, there would only have been 2 new records inserted instead:
  • 1 in DimensionAttributeValueCombination
  • 1 in DimensionAttributeValueGroupCombination
  • 0 in DimensionAttributeValueGroup
  • 0 in DimensionAttributeLevelValue
This is because all of the DimensionAttributeValueGroup and DimensionAttributeLevelValue records already existed and could be fully reused on the new combination. This is the primary reason why data should never be directly modified within the LedgerDimension storage tables. A change to a single record could affect not only all references to that ledger dimension but also one or more other ledger dimensions and references to them.
Although partially collapsed in the above examples in figure 5 and figure 7, there is a Hash code assigned to the DimensionAttributeValueCombination and DimensionAttributeValueGroup tables.  The purpose and source of this advanced data column are discussed in the next and final blog post in this series.

Ledger account combinations - Part 7 (Advanced topics)

$
0
0

Introduction

Concluding this series of blog posts, we will discuss some of the advanced topics that explain some of the deeper design and implementation decisions that drive the way the dimension framework works.
The model below in figure 1 shows the various areas within the dimension framework.
 
Figure 1: Overall framework

Hashes

The design of the database storage in the dimension framework intends to:
  • Support immutable data where data is only inserted, never updated or deleted
  • Reuse previously created combinations to lower insertion costs
  • Avoid reference counting and maintenance of it
  • Provide fast performance to find an existing combination for reuse
As the dimension framework allows unlimited dimensions and unlimited structures on a ledger account combination, it is difficult to create a single large or multiple smaller queries to find an existing set or combination. Since the number of records and order of those records is potentially different for every combination, a hash-based solution was implemented.
This hash represents the unique information contained in the associated tables' records for fast querying.  A single binary container field (160 bit, 20 byte hash column) is stored to uniquely identify the data contained by the set or combination.
The dimension framework uses hashes to uniquely identify data in the following tables:
  • DimensionAttributeValueCombination
    • Consisting of data from all the linked records in the DimensionAttributeValueGroup and DimensionAttributeLevelValue tables
  • DimensionAttributeValueGroup
    • Consisting of data from the linked records in the DimensionAttributeLevelValue table
  • DimensionAttributeSet
    • Consisting of data from the associated DimensionAttributeSetItem records
  • DimensionAttributeValueSet
    • Consisting of data from the associated DimensionAttributeValueSetItem records

Hash messages

In order to produce a hash, a message is created containing individual ordered information about the contents of the set or combination. It varies based upon the particular hash being generated, but basically includes information about the dimensions, values, and structures and their order within the set or combination, if applicable. This information is internally calculated in a prescribed manner and passed onto a hashing routine to generate a SHA-1 hash to persist using a binary container. The exact order and contents of these messages are provided by the methods within the storage supporting classes of the dimension framework including the DimensionAttributeSetStorage, DimensionAttributeValueSetStorage, and DimensionStorage classes.

HashKeys

In order to generate a hash message, something that uniquely identifies each dimension, value and structure that makes up the combination is needed. While a RecID can serve as a unique identifier, it is only considered a surrogate, as it is not immutable and can change if the record were to be exported and imported into a different system or partition, for example.  The RecID can be reassigned during the import process.  Any hash that was created with a hash message using a RecID could no longer be used to identify a combination in the dimension framework for that new system or partition. Instead another identifier, a GUID, is used. This GUID resides on the DimensionAttribute, DimensionAttributeValue and DimensionHierarchy tables and is stored in the HashKey column.  Each time a new record is created, a GUID is assigned and remains with that record to uniquely identify it.

Risks of changing data directly

It is extremely important that no data be directly modified outside of the application framework such as in SQL Server Management Studio. This extends to modifying any data in any column of the table not just the columns discussed in these posts; as well as replicating data from one row to another and attempting to create 'new' sets or combinations outside of the dimension framework storage classes.
It is also important to understand this when considering backups and only partial restoration of data which could affect referential and hash integrity.  For example, it would be problematic to only back up the LedgerDimension related records and importing them into another partition without also bringing in all of the other records in the dimension framework as well as all of the backing entity records such as from the CustTable or others that were used in the creation of any combinations. Any attempts to modify the data in these tables or to synthesize GUIDs or hashes will lead to corrupt data and complex time consuming analysis to find the source of the corruption and to try to undo it.

Apparent duplicate combinations

When browsing the tables of the dimension framework, it may appear that combinations are duplicated when only viewing the DisplayValue field stored on the records. This does not mean that duplicate combinations exist; rather it means that data within the hash or joined tables is different even though the DisplayValue appears the same.  The DisplayValue strings are stored on the records to improve performance for some scenarios but are not used to uniquely identify the record.
Consider an account structure with [ MainAccount - Department ] in one company and another account structure with [ MainAccount - CostCenter ] in a different company. It is possible for the DisplayValue of 2 combinations, one for each account structure, to appear as " 145 - A ".  For the first account structure "A" represents a Department within that company, but for the second it represents a Cost center within that company.  Additionally, there are multiple types of a LedgerDimension that are stored in the DimensionAttributeValueCombination table including special ones for budgeting that may appear the same from examining the DisplayValue field as other combinations ones but hold different information internally and hold uniquely different hash values.

Versioning / date effective data

The dimension framework does not support versioning or date effective data directly. If any backing entities it references are versioned, and a new RecID assigned to newer versions within the same table, the framework will properly link to the correct version through the DimensionAttributeValue record. If the same backing entity record is used and another table tracks revisions to it in the owning module, then the dimension framework will not be able to know the difference as the backing entity RecID would not be different between versions.  None of the dimension framework tables (such as dimensions, structures, rules, constraints) internally support versioning.  The previous versions are replaced with a new version with no history maintained.
When a structure or rule is changed, and there are ledger account combinations saved on unposted transactions, the dimension framework will create new combinations and update any foreign key references to them on unposted transaction tables. It will not change the original combinations as they may be referenced from posted transactions.  The two combinations are not linked in any way. There is not a way to determine the way a structure and its rules appeared prior to change. Some information can be determined by the data stored in the combination, but since blank values are not stored, it is incomplete and cannot be used to reconstruct a previous version.
The dimension framework does supports valid from and valid to dates at the level of a dimension value.  This indicates when the value is considered "valid" and does not represent the historical state of the value in the same way that date effective data does.
This concludes this series of blog posts about the dimension framework and “What happens when I create a ledger account combination?”

Ledger account combinations - Part 4 (Advanced rules)

$
0
0

Introduction

Continuing this series of blog posts, we will cover the Advanced Rules region highlighted in pale yellow in the model below in figure 1.
While account structures and constraints allow the user to build very simple to very complex trees of valid combinations, sometimes the business requirements are to only show a dimension as a segment in an ledger account combination only at certain times rather than just constrain the valid values allowed showing it all the time. The use of advanced rules supports this requirement. 
 
Figure 1: Advanced rules in framework

Advanced rules

Advanced rules can be added to an account structure and its constraints. While versatile, there are guidelines when they should and should not be used for best usability, performance and understanding:
  • Rules cannot replace the account structure.  A structure must always exist with at least a main account segment.
  • Rules cannot add dimensions before other segments already in the account structure.
  • Rules should not be used to replace the use of constraints in the account structure for additional dimensions that are always required regardless of the main account.
  • Rules should not be used to replicate segments that already exist in the account structure or other rules
  • Any duplication will automatically join and use the most restrictive constraint.
  • The location of the duplicated segment will only appear in the first occurrence of it.
Setting up an advanced rule involves defining a filter that controls when additional segments are added to a ledger account combination, and then linking rule structures (similar to account structures) that specify the additional segments, their hierarchy order and any constraints between them to be added.
Assuming the following account structure is set up:
 
Figure 2: Basic structure and constraints
Let’s assume that a new advanced rule is needed to optionally add a segment (or segments) only if the user has entered main account 145 and customers G thru Q:
 
Figure 3: Advanced rule form
Once the rule is configured, a structure and constraint definition needs to be created to define what segments to add to the ledger account combination. This is done by creating a new rule structure, similar to how an account structure is created. These structures are not immediately bound to the rule, and as such can be shared across multiple rules if necessary.
Figure 4: Advanced rule structure form
After the structure is created, it is added onto the dimension rule, and the account structure along with the rule is then activated:
 
Figure 5: Added advanced rule structure to rule
The storage of this data uses some of the same tables as the storage of the account structures discussed in the previous post.  The DimensionRule, DimensionRuleAppliedHierarchy and DimensionRuleCriteria tables hold the data specific to the definition of the rule and the link to the definition of the rule structures.  The rest of the tables are shared with the account structure definition:
 
 Figure 6: Combined structure, rule and all constraints query results
Examples of the effects of these rules, rule structures, segments and constraints on the entry of a ledger dimension account will be explained in the next blog post when we begin discussing entry of ledger account combinations and their storage.

How Do I Link Parent and Child Forms by Using Dynamic Links

$
0
0

Dynamics AX developers will learn how to create a child form that automatically refreshes when the parent form changes.

How to write code for sorting field in a grid

$
0
0

Assuming you are trying to sort field CustGroup on datasource CustTable:
1) add ComboBox on form, set Name=ComboSortOrder, AutoDeclaration=Yes and EnumType=SortOrder
2) override modified() method on ComboBox form control to call executeQuery() of the datasource
public boolean modified()
{
boolean ret;
;
ret = super();
CustTable_ds.executeQuery();
return ret;
}
3) override executeQuery() method on datasource to change sortorder before actual fetch of records
public void executeQuery()
{;
CustTable_ds.query().dataSourceNo(1).sortClear();
CustTable_ds.query().dataSourceNo(1).addSortField(fieldNum(CustTable,
CustGroup), ComboSortOrder.selection()); // you can change that to //CustTable_ds.query().dataSourceNo(1).addSortField(fieldNum(CustTable,
//CustGroup), SortOrder::Ascending); //If you want to display fields in an ascending order.
super();
}
Notice There is a sort method on each control, overriding which you can influence the actual actions which happed when you click on the header of a column

Dynamics AX 2012 error when running SSRS-reports just after deleting a table field from report's temporary table

$
0
0

When designing reports I sometimes faced a strange problem. After testing a new SSRS-report successfully I am always checking theSSRS-report’s temporary tables for table fields which were created by me during design-process but which are not used at the end (e.g. because of design-changes).

If I find one or more of this obsolete table fields I just delete the fields because they are no longer needed for the report. In a second step I refresh the datasets of the SSRS-report in Visual Studio. (Without refreshing the datasets the report would run into an error because of the missing table fields.) As last step I deploy the SSRS-report again.

When testing the report just after refreshing the datasets and redeploying the SSRS-report in most times there is no problem. SSRS-report just executes as expected because the deleted table-fields are not needed by the report.

But sometimes I get a strange error message like this (sorry, only available in German language):

"Table-field not found"-error

The error-message says that Dynamics AX was not able to run report because “PurchOrderCollectLetterIndic”-field in “PurchPurchaseOrderHeader”-table is missing.

Indeed I just had deleted the mentioned field from the mentioned table. (FYI: The table holds the data for Header of a Purchase Order.) I also just refreshed the datasets in Visual Studio and redeployed the report. But the SSRS report failed.

We tried (mostly) everything: Restarting the client. Restarting IIS. Even restarting AOS. But nothing helped. The only solution was to wait some hours because magically the error disappeared after some time.

Long story short: We missed the obvious…

…. Restarting SQL Server Reporting Services!!!!

Restarting Reporting Services just costs you some seconds. The worst effect which is caused by an restart is that for about one minute reports are not available or just a little bit delayed.

Now the question is why restarting Reporting Services solves the problem? The solution is simple:
Reporting Services caches report-data for some time and does not recognize the change in table-data. After some time of not running aSSRS-report Reporting Services shuts down most of its application pool. When requesting a new report, SSRS restarts its application pool.When doing this it loads the report data completely new and recognizes the change in table data. The result is that SSRS Report now runs perfectly fine.

Conclusion: If you face an error regarding SSRS reports in Dynamics AX 2012 which could be caused by refreshing-problems first restartSQL Server Reporting Services before you restart AOS or something other which may affect other users

Blank, last page in SSRS-Report

$
0
0
Ok, it took some time but here is a new entry. A short one. 

You may face this problem sooner or later, when creating a SSRS-report with SQL Server 2008. It can happen with both plain Reporting Services and SSRS with Dynamics AX 2012.

After creating a report all looks fine, till you reach the end of the report. Although the last page with report-data has plenty of space left, there is a last completely empty - meaning white page – at the end of the report. 

With Reporting Services for SQL Server 2005 you did not face this kind of problem, because white spaces are removed automatically. This is not a bug just a changed behavior. 

But how to solve this problem with SQL Server 2008?
Quite simple: Just select the properties of the report. Look for the ConsumeContainerWhitespace-property. If the value is FALSE change it to TRUE and your problem with a last white page in SSRS-reports should be history. 

"ConsumeContainerWhitespace"-Property

Tipp: If you have the problem that there is a page with report-data, followed by a blank one, followed by a page with report data, a blank one and so on, the problem is different but as easy to solve. Just make sure that Body Width of the report + Left margin + Right margin are together smaller than the Page Width.

Récupérer une distance en km grâce API Google Maps/DotNet/XML

$
0
0

static void OBRFindKm(Args _args)
{
    dialog                           d;
    dialogField                    Depart,Arrivee;
    Name                           VilleDepart,VilleArrivee;
    Str                                url,xml;
    System.Net.WebClient  webClient = new System.Net.WebClient();
    XMlDocument              doc;
    XMLNodeList              Distance;
    XMLNode                    node;
    real                                totaldistance;
    ;
    d = new dialog();

    Depart = d.addField(extendedTypeStr(Name));
    Depart.label("Départ");

    Arrivee = d.addField(extendedTypeStr(Name));
    Arrivee.label("@SYS14181");

    d.run();

    VilleDepart = Depart.value();
    VilleArrivee = Arrivee.value();

    if(VilleDepart != "" && VilleArrivee != "")
        {
             url = "http://maps.google.com/maps/api/directions/xml?language=fr&origin="+VilleDepart+"&destination="+VilleArrivee+"&sensor=false";
             xml = webClient.DownloadString(url);
             doc = XMLDocument::newXml(xml);
             Distance = doc.selectNodes('//distance');
             node = Distance.nextNode();

            if(d.closedOk())
                {
                     while(node)
                        {
                            totalDistance = any2real(node.selectSingleNode('value').text());
                            node = Distance.nextNode();
                        }
                    box::info((strfmt("%1 %2 %3","Distance totale:",totalDistance/1000,"km")));
                }
            else
                {
                    box::info("@SYS93289");
                }
        }
    else
        {
            box::info("le point de départ et/ou le point d'arrivé sont mal renseignés");
        }
}

Fullscreen Form - Microsoft Dynamics AX

$
0
0
Is it possibile by code resize a form to fullscreen? (like button Maximize) ?


public void activate(boolean _active)
{
super(_active);

#define.SC_MAXIMIZE (61488)
#define.WM_SYSCOMMAND (0x0112)

WinAPI::SendMessage(element.hWnd(), #WM_SYSCOMMAND, #SC_MAXIMIZE, '');
}

Extensible data security Framework– Create Policies [Dynamics AX 2012]

$
0
0

Friends,
This is really interesting and I thoroughly enjoyed learning Policies and implementing them.
The extensible data security framework is a new feature in Microsoft Dynamics AX 2012 that enables developers and administrators to secure data in shared tables such that users have access to only the part of the table that is allowed by the enforced policy. This feature can be used in conjunction with role-based security (also supported in Microsoft Dynamics AX 2012) to provide more comprehensive security than was possible in the past. [MS Help]
Extensible data security is an evolution of the record-level security (RLS) that was available in earlier versions of Microsoft Dynamics AX. Extensible data security policies, when deployed, are enforced, regardless of whether data is being accessed through the Microsoft Dynamics AX rich client forms, Enterprise Portal webpages, SSRS reports, or .NET Services [MS help]
Let me walk through with a simple example:
Requirement is to show a particular user only those Bank accounts that belongs to the Bank group “BankCNY
Below are the Bank accounts that are available in my system. By using policy framework on roles , I can restrict user to view only bank accounts that belong to Bank group “BankCNY”
image
First of all , where are these policies in AX? They are actually in the AOT >> Security >> Policies
image 
Before we create policies, we need to create a query to use it in policies. Remember, try to optimize the queries to the best otherwise it might lead to performance issues.
To keep it very simple, Create a Query by name SR_BankAccountTable by adding data source[PrimaryTable] as “BankAccountTable” and add a range on BankGroupId field and set it to “BankCNY” as shown below

image
Now let us create a new Role by name SR_BankController as shown below
Go to AOT >> Security >> Roles >> New Role
image
Set the following properties of the newly created role by right clicking and going to properties
image
Now lets create duties for this role: In this example I will create one simple duty called “SR_BankAccountsMaintain
Go to AOT >> Security >> Duties >> Right click >> New Duty
image
Set the following properties for the newly create duty. Name it as “SR_BankAccountsMaintain” and provide label and description as shown below

image
Now, let us create a new privilege and add entry points [Menu Items] to it to provide only access to the user
Go to AOT >> Security >> Privilege >> New Privilege.
image
Name the privilege as “SR_BankAccountTableMaintain” and set the label and Description as shown below
image
Now drag and drop some menu items on to Entry points from AOT >> Menu Items >> Display as shown below
image
Now add this newly created privilege  “SR_BankAccountTableMaintain” to the duty “SR_BankAccountMaintain” which we have created.
image
Then, add SR_BankAccountsMaintain duty to the Role SR_BankController
image
Now, let us create a new Policy by name “SR_BankAccountPolicy” and set the properties as shown below
image
Set the below properties
image
In the above screen, Select the context type as “RoleName“ and the role “SR_BankController” and select the query as ”SR_BankAccountTable
PrimaryTable : should always be the first data source Table which you have added in the query. So, selectBankAccountTable
constrained table is the table or tables in a given security policy from which data is filtered or secured, based on the associated policy query. For example, in a policy that secures all sales orders based on the customer group, the Sales Order table would be the constrained table. Constrained tables are always explicitly related to the primary table in the policy [MS Help]
Context [MS help]
A policy context is a piece of information that controls the circumstances under which a given policy is considered to be applicable. If this context is not set, then the policy, even if enabled, is not enforced.
Contexts can be of two types: role contexts, and application contexts. A role context enables policy application based on the role or roles to which the user has been assigned. An application context enables policy application based on information set by the application
we are almost done, we need to add this role= to some user and verify whether he is able to see only Bank accounts that belongs to BankCNY group
Go to System Administration >> Users >> select any user >> Click on Assign roles.
Select “Bank Accounts controller”  and click on Ok Button.
image
Now , let us log in with the user credentials for which we have assigned the new Role and verify the Bank accounts.
As you see, the user can only see the Bank accounts which belong to “BankCNY” group.
image
That’s it for now.
Happy Dax6ng
sree

Event Handling in Microsoft Dynamics AX 2012

$
0
0

Today, I am going to talk on the event handling mechanism in Microsoft Dynamics AX 2012. With the event-handling mechanism in Microsoft Dynamics AX 2012 you can lower the cost of doing development and then upgrading these customizations.
Events are a simple and yet powerful concept. In daily life, we encounter with so many events. Events can be used to support these programming paradigms.
  • Observation: Generate alerts to see exceptional behavior.
  • Information dissemination: To convey information to right people at right time.
  • Decoupling: The consumer doesn’t need to know about the producer. Producer and Consumer can be sitting in totally different applications.
  • Terminology: Microsoft Dynamics AX 2012 events are based on .NET eventing concepts.
  •  
  • Producer: Object to trigger the event.
  • Consumer: Object to consume the event and process logic based on the event triggered.
  • Event: An action that needs to be triggered
  • Event Payload: Information that can go along with event.
  • Delegate: Definition that is passed to trigger an event. Basically, communicator between producer and consumer
Things to remember while using Events in AX2012
  • Delegate keyword to use in delegate method.
  • Public or any other accessibility specifier is not allowed in a delegate method.
  • Delegate Method return type must be void.
  • Delegate Method body must be empty.
  • A delegate declaration can have the same type of parameters as a method.
  • Event handlers can run only on the same tier as the publisher class of the delegate runs on.
  • Only static methods are allowed to be event handlers.
  • Delegate method can’t be called outside class. Basically, events can’t be raised outside class in which event is defined.
  • Event handlers for host methods can use one of two parameter signatures:
    • One parameter of the type XppPrePostArgs. Go through all the methods available in XppPrePostArgs.
    • The same parameters that are on the host method that the event handler subscribes to.
Now, let’s talk about how to use events in Microsoft Dynamics AX 2012.
  1. Let’s create a class Consumer to create EventHandler (sendEmailToCustomer). This will be called once order is shipped so that email can be sent to customer to notify. It has to be static method.
  2. Now let’s create Producer class where this event (sendEmailToCustomer) is called using Delegates. Add delegate by right clicking on Producer class > New > Delegate.
  3. Change its name to delegateEmail (you can have any name). Parameter should be same as event handler method (sendEmailToCustomer) i.e. of type Email. Notice it has no body and is a blank method.
  4. Now drag and drop sendEmailToCustomer method from Consumer class to delegateEmail
  5. Look at properties of EventHandler. You will notice it is pointing to Class Consumer and method sendEmailToCustomer
  6. If order is not shipped, I am creating another event handler (errorLog) in Consumer class to log error into error log.
  7. Create another delegate method (delegateErrorLog) in Producer class to call this event handler (errorLog)
  8. Drag and drop event handler (errorLog) in delegate method (delegateErrorLog) similar to step 4.
  9. Now let’s create main method in Producer class to ship order and let’s see how delegates can be used to trigger event handlers.
  10. Suppose shipOrder method returns true. Now, if I run this main method, it should go into delegateEmail method and should trigger method sendEmailToCustomer. Let’s run and see the result.
  11. Here is the result and it is as expected so it did trigger method sendEmailToCustomer.
  12. Let’s suppose shipOrder method returns false. Now, if I run this main method, it should go into delegateErrorLog method and should trigger method errorLog. Let’s run and see the result.
  13. Here is the result and it is as expected so it did trigger method errorLog.
  14. Handlers can also be added or removed
    Add Handler: It uses += sign.
    Remove Handler: It uses -= sign.
  15. Now, let’s use addStaticHandler in main method. If you see the code, it is calling addStaticHandler before calling delegate method. If we run it and see the result, it should send 2 emails.
  16. Here is the result as expected.
  17. Similarly if we use removeStaticHandler method instead of addStaticHandler before calling delegate method then it will remove handler and will not send any email.
So, you can see that with the use of delegates and event handlers, it is so easy to trigger events. Also, it will be easy and less time consuming to upgrade it. Suppose if delegates are called from standard methods while doing customizations then it will be so easy to upgrade if standard methods are changed in next release because only 1 liner code of calling delegate method needs to be rearranged and no changes will be required in event handler methods.
Use of Pre and Post event handlers
In Microsoft Dynamics AX 2012, any event handler method can dropped in other method. If the property "CalledWhen" is set to "Pre" then it becomes pre event handler. If it is set to "Post" then it becomes post event handler. Pre event handler is called before the method under which it is dropped and Post event handler is called after method ends. These are so powerful that event handler method can be created in new class and can be dropped in any standard or any other method without changing a single line of code and can be set as pre or post event handler as per business need. Suppose, before creating a customer in AX, business need is to do some business logic then logic can be written in pre event handler and can be dropped in insert method of CustTable. Similarly, if there is post logic to be written after customer is created then post event handler can be created and dropped in insert method of the Customer Table (CustTable).
Let’s see how pre and post event handler methods can be created and used.
  1. Let’s take same example. I added 2 event handler methods in Consumer class.
  2. Drag and drop both these event handlers in method sendEmailToCustomer
  3. Set property "CalledWhen" to Pre for EventHandler1 and Post for EventHandler2.
  4. Now let’s run main method of Producer class again and see the results. It should call EventHandler1 and then sendEmailToCustomer and then EventHandler2.
  5. Here is the result as expected.
With use of events, it has opened so many doors and possibilities. Model architecture and events can be integrated which can help if multiple vendors are doing customizations in different models so that it doesn’t impact customizations of other models/vendors. Use of pre and post handlers is so powerful that it can be used without changing a single line of code in original method. Pre or Post handlers can be just dropped in the original method and will be called automatically before (pre handler method) or after (post handler method) original method.

Microsoft Dynamics AX 2012 :Table Inheritance Part 1

$
0
0

Hi All
In Microsoft Dynamics AX 2012, tables can inherit, or extend, from the tables that are situated above them in a hierarchy. A base table contains fields that are common to all tables that derive from it. A derived table inherits these fields, but also contains fields that are unique to its purpose. Each table contains the Support Inheritance and Extends properties, which can be used to control table inheritance.
First we need understand that when we need to apply this inheritance methodology to tables. First we need to identify the Parent table and its siblings like
DataModel
Here ‘Basic Info’ is the Parent table containing fields that are required for its child table i.e. CompnayTable and EmpTable. And these tables have their own fields as well.Now to design a Inheritance pattern we need to consider following important things:

  • We can only apply inheritance on regular tables not on Temp or Memory tables
  • A type discriminator field must be defined on any table inheritance hierarchy created in the AOT. The field must be defined as an int64 type on the root table, with the name of the field set to InstanceRelationType.
  • The InstanceRelationType field of the root table is read-only and stores the TableIDs of record instances; it is populated automatically by Microsoft Dynamics AX 2012.
  • Also we can only set the table properties for the table inheritance only when there are no fields in the table.
  • If these requirements are not met, a compilation error will occur when the table inheritance hierarchy is compiled.
Let create parent Table ‘BasicInfo’
BasicInfo
Setting its SuppourtInheritance Prpoerty to Yes
SupportInhheritane
When you save and compile,it will give following error
ComipleError
For this we need to create a discriminator; name ‘InstanceRelationType’ and of type Int64.Now I have created a field including discriminator
InstanceRelationTYpe
Finally I have set another table property ‘InstanceRelationType’ to ‘InstanceRelationType’  field
InstanceRelationTYpeProperty.jpg
And when I compiled, the error is gone now.
Now we have to create Two child tables
EmpTable:
First I have set the ‘SupportInheritance Property to Yes.
SupportInheritance
Now for the child table to have the parent we need to set the ‘Extends’ property of child table to parent table value like
ExtendsProperty
And finally added all fields.
EmpTable

CompanyTable:
Same as what already we have done for EmpTable
Now when I compile it still give the two errors i.e.
TwoCompilerErrors
Basically these errors indicates that the automatic relation that have been created in the child table,have the same relation name and so it is showing duplicate so for this I have changed the name See below screen shot
ScreenShot (see below)
 FinalScreenShot
And that’s it we have created Parent-child hierarchy table .
Finally, we need to also set the ‘Abstract’ property of the parent table to ‘Yes’ and for this we need to understand below.
Abstract versus concrete tables:
Tables in a table inheritance hierarchy can be defined as either abstract or concrete, depending on whether the table property Abstract is set to Yes or No. Records can only be created for concrete table types. Any attempt to create a record and insert it in an abstract table will result in a run-time error. The position of the table in the inheritance hierarchy does not restrict its ability to be defined as abstract.

How to Enable Remote Errors for SQL Server Reporting Services

$
0
0
Enabling remote errors for SQL Server Reporting Services means setting EnableRemoteErrors Reporting Services system property to True
There are two ways to set the EnableRemoteErrors property to true for a Reporting Services instance.  
Update Report Server database Configuration table for EnableRemoteErrors  
First way is updating the ConfigurationInfo table which is in the ReportServer database for configuration record named “EnableRemoteErrors”.
The default value for EnableRemoteErrors property in the ConfigurationInfo database table is “False”. You can simply run an update sql statement to enable remote errors.
But you may not be successful to see the changes made on the ConfigurationInfo table on the Reporting Services application, if the application is being used intensely.  
image009


  Enable EnableRemoteErrors property though running a script  
Second way to enable remote errors is using and running a script which updates the running configuration values of the Reporting Services.
The codes of the script that will update configuration values for EnableRemoteErrors is given in the SQL Server 2005 Books Online.
Here is the script codes :
Public Sub Main()
Dim P As New [Property]()
P.Name = “EnableRemoteErrors”
P.Value = True
Dim Properties(0) As [Property]
Properties(0) = P
Try
rs.SetSystemProperties(Properties)
Console.WriteLine(“Remote errors enabled.”)
Catch SE As SoapException
Console.WriteLine(SE.Detail.OuterXml)
End Try
End Sub  
Copy the above script code in an empty text file and as the script file as EnableRemoteErrors.rss on the root folder of your C drive. Of course you can select another name for the script file name and another folder to save your script. I chose C drive to keep it easy to run the below command prompt statement. Open the command prompt window by running the “cmd” command in the “Run” box. Then run the below command after you have replaced the ReportServerName with the actual name of the Reporting Services server you want to configure and the ReportServer instance name. You can keep ReportServer unchanged if you use the default configurations.
rs -i C:\EnableRemoteErrors.rss -s http://ReportServerName/ReportServer  
Enabling remote errors for a Reporting Services may help you to get more detailed information that may help for troubleshooting problems with Reporting Services applications and reports you are developing  
Errors on reports rendered by SQL Server Reporting Services 2005 and 2008 will not give you the full details of the issue if you are browsing on a machine other than that hosting SSRS. Instead, you just get this:  
  
With SSRS 2005 you had to manually edit a web.config or run code (SQL or other) in order to get more details beyond the SSRS box. Jim (Saunders) showed me something cool today in SSRS 2008 however:  
  
Setting EnableRemoteErrors here to TRUE will get you full report error details on remote clients. You access this screen via SQL Management Studio. Connect to SSRS, right-click on the server instance in Object Explorer and select “Properties”.  

how to convert string to time in dynamics ax x++

$
0
0
str2time
The str2time function converts a string representation of time to the timeofday value as long as the string is a valid time. If it's not a valid time, the method returns -1.

static void Datatypes_str2time(Args _arg)
{
str timeStr;
timeofday time;
;
timeStr = "09:45";
time = str2Time(timeStr);
info(strfmt("%1 seconds has passed since midnight when the clock
is %2", time, timeStr));
}
The example will print the following to the info:
35100 seconds has passed since midnight when the clock is 09:45

Electronic vendor payments in AX 2012

$
0
0
This post is a technical overview of how to process electronic vendor payments in Microsoft Dynamics AX 2012. It is primarily targeted at consultants and developers who have implemented, or are looking to implement, Dynamics AX 2012.

1. Overview

The creation of bank files to make vendor payments has changed dramatically in Microsoft Dynamics AX 2012. No longer does one need to create classes and write code; instead, all you have to do it create an XML transformation document (XSLT).
In previous versions of Dynamics AX, the developer had to modify classes in order to create a payment file. These classes were typically complex to understand, and this complexity led to a variety of different modification methods; managing these has its own challenges.
The core purpose of these classes was to create a text file and save that text file to a hard drive. Generally these text files were very simple CSV files. One of the limitations of this approach was the complexity involved in generating XML documents from these files; this has now been rectified. As banks start to request payment files in different formats, such as XML, Microsoft has extended the Dynamics AX Application Integration Framework (AIF) to allow the creation of vendor payment files in XML-based formats.
In this post we look at how to create these files.

2. The XML document

The new vendor payments XML document is based on the query ‘VendPayments.’

3. Setting up an outbound payment format (XML)

This is based on the Single Euro Payments Area (SEPA) Credit Transfer xslt example as supplied by Microsoft.
Create a directory “C:\AIF Examples\SEPA.”

3.1 Export the XSLT sample

In the “Resources” node in the AOT find and “Open” the object “VendPayments_SEPACreditTransfer_xslt”.
Export the XSLT sample
Click on “Export” and save the document in the new directory.
Export the XSLT sample

3.2 Set up an outbound port for electronic payment

Go to ‘System administration > Setup > Services and Application Integration Framework > Electronic payment services > Outbound ports for electronic payments.’
Click on “New.”
Enter a “Payment format” e.g. “SEPACreditTransfer.”
Specify the path where the XSLT file is stored.
Specify the “Outbound folder.”
Setup an outbound port for electronic payment
Click on “Create ports.”
Set up outbound port for electronic payment
Click on “Payment processing data.”
Enter the information specific for the payment format.

Set up outbound port for electronic payment

3.3 Create a payment journal

Accounts payable > Journals > Payments > Payment journal.
Open the lines and click on Functions > Generate payments.
Select “Export payment using service” and select the new “SEPACreditTransfer.”
Create payment journal
Click on OK.
Modify the “Payment processing data” of required and then click on “OK.”
Then, assuming that the AIF services are running in batch, the document will be processed and exported to the specified directory.

4. Setting up an outbound payment format (CSV)

The problem: AIF is designed to only export XML documents, and most of the banks we deal with only accept CSV files.
The solution: set up an outbound port for electronic payment.

4.1 Setup an outbound port for electronic payment

Create a new “Outbound ports for electronic payments” 
Setup an outbound port for electronic payment 
(Note: While it is mandatory to specify the XSLT path to create the electronic port, it is not used.)

4.2 Modify the outbound port

Open the outbound port.
Go to ‘System administration > Setup > Services and Application Integration Framework > Outbound ports.’
Select the port you just created and deactive it.
Modify the outbound port 
You will noticed that there is a non-standard field called “File extension.” This is an enum and by default is set to XML and therefore standard AX. If you select another value, in this instance “CSV,” then the file will be exported with an extension of CSV.
Select “CSV” for the field “File extension.”
In this process we won’t be using “Outbound piplines” so untick the checkbox. Instead we will use the “Outbound transforms” so select the “Transform all responses” checkbox and click on “Outbound transforms.”
Modify the outbound port
Click on “Manage transforms.”
Click on “New.”
Enter in the values for “Name” and “Description” leaving “Type” as XSL.
Next click on the “Load” button and select the appropriate XSLT file.
Modify the outbound port
Click on “Close.”
Click on “New” to create a new “Outbound transforms” and select the transform you created above.
Modify the outbound port
Click on “Close.” If the XSLT contains scripts you will get a warning message; if you trust the source select OK and continue.
Activate the outbound port.
Go back to your payment journal and generate payments again, however this time pick the new payment format.
Activate the outbound port.
Once again run the AIF services.

Managing integration ports [AX 2012]

$
0
0
What are Integration ports?
Integrations ports are basically the inbound or outbound ports through which external applications can communicate with Dynamics AOS via AIF (WCF).

The exchange of data between External/Internal application is divided into:
1.      InBound Exchange
a.     Both Basic and Enhanced Integration ports can be used.
b.     Basically to Receive data and create in Ax

2.     OutBound Exchange
a.     Only Enhanced Integration ports can be used.
b.     To Send data to ext. applications
c.      To Send data to ext. applications in response to their Requests
How to: Create a Basic Inbound Integration Port [AX 2012]
Basic port is used to test the operation of a custom service that does not require any data processing or exposure to the Internet.
Only a developer can create a new basic integration port


To create a basic inbound port
  1. Open the Application Object Tree (AOT).
  2. Right-click the Service Groups node, and then click New Service Group.
  3. Right-click the new service group, and then click Properties. Set the Name property to TestBasicPortServiceGroup. Click Save.
  4. Right-click TestBasicPortServiceGroup, and then click Open New Window. Drag one of the custom services from the Services node onto TestBasicPortServiceGroup.
  5. Right-click TestBasicPortServiceGroup, and then click Save.


  6. Right-click TestBasicPortServiceGroup, and then click Deploy Service Group.

        
  7. After the service group is successfully deployed, a confirmation message appears in the Infolog. And the TestBasicPortServiceGroup port is appended to the Port Names list as a port of the Basic type.

        
  8. To view the basic port you have created, open the Inbound ports form. Click System administration > Setup > Services and Application Integration Framework >Inbound ports.
    The TestBasicPortServiceGroup port appears in the Port Names list as a port of the Basic type.
Important: To start this service every time that the AOS is restarted, set the AutoDeploy property for the service group to Yes.

How to manage the Enhanced integration port:
#1: To create an enhanced integration port, follow these steps.
1.      To create an inbound integration port, open the Inbound ports form. Click System administration > Setup > Services and Application Integration Framework > Inbound ports.
–or–
To create an outbound integration port, open the Outbound ports form. 
Click System administration > Setup > Services and Application Integration Framework > Outbound ports.

2.     Click New.


3.     Enter a name and description for the new integration port. The name of a port must begin with a letter and can contain only alphanumeric characters.

4.     Configure the integration port
Click service operations – to select Service operations which you want to perform using this Enchanced port.
Close Select service operations form.

5.     Or just click Close to save the default configuration and you can modify the configuration later.

6.     Click button Activate

Important:
If you activate or deactivate an integration port, all integration ports on that particular instance of AOS are reactivated. 
Do not click the Deactivate/Activate button while integration ports are processing messages.

#2: To Edit or delete an enhanced integration port, follow these steps:

To change the settings for an existing enhanced integration port, or to delete the port, you must first deactivate the port.
1.      Identify and select the particular Port name field you want to change or delete.

2.     Click Deactivate to deactivate the port.

3.     Change the configuration settings.
–or–
Click Delete to delete the port.

4.     Click Activate to reactivate the integration port.

#3: Configure addresses for Enhanced Integration ports:
Enhanced integration ports use adapters to enable Microsoft Dynamics AX to communicate by using various transport protocols.
The addresses of integration ports are defined by the adapters that you select and the Uniform Resource Identifiers (URIs) of the adapters.
Inbound integration ports have an inbound address that is used for inbound messages, and they can also have a response address that is used for outbound messages.
Outbound integration ports have only an outbound address that is used for outbound messages.
How to Register Adapaters:
An adapter must be registered before it can be used. Adapters that are included with Microsoft Dynamics AX are automatically registered during installation.
Whenever a new adapter is added to the (AOT), you must register the adapter to make it available in the configuration forms for enhanced integration ports.
To register adapters, follow these steps:
1.      Click System administration > Setup > Checklists > Initialization checklist.

2.     Expand the Initialize system node.

3.     Click Set up Application Integration Framework. By doing so, Adapters, basic ports, and services are registered. This operation can take some time to be completed.
How to select Adapaters:
After adapters have been registered, you must select the adapters that you want to use for integration.
In the Address group or the Response address group, click the arrow in the Adapter field, and then select an adapter in the list.
The list by default consists of:
1.      File system adapter – Receive or Send
2.     HTTP – Send and receive
3.     ISABEL SEPA credit transfer – Receive or Send
4.     MSMQ – Receive or Send
5.     NetTcp – Send and receive
You can select the appropriate adapter for your connection when you configure an enhanced integration port.

How to Specify URIs
Before you can configure an adapter, you must specify its URI. The format of the URI varies, depending on the type of adapter that you selected:
1.      For File system adapter and:
a.     Address is an inbound address then the URI is the file system path of the directory where the port retrieves documents.
b.     And if the address is an outbound/response address, the URI is the file system path of the directory where the port saves documents. 
To select a directory, click the arrow in the URI field, and then browse to a folder.
Notes: 
Make sure that the service account for Application Object Server (AOS) has the appropriate read or write permissions for the directory. When you submit multiple documents to a port that uses the file system adapter, the documents are processed in order based on the file names. (Workaround if needed, is to use file names that include a sequencing scheme, such as "PO_0001" and "PO_0002")

2.     For NetTcp adapter, the URI is automatically provided by Microsoft Dynamics AX, based on the port name. You can view the URI after you save the port configuration.

3.     For MSMQ adapter, the URI is based on the queue that you select. To select a queue, click the arrow in the URI field, and then select a queue in the list. 
The server must be configured to provide Message Queuing services, and queues must be defined before they can be used by the integration port.

4.     For HTTP adapter type is HTTP, the URI is the Internet address of a website that you added by using the Web sites form. To select a website, click the arrow in the URI field. Then, in the Select Web site form, click the arrow in the Web site field, and then select a website in the list.

How to Configure adapters:
After you specify the URI of the adapter that you selected, you can configure the adapter.
In the Address group or the Response address group, click Configure. In Microsoft Dynamics AX 2012 R2, for adapter types other than NetTcp, to make the Configure AOS button visible you must save the port first.
One of the following configuration forms opens:
1.      For the file system adapter, the File system adapter configuration form opens. The Microsoft Dynamics AX user account that is specified should have required rights. For example, User Account Control (UAC) is enabled in Windows, and files are created by an administrator account. For these files, the Owner attribute in the file properties is set to the Windows Administrators group. Similarly, for files that are created from a process that runs on a network service, the owner is set to NT AUTHORITY\NETWORK SERVICE.
2.     For NetTcp, HTTP, and MSMQ adapters which are based on Windows Communication Foundation (WCF), the WCF configuration form opens.The WCF configuration form contains the WCF Configuration Editor tool, SvcConfigEditor.exe, if the tool is installed. This tool is installed as a component of some versions of the Windows SDK and by Microsoft Visual Studio 2010. This tool provides a graphical user interface (GUI) that you can use to create and modify configuration settings for WCF services. 
If the WCF Configuration Editor tool is not installed, the WCF configuration file opens in Notepad. You can change the WCF configuration information by modifying the XML code in Notepad. Then save the file.
Viewing all 181 articles
Browse latest View live


<script src="https://jsc.adskeeper.com/r/s/rssing.com.1596347.js" async> </script>