Quantcast
Channel: Microsoft Dynamics Ax
Viewing all 181 articles
Browse latest View live

Number sequence framework in Ax 2012 (simplified implementation)

$
0
0

Today. this post is about the “Number sequence framework in Ax 2012”. I did get a chance to work on it yesterday and I implemented the number sequence using the white paper available atmsdn. I won’t be discussing the core concepts here, as they are already discussed comprehensively in the white paper, however I will be focusing on the implementation details. I found couple of problems during the implementation and I thought I should discuss those issues and solutions for those. Also I tried simplifying the steps for the uptake of the number sequence, by classifying the steps in categories and providing “a, b, c, d” steps to uptake it.
So firstly the broader picture
To simplify, There are three areas that are controlled by number sequence API as shown in the picture and for each area you need to do code specifically to that particular area to achieve the functionality.

The first two areas(A and B) are related to the Setup and ( C ) part is related to the consumption.
A. Number Sequence Module Setup
i. Create an extended data type that will be storing the Number sequence generated number for your table. We mostly make it string type since we may want to store the company Id with generated number.
ii. Append the module name in the NumberSeqModule
iii. Make a new class with your module name prefix so if you are making Module Abc, you class name would be named NumberSeqModuleABC. This class will add the area in the number sequence administration page.
iv. You need to extend this class with NumberSeqApplicationModule class.
v. Override the loadModule method and add your extended data type reference here. The dataArea line is only needed if you want to provide the user an option in the Module parameters Form, this is my understanding, please correct me on this if I am wrong. This method will create the data types in the NumberSeqDataType data table
protected void loadModule()
{
NumberSeqDatatype datatype = NumberSeqDatatype::construct();
/* Setup application numbers */
datatype.parmDatatypeId(extendedtypenum(TestEdt));
datatype.parmReferenceHelp(literalstr(“@testHelp”));
datatype.parmReferenceLabel(literalstr(“@testLabel”));
datatype.parmWizardIsContinuous(true);
datatype.parmWizardIsManual(NoYes::No);
datatype.parmWizardIsChangeDownAllowed(NoYes::No);
datatype.parmWizardIsChangeUpAllowed(NoYes::No);
datatype.parmWizardHighest(999999);
datatype.parmSortField(1);
datatype.addParameterType(NumberSeqParameterType::DataArea, true, false);
this.create(datatype);
}
vi. Override numberSeqModule method and return your module just like below
public NumberSeqModule numberSeqModule()
{
return NumberSeqModule::TestModule;
}
vii. Run the job to load your module since the module loading code in Ax 2012 has moved to the check list part, in Ax 2009 the service restart used to perform this action. This is the tricky part because the code written in the whitepaper didn’t work for me and I ran the following job.
static void Job1(Args _args)
{
NumberSeqModuleTestModule obj = new NumberSeqModuleTestModule();
obj.createReferencesForScope();
obj.load();
}
viii. After running job, go to Organization Adminsitration à Number sequences à Number sequences à generate wizard button. Note, whitepaper for Ax 2012 states that there is no need to restart Aos service after that, however you will encounter error here that the module you made does not exist, so you need to restart AO and you are done.
B. Number sequence for the parameter Form
i. If you want to just add your edt to an existing module, just create the edt data type in Module specific number sequence module as mentioned above and include the DataArea there in the parameter type to show here.
ii. One useful tip is, if you are doing try and run on load module code, the changes won’t reflect as each time load module code run, it creates a row for the Number sequence data type in the data type table so you need to remove the row and make sure there is one row for your data type so that API doesn’t get confused when you update the code for your data type.

iii. Go to parameters Form now, add the numberSequencePreInit() method in the Form, just like below
void numberSeqPreInit()
{
runExecuteDirect = false;
numberSequenceModules = [NumberSeqModule::Payroll]; numberSeqApplicationModule = new NumberSeqModulePayroll();
scope = NumberSeqScopeFactory::createDataAreaScope();
NumberSeqApplicationModule::createReferencesMulti(numberSequenceModules, scope);
tmpIdRef.setTmpData(NumberSequenceReference::configurationKeyTableMulti(numberSequenceModules));
}
iv. Add numberSequenceReference data source in the Parameter form and add numberSequence table as reference in the data source
v. Make three methods on the data source as above, you can copy it from other Forms like CustParameters and VendParameters Form and you are good to go

Number Sequence Framework

$
0
0

This topic describes how to implement the number sequence framework for a new module in Microsoft Dynamics AX. The topic will show how some number sequences could be implemented for the Fleet Management (FM) sample module. (Some of the following steps might be irrelevant if they have been previously performed for other purposes in your new Microsoft Dynamics AX module.)
The first step to implementing number sequences for a new module is to create a parameter table and a number sequence reference class.
  1. Create a parameter table for the new module: MyModuleParameters. For the Fleet Management module, this table is named FMParameters. The table must, at a minimum, contain a Key field and a find method. The delete and update methods must be overridden. These methods can be copied from one of the other parameter tables, such as BOMParameters.
  2. Create an enumerated value that represents all of the number sequences for the module by adding a new element to theNumberSeqModule base enum. For the Fleet Management module, the FM element was added to the base enum.
    NoteNote
    Configuration keys are used to detect the active number sequence references in your Microsoft Dynamics AX installation. If the configuration key is not enabled, the modules number sequence references are not displayed in the general References form. The user cannot see references from modules that are not enabled.
  3. Create a new number sequence reference class named NumberSeqReference_MyModule. This class must extend theNumberSeqReference class. For the Fleet Management module, this class is named NumberSeqReference_FM.
  4. Add the numberSeqModule method to the new number sequence reference class. This method must return the element for your module from the NumberSeqModule base enum. The following code shows how this is done for the Fleet Management module.
    public static client server NumberSeqModule numberSeqModule()
    {
    return NumberSeqModule::FM;
    }
  5. Implement the numberSeqModule and numberSeqReference methods for the parameters table.
    Copy these methods from one of the other parameter tables such as BOMParameters, and then change the names that are found in the method. Change the return value of the numberSeqModule method so that it references the number sequence class for your module.
    For example, the numberSeqModule method from the FMParameters table returnsNumberSeqReference_FM::numberSeqModule. The numberSeqModule method of the NumberSeqReference_FM class returns NumberSeqModule::FM (the FM element of NumberSeqModule).
  6. Add MyModuleParameters::find() as a new line in the selectParameters method of the Company class. The following example shows the line that was added for the Fleet Management module.
    FMParameters::find();
  7. Create a form to display the new parameter table.
    It is important that the functionality of number sequence references is copied exactly from one of the other parameter forms (for example, CustParameters). Remember to change the names of the called methods.
  8. In the NumberSeqReference class, add a new line to the construct method—copy one of the existing lines, and then change the name of the class. The following example shows the line that was added for the Fleet Management module.
    case(NumberSeqReference_FM::numberSeqModule()) : return new NumberSeqReference_FM(_module);
  9. In the NumberSeqReference class, add a new line to the moduleList method—copy one of the existing lines, and then change the name to reference your number sequence class. The following example shows the line that was added for the Fleet Management module.
    moduleList += NumberSeqReference_FM::numberSeqModule();
    The new number sequence framework is now established. The Number sequences tab should display the "No setup required" message.
Next, you will make number sequence references for the number sequences you are creating for your new module.
  1. In your number sequence reference class, override the loadModule method.
  2. In this new method, specify the characteristics of each number sequence reference you need in the new module. For example, the following code is from the loadModule method of the NumberSeqReference_FM class. It defines two number sequences used by the Fleet Management module.
    protected void loadModule()
    {
    NumberSequenceReference numRef;
    ;

    // Setup VehicleNum ID
    numRef.DataTypeId = typeId2ExtendedTypeId(typeid(VehicleNum));
    numRef.ReferenceHelp = "Unique key for Fleet Management vehicles";
    numRef.WizardContinuous = false;
    numRef.WizardManual = NoYes::Yes;
    numRef.WizardAllowChangeDown = NoYes::No;
    numRef.WizardAllowChangeUp = NoYes::No;
    numRef.SortField = 1;

    this.create(numRef);


    // Setup TripNum ID
    numRef.DataTypeId = typeId2ExtendedTypeId(typeid(TripNum));
    numRef.ReferenceHelp = "Unique key for trips";
    numRef.WizardContinuous = false;
    numRef.WizardManual = NoYes::Yes;
    numRef.WizardAllowChangeDown = NoYes::No;
    numRef.WizardAllowChangeUp = NoYes::No;
    numRef.SortField = 2;

    this.create(numRef);
    }

TipTip
For details about how to create a reference, see the comments written above the code for theNumberSeqReference.loadModule method.
After creating your references, the system automatically detects them when opening the parameter form. They should now be visible in the grid on the Number sequences tab.
For each reference specified in NumberSeqReferenceMyModule.loadModule, you must create a static method on your parameter table. Assuming that you have specified a reference for the MyDataType data type, create theMyModuleParameters::numRefMyDataType method.
  1. Copy a numRef method from one of the other parameter tables.
  2. Change the name of the method to numRefMyDataType.
  3. Add code that will return a number sequence reference object for that specific data type. For example, the following method retrieves the number sequence reference object that is used for the TripNum field.
    server static NumberSequenceReference numRefTripNum()
    {
    return NumberSeqReference::findReference(typeId2ExtendedTypeId(typeid(TripNum)));
    }
To use the number sequence for a form in Microsoft Dynamics AX or in Enterprise Portal, you will typically add code to the data source for the form or data set. You can also retrieve a number sequence value directly in code. For example, the following example retrieves the next available vehicle number from the number sequence used for the VehicleNum field and displays it in the Infolog.
Info(NumberSeq::newGetNum(FMParameters::numRefVehicleNum()).num());

Forms

To use a number sequence for a form in Microsoft Dynamics AX, follow these steps.
  1. In the classDeclaration method of the form that will be accessing data, add a variable declaration for the number sequence handler. The following example shows the variable definition for a number sequence handler.
    public class FormRun extends ObjectRun
    {
    NumberSeqFormHandler numberSeqFormHandler;
    }
  2. Add the NumberSeqFormHandler method to the form. The code in this method will create an instance of the number sequence form handler and return it. The following example shows the code that returns the number sequence form handler for the Trips form of the Fleet Management sample module.
    NumberSeqFormHandler numberSeqFormHandler()
    {
    if (!numberSeqFormHandler)
    {
    numberSeqFormHandler = NumberSeqFormHandler::newForm(
    FMTrips::numRefFMTrips().NumberSequence,
    element,
    FMTrips_DS,
    fieldnum(FMTrips, TripNum));
    }
    return numberSeqFormHandler;
    }

  3. Add createdelete, and write methods to the data source of the table that contains the field for which the number sequence is being used. The following code examples show these methods that are added to the data source for the FMTrips table to support the number sequence for the TripNum field.
    public void create(boolean _append = false)
    {
    element.numberSeqFormHandler().formMethodDataSourceCreatePre();
    super(_append);
    element.numberSeqFormHandler().formMethodDataSourceCreate();
    }

    public void delete()
    {
    element.numberSeqFormHandler().formMethodDataSourceDelete();
    super();
    }

    public void write()
    {
    super();
    element.numberSeqFormHandler().formMethodDataSourceWrite();
    }

Enterprise Portal

To use a number sequence for a form in Enterprise Portal, follow these steps.
  1. In the classDeclaration method of the data set that will be accessing data, add a variable declaration for the number sequence handler. The following example shows the variable definition for a number sequence handler.
    public class DatSetRun extends ObjectRun
    {
    NumberSeqFormHandler numberSeqFormHandler;
    }
  2. Add the NumberSeqFormHandler method to the data set. The code in this method will create an instance of the number sequence form handler and return it. The following example shows the code that returns the number sequence form handler for the FMTripAddEdit data set of the Fleet Management sample module.
    NumberSeqFormHandler numberSeqFormHandler()
    {
    if (!numberSeqFormHandler)
    {
    numberSeqFormHandler = NumberSeqFormHandler::newForm(
    FMTrips::numRefFMTrips().NumberSequence,
    element,
    FMTrips_DS,
    fieldnum(FMTrips, TripNum));
    }
    return numberSeqFormHandler;
    }

  3. Add createdelete, and write methods to the data source for the data set that contains the field for which the number sequence is being used. The following code examples show these methods that are added to the data source for the FMTrips table to support the number sequence for the TripNum field.
    public void create(boolean _append = false)
    {
    element.numberSeqFormHandler().formMethodDataSourceCreatePre();
    super(_append);
    element.numberSeqFormHandler().formMethodDataSourceCreate();
    }

    public void delete()
    {
    element.numberSeqFormHandler().formMethodDataSourceDelete();
    super();
    }

    public void write()
    {
    element.numberSeqFormHandler().formMethodDataSourceWrite();
    super();
    }

Number sequences

$
0
0

Number sequences in Axapta are a mechanism for generating unique numbers. These are generally used as a unique Id to identify a table record.
Every number sequence is linked to an ExtendedDataType inside Axapta. Therefore you will need to create separate datatypes for each number sequence which will be created.


You may wish to use one or more new number sequences when you create your own module inside Axapta.
[edit]
Adding a number sequence

The steps to add your own number sequence to Axapta are fairly straight-forward, but lengthy. The following description is based on the Axapta best-practice methodologies.
For this example, we will add one new number sequence called NSId for a new module called NS. This assumes that an ExtendedDataType called NSId already exists.
If not using an existing extended datatype, create a new string EDT, which extends datatype 'num'. Note that in Ax 3.0 this num is a string field, length of 20.

[edit]Add an element to the NumberSeqModule base enum

One element should be added to the enum for your module, irrespective of the number of actual number sequences which will be created.
Therefore we modify the NumberSeqModule enum and add the element NS.

[edit]Extend the NumberSeqReference class

Create a new sub-class of NumberSeqReference and implement the numberSeqModule() and loadModule() methods. Use an existing sub-class as a template to assist with this. This is shown below.
publicclass NumberSeqReference_NS extends NumberSeqReference
{
 
}
/*
Detailed description of how to setup references for number sequences can
be found i method loadModule() on the 'father' class: numberSeqReference.
*/

 
protectedvoid loadModule()
{
NumberSequenceReference numRef;
 ;
 
// Setup Job TransId
numRef.dataTypeId = typeid2extendedtypeid(typeid(NSId));
numRef.referenceHelp = "Some description here";
numref.WizardContinuous = false;
numRef.WizardManual = NoYes::No;
numRef.WizardAllowChangeDown = NoYes::No;
numRef.WizardAllowChangeUp = NoYes::No;
numRef.sortField = 1;
 
this.create(numRef);
 
}
publicstatic NumberSeqModule numberSeqModule()
{
return NumberSeqModule::NS;
}
In addition, you must modify the construct() and moduleList() methods on NumberSeqReference itself to add references to your new module class. Note the sections of code surrounded by //--- NS Begin and //--- NS End
staticpubliccontainer moduleList()
{
container moduleList;
 ;
 
moduleList += NumberSeqReference_Bank::numberSeqModule();
moduleList += NumberSeqReference_BOM::numberSeqModule();
moduleList += NumberSeqReference_Customer::numberSeqModule();
moduleList += NumberSeqReference_Document::numberSeqModule();
moduleList += NumberSeqReference_ForeignTrade::numberSeqModule();
moduleList += NumberSeqReference_General::numberSeqModule();
moduleList += NumberSeqReference_Inventory::numberSeqModule();
moduleList += NumberSeqReference_Ledger::numberSeqModule();
moduleList += NumberSeqReference_Location::numberSeqModule();
moduleList += NumberSeqReference_MasterPlanning::numberSeqModule();
moduleList += NumberSeqReference_Production::numberSeqModule();
moduleList += NumberSeqReference_Project::numberSeqModule();
moduleList += NumberSeqReference_PurchaseOrder::numberSeqModule();
moduleList += NumberSeqReference_Route::numberSeqModule();
moduleList += NumberSeqReference_SalesOrder::numberSeqModule();
moduleList += NumberSeqReference_Tax::numberSeqModule();
moduleList += NumberSeqReference_Vendor::numberSeqModule();
moduleList += NumberSeqReference_Internet::numberSeqModule();
moduleList += NumberSeqReference_Asset::numberSeqModule();
 
//--- HRM Begin
moduleList += NumberSeqReference_HRM::numberSeqModule();
moduleList += NumberSeqReference_KnowledgeCollector::numberSeqModule();
moduleList += NumberSeqReference_VirtualNetwork::numberSeqModule();
//--- HRM End
 
//--- CRM Begin
moduleList += NumberSeqReference_CRM::numberSeqModule();
//--- CRM End
 
//--- SFC Begin
moduleList += NumberSeqReference_JobManager::numberSeqModule();
//--- SFC End
 
//--- NS Begin
moduleList += NumberSeqReference_NS::numberSeqModule();
//--- NS End
 
return moduleList;
}
publicstatic numberSeqReference construct(NumberSeqModule _module)
{
switch (_module)
{
case (NumberSeqReference_Ledger::numberSeqModule())  : returnnew NumberSeqReference_Ledger(_module);
case (NumberSeqReference_Tax::numberSeqModule())  : returnnew NumberSeqReference_Tax(_module);
case (NumberSeqReference_Bank::numberSeqModule())  : returnnew NumberSeqReference_Bank(_module);
case (NumberSeqReference_SalesOrder::numberSeqModule())  : returnnew NumberSeqReference_SalesOrder(_module);
case (NumberSeqReference_ForeignTrade::numberSeqModule())  : returnnew NumberSeqReference_ForeignTrade(_module);
case (NumberSeqReference_Customer::numberSeqModule())  : returnnew NumberSeqReference_Customer(_module);
case (NumberSeqReference_PurchaseOrder::numberSeqModule())  : returnnew NumberSeqReference_PurchaseOrder(_module);
case (NumberSeqReference_Vendor::numberSeqModule())  : returnnew NumberSeqReference_Vendor(_module);
case (NumberSeqReference_Inventory::numberSeqModule())  : returnnew NumberSeqReference_Inventory(_module);
case (NumberSeqReference_BOM::numberSeqModule())  : returnnew NumberSeqReference_BOM(_module);
case (NumberSeqReference_Route::numberSeqModule())  : returnnew NumberSeqReference_Route(_module);
case (NumberSeqReference_Production::numberSeqModule())  : returnnew NumberSeqReference_Production(_module);
case (NumberSeqReference_MasterPlanning::numberSeqModule()) : returnnew NumberSeqReference_MasterPlanning(_module);
case (NumberSeqReference_Project::numberSeqModule())  : returnnew NumberSeqReference_Project(_module);
case (NumberSeqReference_Location::numberSeqModule())  : returnnew NumberSeqReference_Location(_module);
case (NumberSeqReference_Document::numberSeqModule())  : returnnew NumberSeqReference_Document(_module);
case (NumberSeqReference_General::numberSeqModule())  : returnnew NumberSeqReference_General(_module);
case (NumberSeqReference_Internet::numberSeqModule())  : returnnew NumberSeqReference_Internet(_module);
case (NumberSeqReference_Asset::numberSeqModule())  : returnnew NumberSeqReference_Asset(_module);
 
// CC begin
case (NumberSeqReference_HRM::numberSeqModule())  : returnnew NumberSeqReference_HRM(_module);
case (NumberSeqReference_VirtualNetwork::numberSeqModule())  : returnnew NumberSeqReference_VirtualNetwork(_module);
case (NumberSeqReference_KnowledgeCollector::numberSeqModule())  : returnnew NumberSeqReference_KnowledgeCollector(_module);
// CC end
 
// Shop Floor Control begin
case (NumberSeqReference_JobManager::numberSeqModule())  : returnnew NumberSeqReference_JobManager(_module);
// Shop Floor Control end
 
// CRM addition begin
case (NumberSeqReference_CRM::numberSeqModule())  : returnnew NumberSeqReference_CRM(_module);
// CRM addition end
 
// Product Builder addition begin
case (NumberSeqReference_PBA::numberSeqModule())  : returnnew NumberSeqReference_PBA(_module);
// Product Builder addition end
 
// NS begin
case (NumberSeqReference_NS::numberSeqModule())  : returnnew NumberSeqReference_NS(_module);
// NS end
 
}
 
throw error(strFmt("@SYS53742"));
}

[edit]Create a parameters table and form

You should create a parameters table and form for your new module. The easiest way is generally to duplicate an existing Parameters table and modify it as required.
The important elements on the new parameter table are the numberSeqModule() and numberSeqReference() methods.
clientserverstatic NumberSeqModule numberSeqModule()
{
return NumberSeqReference_NS::numberSeqModule();
}
clientserverstatic NumberSeqReference numberSeqReference()
{
return NumberSeqReference::construct(NSParameters::numberSeqModule());
}
In the parameters form, you must ensure that the code in the numberSeqPreInit(), numberSeqPostInit() and NumberSequenceType.executeQuery() methods correctly reflect your new number sequence elements.

[edit]Calling a number sequence

The following code gets a number from the number sequence setting for EDT CustAccount
staticvoid Job1(Args _args)
{
ExtendedTypeId id = TypeID2ExtendedTypeId(TypeId(CustAccount));
 
NumberSeq num = NumberSeq::newGetNum(NumberSequenceReference::find(id));
 ;
 
num.used(); // mark the number as used
info(num.num());
}

Number Sequence Framework [AX 2012]

$
0
0

Updated: December 8, 2011
Applies To: Microsoft Dynamics AX 2012 R2, Microsoft Dynamics AX 2012 Feature Pack, Microsoft Dynamics AX 2012
Microsoft Dynamics AX has a number sequence framework to generate alphanumeric number sequences that are used to identify transaction documents such as sales orders. This topic describes how to implement the number sequence framework for a new module in Microsoft Dynamics AX. The topic will show how a number sequence was implemented for the Facility Management (FCM) sample module. (Some of the following steps might be irrelevant if they have been previously performed for other purposes in your new Microsoft Dynamics AX module.)
For additional information about the number sequence framework for Microsoft Dynamics AX 2012, see the Number Sequence Framework Whitepaper on the Microsoft Download Center.

The first step to implementing number sequences for a new module is to create a parameter table and a number sequence module class.
  1. Create a parameter table for the new module: MyModuleParameters. For the Facility Management module, this table is named FCMParameters. The table must, at a minimum, contain a Key field and a find method. The delete and update methods must be overridden. These methods can be copied from one of the other parameter tables, such as BOMParameters.
  2. Create an enumerated value that represents all of the number sequences for the module by adding a new element to theNumberSeqModule base enum. For the Facility Management module, the FCM element was added to the base enum.
    NoteNote
    Configuration keys are used to detect the active number sequence references in your Microsoft Dynamics AX installation. If the configuration key is not enabled, the module’s number sequence references are not displayed in the general References form. The user cannot see references from modules that are not enabled.
  3. Create a new number sequence class named NumberSeqModule MyModule. This class must extend theNumberSeqApplicationModule class. For the Facility Management module, this class is namedNumberSeqModuleFacilityManagement.
  4. Add the numberSeqModule method to the new number sequence class. This method must return the element for your module from the NumberSeqModule base enum. The following code shows how this is done for the Facility Management module.
    public NumberSeqModule numberSeqModule()
    {
    return NumberSeqModule::FCM;
    }
  5. Implement the numberSeqModule method for the parameters table.
    Copy this method from one of the other parameter tables such as BOMParameters. Change the return value of thenumberSeqModule method so that it references the number sequence for your module.
    For example, the numberSeqModule method from the FCMParameters table returns NumberSeqModule::FCM (the FCM element of NumberSeqModule).
  6. Create a form to display the new parameter table.
    It is important that the functionality of number sequence references is copied exactly from one of the other parameter forms (for example, CustParameters). Remember to change the names of the called methods.
  7. The new number sequence framework is now established.

Next, you will make number sequence data types for the number sequences you are creating for your new module.
  1. In your number sequence module class, override the loadModule method.
  2. In this new method, specify the characteristics of each number sequence data type that you need in the new module. For example, the following code is from the loadModule method of the NumberSeqModuleFacilityManagement class. It defines a number sequence that is used by the Facility Management module to provide work order numbers.
    protected void loadModule()
    {
    NumberSeqDatatype datatype = NumberSeqDatatype::construct();

    /* Work Order Number */
    datatype.parmDatatypeId(extendedTypeNum(WorkOrderNum));
    datatype.parmReferenceHelp("Unique identifier for work orders");
    datatype.parmWizardIsContinuous(false);
    datatype.parmWizardIsManual(NoYes::No);
    datatype.parmWizardIsChangeDownAllowed(NoYes::No);
    datatype.parmWizardIsChangeUpAllowed(NoYes::No);
    datatype.parmSortField(1);
    datatype.parmWizardHighest(999999);

    datatype.addParameterType(NumberSeqParameterType::DataArea, true, false);
    this.create(datatype);
    }

TipTip
For details about how to set the properties for a data type, see the descriptions of the methods for the NumberSeqDatatype Class.

After you create the number sequence module class and define the number sequence data types for your module, you must load the number sequence information into Microsoft Dynamics AX. This must be done only one time. Typically, this is a step that is performed when the module is installed.
A simple way to load the number sequence information for a module is to create a job in the AOT that creates an instance of the number sequence module and runs the loadModule() method. The following example is the InstallFacilityManagement job in the AOT. It creates an instance of the NumberSeqModuleFacilityManagement class, and then calls the loadModule() method. The job must be run only one time by the person who is installing the Facility Management module.
static void InstallFacilityManagement(Args _args)
{
NumberSeqModuleFacilityManagement n = new NumberSeqModuleFacilityManagement();

n.loadModule();
}


After the number sequence information has been loaded for the module, you must use the Set up number sequences wizard to generate the number sequences that you defined.
  1. In the Microsoft Dynamics AX client, choose Organization administration > Common > Number sequences > Number sequences.
  2. Click Generate to open the Set up number sequences wizard.
  3. Complete the wizard to create the number sequences for your new module.

For each data type specified in NumberSeqModule MyModule .loadModule, you must create a static method on your parameter table. Create the MyModule Parameters::numRef MyDataType method.
  1. Copy a numRef method from one of the other parameter tables.
  2. Change the name of the method to numRef MyDataType.
  3. Add code that will return a number sequence reference object for that specific data type. For example, the following method retrieves the number sequence reference object that is used for the WorkOrderNum field. This is the number sequence that is defined for the Facility Management sample application.
    client server static NumberSequenceReference numRefWorkOrderNum()
    {
    NumberSeqScope scope = NumberSeqScopeFactory::createDataAreaScope(curext());
    return NumberSeqReference::findReference(extendedtypenum(WorkOrderNum), scope);
    }


To use the number sequence for a form in Microsoft Dynamics AX or in Enterprise Portal, you will typically add code to the data source for the form or data set. You can also retrieve a number sequence value directly in code. For example, the following example retrieves the next available work order number from the number sequence used for the WorkOrderNum field and displays it in the Infolog.
Info(NumberSeq::newGetNum(FCMParameters::numRefWorkOrderNum()).num());

Forms

To use a number sequence for a form in Microsoft Dynamics AX, follow these steps.
  1. In the classDeclaration method of the form that will be accessing data, add a variable declaration for the number sequence handler. The following example shows the variable definition for a number sequence handler.
    public class FormRun extends ObjectRun
    {
    NumberSeqFormHandler numberSeqFormHandler;
    }
  2. Add the NumberSeqFormHandler method to the form. The code in this method will create an instance of the number sequence form handler and return it. The following example shows the code that returns the number sequence form handler for the FCMWorkOrders form of the Facility Management sample module.
    NumberSeqFormHandler numberSeqFormHandler()
    {
    if (!numberSeqFormHandler)
    {
    numberSeqFormHandler = NumberSeqFormHandler::newForm(
    FCMParameters::numRefWorkOrderNum().NumberSequenceId,
    element,
    FCMWorkOrders_DS,
    fieldnum(FCMWorkOrders, WorkOrderNum));
    }
    return numberSeqFormHandler;
    }

  3. Add createdelete, and write methods to the data source of the table that contains the field for which the number sequence is being used. The following code examples show these methods that are added to the data source for the FCMWorkOrders table to support the number sequence for the WorkOrderNum field.
    public void create(boolean _append = false)
    {
    element.numberSeqFormHandler().formMethodDataSourceCreatePre();
    super(_append);
    element.numberSeqFormHandler().formMethodDataSourceCreate();
    }

    public void delete()
    {
    element.numberSeqFormHandler().formMethodDataSourceDelete();
    super();
    }

    public void write()
    {
    super();
    element.numberSeqFormHandler().formMethodDataSourceWrite();
    }

Enterprise Portal

To use a number sequence for a form in Enterprise Portal, follow these steps.
  1. In the classDeclaration method of the data set that will be accessing data, add a variable declaration for the number sequence handler. The following example shows the variable definition for a number sequence handler.
    public class DatSetRun extends ObjectRun
    {
    NumberSeqFormHandler numberSeqFormHandler;
    }
  2. Add the NumberSeqFormHandler method to the data set. The code in this method will create an instance of the number sequence form handler and return it. The following example shows the code that returns the number sequence form handler for the FCMWorkOrderAddEdit data set of the Facility Management sample module.
    NumberSeqFormHandler numberSeqFormHandler()
    {
    if (!numberSeqFormHandler)
    {
    numberSeqFormHandler = NumberSeqFormHandler::newForm(
    FCMWorkOrders::numRefFCMWorkOrders().NumberSequenceId,
    element,
    FCMWorkOrders_DS,
    fieldnum(FCMWorkOrders, WorkOrderNum));
    }
    return numberSeqFormHandler;
    }

  3. Add createdelete, and write methods to the data source for the data set that contains the field for which the number sequence is being used. The following code examples show these methods that are added to the data source for the FCMWorkOrders table to support the number sequence for the WorkOrderNum field.
    public void create(boolean _append = false)
    {
    element.numberSeqFormHandler().formMethodDataSourceCreatePre();
    super(_append);
    element.numberSeqFormHandler().formMethodDataSourceCreate();
    }

    public void delete()
    {
    element.numberSeqFormHandler().formMethodDataSourceDelete();
    super();
    }

    public void write()
    {
    element.numberSeqFormHandler().formMethodDataSourceWrite();
    super();
    }


    Reset AOS if needed

    After following the step by step instructions I got an error while opening the parameters form or generating number sequences, it couldn't find the baseEnum value on the map.

    SOLUTION: Just reset AOS and it will be fine.

    Loading the number sequence from the parameters form of the module
    You could consider placing the call to load in the find method of your parameter table.

    If the find method must create the parameter record because it does not already exist, I think it is also safe to assume that the related number sequence has not been loaded:
    ...
        if (!parameter && !parameter.isTmp())
        {
            Company::createParameter(parameter);        // Load related number sequences

            // Load related number sequences
            new NumberSeqModuleMyModule().load();
        }
    ...

    That would eliminate the need for loading it manually.
    Loading Number Sequence Information for a Module
    In the x++ code the call should be to load not loadmodule, because the loadmodule method is protected.

Step-by-Step Checklist for Debugging Batch Jobs in Dynamics Ax

$
0
0

A. Enable Global Breakpoints

            When debugging in the client, you want to set breakpoints that can be caught by the debugger.  The following steps show how.

1.      Launch the Microsoft Dynamics AX Configuration tool from the Start >Administrative Tools menu on your client computer. The first time this tool opens, you will be on the Original configuration. Create a new configuration named Debug. Click Manage and choose the Create Configuration menu option.

2.      Enter a new name such as Debug, and choose copy from Original configuration and click Ok.

3.      A new configuration is created and shown in the configuration tool.  Click theDeveloper tab.

4.      Choose the following options:
·         “Enable global breakpoints to debug code running in the Business Connector or client” (required for this scenario)
·         “Enable user breakpoints to debug code in the Business Connector” (optional for this scenario)

Note: Take special care that the Configuration Target remains set to Local Client since this is the only client you can set global breakpoints from.


B. Configure Your AOS to Run Under Your User Credentials

1.      Launch the Services utility on your AOS server machine, and choose the AOS instance that you are configuring for debugging.

2.      Right-click on your chosen AOS instance name and choose Properties. On the properties window, choose the Logon tab. Select “This account” for the Logon As option.  Enter your full Domain account {e.g. contoso\YourName } and password credentials.  This account must be the same user account as the account used for debugging batch code.

3.      Click Apply once you have modified the user account.

4.      You will be prompted to restart the service. Choose yes to restart the service (note: ensure other users are not working on this service before restarting it).


C. Configure the Dynamics AX Server to Enable Debugging

1.      From your Start > Administrative Tools menu, open the Microsoft Dynamics AX Server Configuration tool. This tool has the same option to Manageconfigurations that you saw earlier in the client configuration tool.

2.      Choose the Manage and Create Configuration option to create a new server configuration. As before, copy from the original configuration and choose Debug as the name.

3.      Verify the AOS instance matches the instance you want to use for debugging.

4.      Choose the following options:
·         “Enable breakpoints to debug X++ code running on this server” (required for this scenario)
·         “Enable global breakpoints to debug X++ code running in batch jobs” (required for this scenario)

Note: When you click Apply, you will be prompted to restart the service, and you should choose Yes.


D. Set breakpoints and start debugging.

1.      Launch the Dynamics AX Client from the Start menu, and open the developer workspace.

2.      Open the class you would like to debug from the AOT and set breakpoints at desired locations.

3.      Launch the Dynamics Ax Debugger from the Start menu. The debugger must be opened directly in order to find and catch global breakpoints.

4.      Schedule the batch job to run. 

Example: To schedule work calendar delete to run in batch; launch the WorkCalendarDelete class in the AOT, click Batch tab, check Batch Processing check box and click Ok.

5.      Wait for the debugger to catch the breakpoints.


E. Version information.
Batch debugging on Windows Server 2003 works with Dynamics Ax 2009.  However, ahot fix (from partners site) is needed for Windows Server 2008.  The next release of Dynamics Ax will include a fix for both operating systems (2003 and 2008).

Know line numbers in X++ code

$
0
0

The following X++ code sample shows the behavior of the #linenumber directive.
static void LinenumberPhysicalJob(Args _args)
{
;
#define.Debug(light)

#if.Debug
info("Physical Line 8: # linenumber == "
+ int2Str(#linenumber));
#endif

/****************** Actual Infolog output
Message (08:55:26 pm)
Physical Line 8: # linenumber == 8
******************/
}

If you want to know function and line number you can use (in batch job also):

error(funcName()+' - '+"@GLS103859"+": "+int2Str(#linenumber));

Can Dynamics AX 2012 talk ?

$
0
0

I was playing around on some with some of the classes, and I found a  small thing that I wanted to share with the community.  How to enable the speech synthesizer in Dynamics AX 2012.  (This is the core essence of the “virtual burger” demo)
Here is the code that makes Dynamics AX speak:
image
You also need to add the System.Speech to the references in AX:
image
Making Dynamics AX 2012 talk in a demo is great, but the functional value is normally low.
Happy Daxing Smilefjes

Dynamics AX 2012 architecture for carton, packages and pallets

$
0
0

When shipping goods, there are many requirements that needs to be fulfilled. You have the ability to have correct addresses, customer requirements, freight forwarder requirements and legal requirements. To solve this we have many different “systems” in Dynamics AX 2012 (and earlier versions) to solve each of these requirements. Some of these systems are:
  • Sales Shipping Stats – Print the std. AX delivery label, and get volumetric information on the packingslip/invocie.
  • Bill of Lading – A document used with the freight forwarder to keep track of where to deliver the goods.
  • Packing material – A system to keep track of fees related to packing material
  • Ship carrier integration – A system for integrating to shipping software, like UPS Worldship og Clipper ship. Can also be used in „test mode“ if you don’t have such a shipping software.
I have gone as deep as possible into the subject to understand, and my judgment is “The data model for storing and maintaining package information in Dynamics AX 2012 is a mess!” In reality we have more than 4 different systems for maintaining package information. In reality this means we could have 4 versions of the truth. And to cover all eventualities and requirements of a advanced distribution company we need to make sure that we update all the necessary information in all 4 different systems. If Microsoft is reading this post, my suggestion for the next release is to combine these systems into one.
image
But it can take several years before our customers could benefit from such a change. So this blog post is about how we can make this work with what we have. First I will go deep on each of these 4 “systems”.

Sales shipping stats

The first “system” is the Shipping Specification. These are fields you register when you do packing slips.
image
Here you can also select to print out the standard AX delivery label.
image
The design is not very impressive and it clearly needs some customizations to make this acceptable for any customer of freight forwarder. But I guess that the idea from Microsoft is that shipment labels is not printed from Dynamics AX, but from a shipping software.
There also exists an inquiry form, where you can reprint the standard Dynamics AX 2012 delivery labels. I have found this menuitem available in the main manu under sales –> inqueries –> distribution –> Shipments. (Quite confusing since this is a terminology used for WMSShipments)
image
After the packingslip is posted, the user cannot change the data here.
The information of this is stored in a table called SalesShippingStat.
image
The “filling” of this information is manually done before doing a packing slip update, but it gets “marked” with Packingslip ID in the following code.
image
We see from this code, that the Sales Shipping Stat system does not have any uniqueness on the data or cartons. This code just related to get the summary of weight and cartons on the packingslip. Also see that the SalesParameters.useShippingStatOnPackingslip must be enabled for it to work.

Bill of Lading

The bill of lading is a receipt for goods that the carrier agrees to transport and to deliver to a designated person. It shows the list of goods delivered for transportation. In case of loss, damage, or delay, the bill of lading is the basis for filing freight claims. The bill of lading includes information about:
  • The customer order.
  • The carrier.
  • The origin and destination of the shipment.
  • The number of units in the shipment.
  • Freight charge terms.
  • Special instructions.
The bill of lading system is originating from the shipping module, and do not share any information with the SalesShippingStat system. It makes it possible to create a formletter like this :
image
The bill of lading can be both automatically and manually created,
image
The Bill of lading system is much more comprehensive than the sales shipping stat system, because it is possible to have some kind of unique ness.
The tables and fields used in this system is the following:
image
As seen here, the tables are missing the WMSPickPalletId or any SSCC-capable fields.
The tables refers to the following :
image
The automatic creation of BOL’s are done in the WMSShipment.ship method:
image
image
What I would expect from the BOL, is that the uniqueness of each package/pallet would be more clear. In a consolidated picking scenario we do have the WMSPickPalletID, that could provide this uniqueness, but this information is never passed into the bill of lading tables.
There is therefore no way to pass information like SSCC etc, or to use the BOL system as a basis for ASN/EDI processes. It is all about creating the Bill-Of-Lading document.

Packing material

The third way of dealing with packing material is the Packing material tables
image
The packing material is primarily for calculating a packing material fee. The table is normally filled in when a sales invoice is posted.
The tables look like this:
image
The packing material system therefore seems to only have one single function. To keep track of packing material fees, and not for logistical purposes.

Shipping carrier integration tables.

The shipping carrier interface feature allows Microsoft Dynamics AX customers to integrate with shipping software. The shipping software packages can pull information from Microsoft Dynamics AX, process packages, and then move their information into Microsoft Dynamics AX, eliminating manual entry and improving tracking visibility.
In the Shipping Carrier Interface for Dynamics AX 2009, Microsoft described this feature as this in the following whitepaper.
image
It is intended that the packing is handled in an external shipping, and then later transferred to Dynamics AX. This is described as a process that happens between packing slip and invoicing.
It is possible to manually fill in the information, by placing the carrier integration in “test-mode”. When posting the packing slip update, then the following screen will appear:
image
If we look deeper into the implementation of this ship carrier system, we see that it is interesting, because it does contain much what is needed. I would say that it is the best “survival candidate” of the 4 different systems.
What happens, when the packingslip is posted is the following:
image
PS! Check out the calculation of the ShipCarrierCODPackage.codAmount. It does not cover discounts!
The fields in the requester table contains the following:
image
It is a bit sad, that it does not transfer any information about already created pick pallets intothe ShipCarrierShippingRequest. In a consolidated picking scenario often these pick pallets have already been created, and it would simply the process of that was available for the shipping software.
It is in the process made so that the shipping software will return data into a staging table, that contains the following fields.
image
What is interesting here, is that the PackageId field, that is actually extended from WMSPickPalletId. So this means that pallet ID can be returned back. What is missing is information about width, height, length and volume. But Microsoft have placed this information in the table ShipCarrierCODPackage:
image
But this volumetric information is never filled in by standard AX. The table is only created from AX if there is a COD(Cash On Delivery). 

A solution suggestion

There are some facts. We have AX 2012 and AX 2014 is not here yet. Our customers hate large footprint customizations, because they make upgrades more difficult. And there is already many dependencies in AX 2012 that we need to take care of. So what do I do for my customers ? I cheat the system.
  1. When picking all picking transactions will be marked with a pick pallet ID.
  2. When Packing I have a new table, that is quite large and „flat“, but contains almost all I need to fiels for my labels, freight charges, weight, volumetric information ++++
  3. After packing is done per shipment, then I will generate information’s into all the 4 systems from the „New architecture“ system, and prevent the standard AX to generate this information.
image
This gives me much more control, and also the ability to have uniqueness on all outbound cargos, tracking +++. And my footprint is ZERO in standard AX, and compatible with my PDA and label printing system (BTI)
Posted in Dynamics AX 2012Warehouse ManagementX++| 3 Comments

Shipping Container Labeling guide

image
Major retailers have identified incorrect logistic unit (pallet) labeling as a major emerging supply chain issue. A recent sample audit found that approximately 44% of pallet labels are not meeting agreed upon industry requirements. The issues they face include:
  • No label has been applied
  • Label is in the wrong location
  • Information on the label does not match what is on the pallet
  • Multiple labels with different Serial Shipping Container Codes (SSCC) been applied
  • Pallet label will not scan
  • Stretch-wrap has been applied over the pallet label so it doesn’t scan
The following information contains guidelines and general information on how to create and apply good quality logistic (pallet) labels as per the standard requirements of the Retail Industry.
As the Retail Industry adopts the key principles of Efficient Consumer Response (ECR) there is increased demand for high quality data capture at all points in the supply chain. Although the industry has been numbering and bar coding trade items for a number of years, the biggest emerging problem in the supply chain is logistic unit labeling.
With the migration to more and more automated scanning in warehouses and distribution centres, it is imperative that suppliers and their logistics providers ensure 100% scannability of all bar codes which will bring mutual benefits to all trading partners. Printing and applying a good quality bar code label that complies to industry standards and which is scannable by all trading partners’ costs no more than printing and applying a bar code label that doesn’t scan.
This document and its recommendation should be read in conjunction with other GS1 technical guidelines as well as retailer specific documentation all of which can be accessed and downloaded from their respective websites. 

The Importance of Logistic (Pallet) Labels

The use of the logistic label incorporating the Serial Shipping Container Code (SSCC) by all parties in the supply chain, from manufacturers to transporters, distributors and retailers, is seen to be inevitable for the identification and tracking of pallets and other forms of logistic units. The purpose of the GS1 logistics label is to uniquely identify specific information about the pallet clearly and concisely in a standard format, to facilitate the process of moving products through the supply chain quickly and efficiently.
Industry Business Benefits of GS1 Logistics Label
  • Logistics Units are identified with a number that is unique worldwide
  • GS1 standards are global and apply through the entire supply chain, from raw materials supplier to manufacturer to distributor/wholesaler to end user/retailer.
  • Provides a link with bar coded information on a logistics unit and the information that is communicated between trading partners via electronic business transactions.
  • Use to identify contents of pallets, including stock data, use-by-dates etc
  • Contributes to efficient management of stock rotation at a glance
  • Saves costs by doing it once
  • Avoids multiple label types (industry standard)
  • Faster receiving, quick turnaround
  • Improves data integrity – use by date and quantity fields
  • Stock rotation based on use by date
  • Pallet tracking from vendor to retailer can assist product recalls
  • Works in conjunction with a Dispatch Advice – Advanced Shipping Notice (ASN)
  • SSCC can be used for both inter and intra-company transactions.
image
Fig 1: Example of Numbering & Bar coding Labelling Hierarchy 

Logistic (Pallet) Label Requirements for the Retail Industry

The GS1 Logistics Label can typically have many different formats. The SSCC is the only mandatory piece of information that must be contained on the label itself as ideally the information flow, which accompanies the physical flow of goods, is communicated between trading partners by EDI.
In practice, however, fully automated communication channels, which make it possible to rely exclusively on electronic files for retrieving information on the movements of goods, are not always available. In this situation there may be a requirement to add additional information to the logistics label to facilitate the process of the logistic units through the supply chain.
The purpose of the GS1 logistics label is to provide information about the unit to which it is fixed, clearly and concisely. The core information on the label should be represented both in machine (bar code) and human readable form. There may be other information, which is represented in human readable form only. 

What can go wrong? – Common Pitfalls

It is imperative that suppliers and logistics providers ensure 100% scannability of all barcodes. There are many reasons as to why pallet labels may not meet industry requirements. Here are some examples:
  • Label position incorrect
  • No pallet label applied
  • Multiple or mismatching SSCCs on the same pallet
  • Duplicated SSCCs
  • Damaged label such as creases and folds.
  • Will not scan due to incorrect bar code symbology or poor print quality
  • Label applied underneath stretch wrap
  • Pallet label applied to only one side of the pallet
  • Product information applied in the bar code does not match the product on the pallet
  • Pallet label bar codes not scanning
    • Ribbon wrinkle with thermal transfer application
    • Print-head element failure leading to a line through a black bar (split bar) within the bar code
    • Poor print quality – faint print due to the label print-head heat being too low or the print speed too high
    • Poor print quality – bleeding print due to the label printer print-head heat being too high with the print speed too low
  • Handwritten changes are not reflected in the bar code and are therefore not permitted on pallet labels
  • Label applied over carton joins/seams causing tearing
  • Label Dimensions
The business requirements for most users of GS1 Logistic Labels are met by using one of following:
  • A6 (105 mm x 148 mm) – 4 x 6 inch, which is particularly suitable when only the SSCC, or the SSCC and limited additional data, is encoded
  • A5 (148 mm x 210 mm) – 6 x 8 inch
However, the label can be any size that suits the labeller’s requirements, but it must be  large enough to carry all the information required together with the GS1-128 bar codes.
Factors influencing label sizes include the amount and a type of data required the content and X-dimensions of the bar code symbols used, and the dimensions of the logistic unit to be labeled.
image
Example label used for single product parcels and pallets, with GTIN information.
image
Example label used for parcels and pallets with AI 403 – Routing code without GTIN and product information. 

Logistics Label Requirements


Label Size

  • The minimum label size is A6, 105mm x 148mm, however larger label sizes such as A5 or A4 are permitted

Label Format

  • The label layout can be either portrait or landscape
  • Information contained in the top bar code can be broken down into more multiple bar codes if required, in order to maintain a larger magnification (bar width)

Label Location

  • Two identical labels, one placed on each fork entry side
  • Label should be placed between 50mm – 100mm from the right hand vertical edge
  • Label should be placed between 400mm – 800mm from the base of the pallet
  • The target placement of the label (top of SSCC bar code) is 600mm from ground level

Label Data and Application Identifiers

  • · SSCC (Serial Shipping Container Code) – AI (00)
    • It is recommended that additional information not be included in the SSCC (00) bar code unless feasible
  • GTIN of the product – AI (02)
    • The data format for AI (02) is that it has to be numeric and 14 digits in length. Note: that if your carton barcode number is 13 digits, you need to include an additional zero at the beginning to increase it to 14 digits
  • Quantity of trade units on the pallet – AI (37)
  • Date Information YYMMDD – Mandatory if this information is on consumer unit
    • Use By Date – AI (17)
    • Best Before Date – AI (15)
    • Packed on Date – AI (13)
  • Batch Number, if on consumer unit – AI (10)
  • Total Net Weight (excluding wooden pallet weight – A1 (310n) where n = number of decimal places eg. 3102 = x.xxkg, 3101 = xx.xkg, 3100 = xxxkg

What is a Serial Shipping Container Code (SSCC)

The Serial Shipping Container Code (SSCC) is a reference number or license plate used to uniquely identify logistic units (pallets). In Dynamics AX the Pallet ID is most used for this.
The SSCC acts as a “reference key” which can be stored in a computer system to which information can be added and shared amongst trading partners as the logistic unit moves throughout the supply chain. This unique “license plate” provides the opportunity to track and trace logistic units in the supply chain.
Scanning the SSCC marked on each logistic unit allows the physical movement of units to be individually tracked and traced by providing an information flow. It also opens up the opportunity to implement a wide range of applications such as cross docking, shipment routing, automated receiving etc.
The SSCC is used to uniquely identify goods on the way from sender to final recipient, and can be used by all participants in the transport and distribution chain.
image
Figure 3: The Use of the SSCC throughout the supply chain. 

Allocating an SSCC

The SSCC is a unique, non-significant, eighteen-digit number which is assigned by the company constructing the logistic unit. It remains the same for the life of the logistic unit. The SSCC is encoded in a GS1-128 Bar Code and is represented by the Application Identifier (AI) 00.
When assigning an SSCC, an individual SSCC must not be reallocated within one year of the shipment date from the SSCC assignor to a trading partner.
How you allocate an SSCC depends on the length of your assigned GS1 Company Prefix. Your company cab ne allocated a seven- to nine-digit GS1 Company Prefix.
image 
Application Identifier (00)
Used in the GS1-128 Bar Code to identify that the data following is an eighteen-digit Serial Shipping Container Code (SSCC)
Extension Digit
A digit (0-9) used to increase the capacity of the Serial Reference within the SSCC. The company that constructs the SSCC assigns the Extension digit to the logistic unit.
GS1 Company Prefix:
The GS1 Company Prefix is allocated by GS1 Member Organisations. GS1 allocates nine- or seven-digit GS1 Company Prefixes. It makes the SSCC unique worldwide but does not identify the country of origin of the unit.
Serial Reference:
A Serial Reference usually comprises seven digits (nine digits if the GS1 Company Prefix is seven digits) and uniquely identifies each transport package or logistic unit. The method used to allocate a Serial Reference is at the discretion of the company coding the package. In Dynamics AX this can be the number sequence of a WMS pallet
Check Digit:
Calculated using a mathematical formula.

Logistic Label Location on parcels

For parcels, symbol placement will vary slightly in practice; however the target placement for the bottom of the bar code symbol is 32 mm (1.25 inches) from the natural base of the item. The symbol including, its quiet zones, should be at least 19 mm (0.75 inches) from any vertical edge to avoid damage.
For smaller packages, which may be sorted automatically on a conveyor, the label should be placed on the largest surface.
image

Logistic Label Location on pallet

Industry Requirements is a GS1 Logistics Label to be placed on each fork entry side.
image
If the pallet height does not permit the pallet labels to be at least 400mm from the ground, then the pallet labels should be placed as high as possible on the right hand side on each of the fork entry sides of the pallet.
If the pallet needs to be stretch wrapped for stability, the pallet labels must be applied to theoutside of the stretch wrap as shown above in order to achieve optimum scan rates.
Where there is only one layer high of the trade unit on a pallet and the trade unit height is less than the height of the pallet labels. Please ensure that the bar codes of the labels are on the vertical face of the trade unit with the human readable portion of the labels folded over onto the horizontal surface of the trade unit as shown below. 

Typical Retailer Receival Processes

  • On arrival, a receiving checker will key the purchase order number or appointment number (for a multiple PO truck) into the PDA/Radio Frequency (RF) receiving unit.
  • The receiver will then proceed to the first pallet on the truck and scan all of the bar codes on the pallet label.
  • The RF scanner will send the information back to the WMS that will verify the quantities on that pallet against the order quantity on the PO. The WMS also verifies the pallet information is correct and checks that the date code on the item is suitable against the minimum and maximum dates set in the WMS.
  • If the pallet is accepted then the receiver moves along to the next pallet and repeats the process. If the pallet is not accepted the checker will conduct an investigation to identify the issue and will re label with a generic label if required.
  • Once all pallets are received, the checker will confirm the total quantity against the invoiced quantity and then close the load ready for the pallets to be put away by forklifts using RF scanners. The WMS determines the final location in the warehouse during the receival process.

Typical B2B ASN Receival Processes

  • On delivery into any receiving location, a receive checker will count the logistics units, (eg: number of pallets) and compare them to the driver’s consignment note and stamp the document accordingly. This is the initial proof of delivery.
  • The merchandise is then electronically scan receipted once it arrives at receiving locations. The Advanced Shipping Notice (ASN) must have been transmitted to the receiving company before the goods arrive in order for it to be validated (and rectified if necessary).
  • Receiving staff will validate that all SSCCsas noted in the ASNare physically received by scanning each Logistics label at the receiving dock.
  • When all SSCCs are accounted for, this will trigger the internal processing to update the stock and PO records and provides information to payment systems.
  • Logistic unit contents will be checked to ensure contents exactly match ASN details.

Manufacturer/Supplier Considerations

Pallet Label Quality Standards

Controlling label quality variation requires an integrated quality process incorporating people, processes, procedures and equipment.
Typically there are two options for the application of the pallet label:
  • At the point of manufacture, or
  • At the point of dispatch
The decision on when to apply the pallet label is dependent on individual organizations practices, including manufacturing, warehousing, order assembly or third party service providers.
The SSCC label standards should be incorporated into internal standards and available (electronically) to all factories and warehouses. The same standards are communicated to third party providers both at contract time and by the use of training packages, if necessary. Visual aids are encouraged in factories, warehouses etc to impart SSCC label standards, especially positioning of the labels.
With many automated and manual labeling systems check scanning controls can be purchased as part of the system, providing a level of automated bar code quality checking and control. These systems incorporate a check scanner at the front of the label printer so that as each label is printed the bar code is scanned to check quality. If a fail to read occurs the printer can print void on the erroneous label and re-print. After multiple failures i.e. 2 or 3, the unit will stop and raise an alarm. 

Considerations

  • Automate the data sources to simplify printing and reduce the need for data entry.
  • Label design tested and sent to GS1 testing service for its verification report
  • Document processes
  • Train staff to visually
    • check the pallet label and position applied
    • scan label barcodes to ensure readability
Incorporate checks for
  • Correct Bar code symbology (GS1-128)
  • Label placement
  • Label verification
  • Label Defects

Visual Checklist

Does the data encoded in the pallet label bar codes match the product on the pallet eg
  • GTIN
  • Batch number (if applicable)
  • Quantity
  • Date code information, eg. best before or use by date
The pallet labels applied to the pallet must contain the same SSCC. Pallet labels should not be placed over two separate cartons. Pallet labels should be placed on the outside of the stretch-wrap. Determine if any white lines running vertically through the black lines of the bar code that may hinder the bar code from scanning are evident. 

Audits

It is recommended to perform a compliance audit of the labels coming from each factory, warehouse and third party provider every quarter. Results should be reported back as percentage compliance and the issues found highlighted, together with photos, if necessary. 

Training

It is imperative that anyone that is required to print or apply pallet labels understand
the industry requirements. Training and documentation is widely available. 

Use of KPIs

Establish performance metrics as part of the pallet quality checking procedures. This could be plotted graphically by warehouse upon feedback from trading partners.
The data should be circulated to all factories and warehouses including third party logistics providers, each week with any relevant comments. Provide all of the raw data obtained to help find solutions to particular issues. Include the overall trend of performance for the last twelve months
Communicate progress to factory and warehouse managers at regular operations meetings to ensure the focus is maintained on the importance of achieving this and other key supply chain standards. 

Third Party (3PL) Logistic Service Providers

  • What role/service are they providing
  • Are they applying labels
  • Have you incorporated them into your logistic unit labeling requirements
  • What label application and quality control process do they have in place
  • Are they scanning any part of the label prior to dispatching goods
  • What is their label printer cleaning and maintenance process

Unpicking the entire order all at once

$
0
0
For orders in AX (I am addressing sales orders specifically here), if you want to unpick an order, you have to go to the sales line and, one-by-one, unpick the order. You click on the Inventory button and select the Pick option. In the form, check the autocreate box, then click Post All in the lower area of the form. If you regularly have to pick and unpick orders, especially if you have a lot of lines on your orders, this can become very tedious.

I wrote a job that will unpick the entire order. Now I'm going to put an Unpick button on the sales order form at the order level and allow certain users (security will be used) to do this. I will most likely allow multiple orders to be selected so you can unpick multiple orders with one click of a button. The code for the job I wrote is below:

    // For testing, I set the salesid here.
    // In the final code, I will have to pass in the salesTable record
    // from the salesTable_ds of the form
    SalesId salesid = 'RSO948671';
    TmpInventTransWMS   tmpinventTransWMS;
    InventMovement  movement;
    InventTrans inventTrans;
    salesline   salesline;
    inventtransWMS_pick inventTransPick;
    ;
    
    while select salesline
    where salesline.SalesId == salesId
    {
        select inventTrans
            where inventTrans.TransRefId == salesline.SalesId &&
                  inventTrans.ItemId == salesline.ItemId &&
                  inventTrans.StatusIssue == StatusIssue::Picked;
        if(inventTrans.RecId)
        {
            movement = null;
            movement = InventMovement::construct(salesLine);
            inventTranspick = new InventTransWMS_Pick(movement,tmpInventTransWMS);
            tmpInventTransWMS = null;
            tmpInventTransWMS.initFromInventTrans(inventTrans);
            tmpInventTransWMS.InventQty = inventTrans.StatusIssue == StatusIssue::Picked ? inventTrans.Qty : -inventTrans.Qty;
            tmpInventTransWMS.insert();
            inventTransWMS_pick::updateInvent(inventTransPick, tmpInventTransWMS);
        }
    }

AX2012: Update Invent Registration from code

$
0
0

This bit of code simply grabs the first InventTransOrigin record where the InventTransID's match, then grabs the FIRST record of the InventTrans table where it matches up with the origin... regardless of status. The issue I was running into was even if it was received/registered, whatever status, it would grab the first InventTrans and override the record and it's InventDim record as well.
So... It works, but not really because it totally messes up all your transactions if you receive more than once against the same PO line
------------------------------------------------------------------------------------------------------------------

Here's a job to update Invent Registration in AX2012. Feel free to try the following job in your testing/development environment.
static void DEV_InventTransRegistrationFromCode(Args _args)
{
    InventTransWMS_Register inventTransWMS_register;
    InventTrans             inventTrans = InventTrans::findTransId( "<inventTransId>");
    InventSerialId          id1 = "<serialId1>", id2 = "<serialId2>" ;
    TmpInventTransWMS       tmpInventTransWMS;
    InventDim               inventDim = inventTrans.inventDim();
   
    inventTransWMS_register = inventTransWMS_register::newStandard(tmpInventTransWMS);
   
    tmpInventTransWMS.clear();
    tmpInventTransWMS.initFromInventTrans(inventTrans);
    tmpInventTransWMS.InventQty = 1;
    inventDim.inventSerialId = id1;
    tmpInventTransWMS.InventDimId = inventDim::findOrCreate(inventDim).inventDimId;
    tmpInventTransWMS.insert();
   
    inventTransWMS_register.writeTmpInventTransWMS(tmpInventTransWMS,
                                                   inventTrans,
                                                   inventTrans.inventDim());
   
    tmpInventTransWMS.clear();
    tmpInventTransWMS.initFromInventTrans(inventTrans);
    tmpInventTransWMS.InventQty = 1;
    inventDim.inventSerialId = id2;
    tmpInventTransWMS.InventDimId = inventDim::findOrCreate(inventDim).inventDimId;
    tmpInventTransWMS.insert();
   
    inventTransWMS_register.writeTmpInventTransWMS(tmpInventTransWMS,
                                                   inventTrans,
                                                   inventTrans.inventDim());
   
    inventTransWMS_register.updateInvent(inventTrans);   
}

How to create return Order from code

$
0
0
staticvoid SR_CreateReturnOrderAfterInvoice(Args _args)
{
CustInvoiceJour _invoiceRec;
str _returnReason;
CustInvoiceTrans custInvoiceTrans;
SalesLine salesLine;
SalesTable newRetOrder;
CustInvoiceJour custInvoiceJour;

SalesTable createReturnOrderHeader(CustInvoiceJour invoiceRec)
{

SalesTable old, newRec;
boolean bChecksOk = true;
;

old = SalesTable::find(invoiceRec.SalesId);
newRec.initReturnFromSalesTable(old);
newRec.CustAccount = old.CustAccount;

newRec.initFromCustTable();

newRec.CustInvoiceId = invoiceRec.InvoiceId;
newRec.ReturnDeadline = today();
newRec.ReturnReasonCodeId = ’21′; // Defective
newRec.SalesType = SalesType::ReturnItem;
newRec.SalesTaker = SysCompanyUserInfo::current().EmplId;

if ( newRec.ReturnReasonCodeId == ” && CustParameters::find().ReturnOrdersReasonReq ||
newRec.ReturnReasonCodeId != ” && !ReturnReasonCode::exist(newRec.ReturnReasonCodeId) )
{
checkFailed(strfmt(“@SYS26332″, fieldid2pname(tablenum(SalesTable), fieldnum(SalesTable, ReturnReasonCodeId))));
bChecksOk = false;
}

if ( bChecksOk && newRec.validateWrite())
{
newRec.insert();
}
else
{
throw error(“@SYS18722″);
}

return newRec;
}

ttsbegin;

// first we need to create the sales order header for the return order
select custInvoiceJour where custInvoiceJour.RefNum == RefNum::SalesOrder && custInvoiceJour.InvoiceId == ’101231′;

newRetOrder = createReturnOrderHeader(custInvoiceJour);

while select * from custInvoiceTrans where custInvoiceTrans.SalesId == custInvoiceJour.SalesId
&& custInvoiceTrans.InvoiceId == custInvoiceJour.InvoiceId
&& custInvoiceTrans.InvoiceDate == custInvoiceJour.InvoiceDate
&& custInvoiceTrans.numberSequenceGroup == custInvoiceJour.numberSequenceGroup
{
// now we need to populate all the necessary fields for the new salesline
// using the existing invoice and the new sales order
salesLine.initFromCustInvoiceTrans(custInvoiceTrans);
salesLine.initFromSalesTable(newRetOrder);

// udpate the quantity
salesLine.ExpectedRetQty = -custInvoiceTrans.Qty;

if (salesLine.ExpectedRetQty > 0)
{
error(“@SYS53512″);
ttsabort;
}

// set the quantity and amount fields
salesLine.LineAmount = salesLine.returnLineAmount();
salesLine.SalesQty = 0;
salesLine.InventTransIdReturn = custInvoiceTrans.InventTransId;

//create the line
salesLine.createLine(true, false, false, false, false, false, false, false, salesLine.InventTransId);

// clear the buffer
salesLine.clear();
}

ttscommit;

info(strfmt(‘Newly created return order is %1′, newRetOrder.SalesId));

}

How to print sales Invoice ?

$
0
0

publicvoid printInvoiceReport(PurchId _purchId)
{
ReportRun report;
RecordSortedList List = new RecordSortedList(tableNum(VendInvoiceJour));

VendInvoiceJour VendInvoiceJour = VendInvoiceJour::findFromPurchId(_purchId);
PurchFormLetter PurchFormLetter;
;

if (VendInvoiceJour.RecId)
{

report = new ReportRun(new Args(ReportStr(PurchInvoice)));

List.ins(VendInvoiceJour);
report.args().object(List);
report.query().interactive(false);
report.report().interactive(false);
report.args().parmEnum(0);
report.args().parmEnumType(920);

report.args().name("KeepSettings");
report.args().caller(PurchFormLetter);
report.setTarget(PrintMedium::Screen);
report.printJobSettings().setTarget(PrintMedium::Screen);
report.printJobSettings().preferredTarget(PrintMedium::Screen);

PurchFormLetter = PurchFormLetter::construct(DocumentStatus::Invoice);
PurchFormLetter.updatePrinterSettingsFormLetter(report.printJobSettings().packPrintJobSettings(), PrintSetupOriginalCopy::Original);
PurchFormLetter.updatePrinterSettingsFormLetter(report.printJobSettings().packPrintJobSettings(), PrintSetupOriginalCopy::Copy);

// print invoice
VendInvoiceJour.printJournal(PurchFormLetter);
}
}

Get product attributes from X++

$
0
0

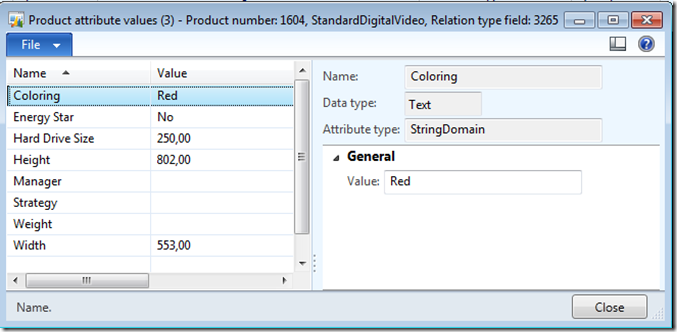
The product attributes is a nice feature, where we can add attributes to the products without adding any additional fields on to the inventory table.
image
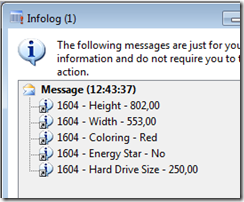
But I wanted to be able to fetch out only the attribute names and values from X++, that had values.
image
Here is how I solved it.

static void Demo_GetProductAttributes(Args _args)
{
inventTable InventTable;
EcoResProductAttributeValue ecoResProductAttributeValue;
EcoResAttribute ecoResAttribute;
EcoResValue ecoResValue;

while select InventTable where InventTable.itemid == "1604"
join RecId from ecoResProductAttributeValue
where ecoResProductAttributeValue.Product == InventTable.Product
join Name from ecoResAttribute
where ecoResProductAttributeValue.Attribute == ecoResAttribute.RecId
join ecoResValue
where ecoResValue.RecId == ecoResProductAttributeValue.Value
{
info(strFmt("%1 - %2 - %3", InventTable.ItemId, ecoResAttribute.Name, ecoResValue.value()));
}
}

Product Attributes in AX 2012

$
0
0

Product Attributes are a nice addition to AX for the 2012 release.  They give you a good way to further describe a product and its characteristics through user defined fields that would previously have required modification.  The drawback is that seeing and using these attributes throughout the application seems rather limited.
 Product attributes are basically user defined additional information fields for a product.  They are created and assigned to a category, and then a product is associated with the category.  Therefore, all the product attributes that are assigned to that category are assigned to the product and a value can be entered for each. 
Note: Product attributes can only be added to the Category Hierarchy that is assigned to the Category Hierarchy Type “Procurement Category Hierarchy”.
 A product can only have a single value for each of these assigned attributes.  These attributes are not specific to each piece of inventory, but rather to each product.  And they are not associated with a dimension like batch or serial number, but are a general specification of a product.
 The Attributes can be associated to both a Product and a Product Master.  But when used with a Product Master, in conjunction with the Constraint-based Configuration, they can be used to define a deep range of input values for creating the product variants. 

 Attributes are created by first defining an attribute type.  The attribute type simply identifies the type of data and the range or list of values that can be entered for the attribute. 
Product Information Management > Setup > Attributes > Attribute Type
 

When at Attribute Type is created, a “type” is assigned.  The choices for a type are as follows:
  • Currency – A currency value that can be left open or limited to a value range
  • DateTime – A date and time stamp that can be left open or limited to a value range
  • Decimal – A numerical value with a unit of measure that can be open or limited to a value range
  • Integer – A numerical value with a unit of measure that can be open or limited to a value range
  • Text – An unspecified text field, or a predefined set of possible values
  • Boolean – A checkbox
 The attribute is then created and associated to an attribute type and given a default value.  A description as well as a Help text can be entered to further define the attribute.
Product Information Management > Setup > Attribute > Attribute
 

The next step would be to assign product attributes to a category in the procurement hierarchy.  Here is one of the confusing parts: This can only be done through the Procurement and Sourcing Module.  If the exact same category hierarchy (in an identical form) is opened through the form in Product Information Management, Product Attributes is not an option.
 To add attributes to a category open the following form?
Procurement and Sourcing > Setup > Categories > Procurement Categories
 

In the tree on the left, additional categories can be added and sorted to develop the desired structure.  The attributes are then added to the “Product Attributes” section, where you can also specify whether attributes should be inherited from the parent category.
 The last steps are to assign the category to the product and define the attribute value.  This is done from the Released Products form in Product Information Management module.
 

From the desired product, click the Product Categories button to open the form where the product is associated to a category.  For the Category Hierarchy, the Procurement Hierarchy should be selected and the category will be the category with the appropriate attributes specified.
 

Then, back on the product, click the Product Attributes button to see and specify all the values for the attributes assigned to the product.
 

Product attributes are used by default in on the Procurement and Sourcing module, almost exclusively for viewing in requisitions, catalogs and purchasing functions.  Unfortunately, it appears that use in any other area of AX would require modification.  But this is still a great way to add more specification and detail to products that previously could not be done.

Label IDs in Dynamics AX 2012

$
0
0


Dynamics AX handles text localization by using a label ID (e.g. @SYS1234) in code and metadata; the real text is looked up then based on user’s language. .NET developers may recall localization resources and satellite assemblies and it’s indeed a very similar principle.
There are few changes in Dynamics AX 2012 regarding labels, mostly because of the movement of application files to database (model store). Labels are now located in AOT (Label Files node) or – from another perspective – in ModelElementLabel table in database.
New label files are still created by Label file Wizard, but the existing ones are imported and exported in AOT, not as before by direct manipulation with .ald files in the application directory.
This alone is a quite confusing change for many people and even more radical changes were made for labels saved in a version control system.
Version control
If you create a new label, let’s say in the ABC label file, ID of the new label is @ABCx (e.g. @ABC42). It was exactly the same in previous versions too.
But if a version control is active, it’s different.
In case of active version control, a temporary label ID is created at first. It looks somehow like @$AA1 (I think one temporary label file is created for each user-defined permanent file – sequentially from AA to AB, AC etc.).
This temporary ID is replaced by a “normal” ID (i.e. ID corresponding to the label file name) when inserting to the version control. Label ID is replaced also in code and metadata, but only if these objects are checked into version control together with the label file.
What are these temporary IDs good for? If every developer has his own Dynamics AX environment (as recommended), it’s necessary to guarantee that no duplicated IDs are created on different places. It used to be accomplished by Team Server which centrally assigned individual IDs. The current solution doesn’t require any central component for development; each environment assign label IDs by its own. Only when inserting to version control, permanent label IDs are assigned, which is a serial operation without any risk of ID conflict.
Version control in Label editor
Version control commands are accessible from Label editor. They work similarly as for other objects (labels are saved in version control as good old .ald files), just be sure that the right label file (field Label file ID) is selected.
Potential problems
And what if I don’t check in code and labels together?
Let’s show it by an example:
I create two labels and code using them. Notice that they are temporary IDs prefixed by @$:
I insert the code to version control but I forget the label file:
Code is saved to version control without any change and thus using temporary IDs:
Such code obviously won’t work correctly in other AX instances. But if I check in the code again, now with the label file:
temporary IDs are correctly replaced. You also get an infolog message enumerating changed objects:
Another situation arises if you insert labels to version control, but omit some code. All code not included in the check-in stays the same and continue to use temporary IDs. Fortunately, it’s not difficult to find the right permanent label, because the text of the temporary label is changed to contain such information:
However, the fix must be done manually.
No matter how we achieved the goal, now we can run the code with correct labels:
Merry Christmas :-)

2 Comments

  1. Tom says:
    Hi,
    Will this also work when the label files are located in another model? Thus the application objects are located in another model.
  2. Martin Dráb says:
    Yes, this works too. I don’t think AX cares about models in this whole logic.

Inside SalesFormLetter class : ReArrange

$
0
0

Many times before I have made changes to the salesFormLetter classes and every time I went in there I was afraid ( as a figure of speech ) of the reArrange method. The whole thing was clear to me from a functional point of view, but the technical side of it was another pair of sleeves. As for today, I needed to add some additional functionality to the sales invoice grouping and there for I had no other options than to start digging into the code for rearranging invoices. Well so the goal of this article is clear by now, so let’s start.
For the post, I will go through the code of rearranging invoice for 2 sales orders with a different customer account but with the same invoicing account.

SalesEditLines form

When posting the invoices via Accounts Receivable à Setup à Sales Update à Invoice, we see the following when we have selected the two sales orders for invoicing.

SalesParmTable table before rearrange

Before rearranging, let’s take a look at the tables in SQL server to see what’s going on in there. As we can see in the following screen, the SalesParmTable table contains the following data for the current run. We can see that both orders have a SalesParmTable record in there.
Every time an instance of the SalesEditLines form is ran, a system sequence number is fetched to log every action that will be done for the current instance. This way we have a history for the invoice and how it has been grouped / posted. The TableRefID field will be an important aspect of the rearranging as to be seen later on.

SalesParmLine table before rearrange

The following data is currently in the SalesParmLine table. Here you will find a line for every related sales order line to be posted. Here we also see the references to the sales orders and lines and also important is the reference to the SalesParmTable records in the TableRefId field.

Hitting the rearrange button

Now we start rearranging. This happens in the SalesFormLetter_Invoice class, Methodrearrange. Except from the check if the code is executed on the server, this is the first interesting piece of code.
This calls the SalesSummary classes. These are used here to build the query object with the invoice lines to be processed. So let us step into that.

SalesSummary classes

In this case, the construction of the SalesSummary class will be this case:
Additionally, inside the new method, the SalesSummaryFields is built to determine which fields will be used to sum by. The setup of these fields can be found here: Accounts Receivable à Setup à ParametersTab page
Summary
Updates, Button Summary update parameters.
After the construction is done, the method will be called to create a query object containing the invoice lines to be posted. The actual query building happens on the SalesPurchSummaryModel_Account class.
Basically the related order table is added and all the fields that are in the update parameters are added as sort fields to begin with. (Detail : It aren’t actually sort fields, but the ordering mode on the query is set to group by)

Looping the SalesParmSubTables

First line

After the query is built, we start looping the SalesParmSubTables and SalesParmSubLines. Important to note is that the subtables are actually a sort of copy of the parm tables to do the selections and to be able to alter the SalesParmTables while processing. At this point, this is the contents of the tables is like this:
Interesting thing to see is that the TableRefID fields are used to link the parm / sub tables together. At this point we arrive at the following code with the first SalesParmSubTable.
As we are doing this with the first line (VO000019) the UpdateParmTable is not executed here. What does happen is that a new SalesParmTable is created with a new TableRefId. (This parm table will be used to group the others on).
Now we have a SalesParmTable that will be the one where the lines will be grouped together on. The next step will be the code that moves the parm line from the original (TableRefId 00006286) to the new SalesParmTable. (TableRefId 00006288) and marking the SalesParmSubTable to be linked to the new SalesParmTable.

Second line

Now the second line from the second order is fetched and processed. First difference here is that the createNewJournal method will return false. When peeking in the insides of that we come to the following code.
This implicates that there will be no second SalesParmTable will be added. The SalesParmLine record will just be moved to the summary SalesParmTable.
The result after the second line is processed is this :
Now both the SalesParmLines and SalesParmSubLines are grouped on the newly created SalesParmTable.
What happens next is the splitting functionality for sites and delivery information but I will not go in the details of this here.

Cleanup

When the grouping is done, the SalesParmTables that have no reference anymore in the sub tables will be deleted. So the two lines are moved to a newly created SalesParmTable and then the originating SalesParmTables are erased.

Result

The result is one invoice with two lines on it. Additionally, it is also possible to check the data in the SalesParmLines and SalesParmSubTables to check the history of the grouping.
  1. August 10th, 2010 at 13:49 | #1
    Nice and clear post!!
  2. Michael Reyntjens
    October 8th, 2010 at 07:52 | #2
    Kenny, zelf ik versta wat er hier gaande is !
    Verborgen talent als trainer !
  3. July 20th, 2011 at 16:03 | #3
    Friend,
    Thanks for the article. Can you please tell me how do you rearrange the orders in AX? Is there a button for doing it? If yes, where is the button located?
    Regards,
    Zahir Khan
  4. UK
    September 22nd, 2011 at 14:04 | #4
    What is the reason behind system rearranging this . Dont understand the neccessity of doing this.
  5. September 22nd, 2011 at 15:41 | #5
    This is kinda like big functionality in Ax. The system does this so that you as a company can decide how you are going to group picking lists, invoices, …
    For example : When you have 10 orders from 10 different customers, but they all have the same invoice accounts. These 10 orders will be grouped on 1 invoice and the invoice customer will receive 1 invoice.
    The same could be done with packing slips. 10 orders could have 10 different customers but they share the location where it is to be delivered.

calculate total sales order or sales quotation amount / discounts / tax etc., through code( X++ ) in AX

$
0
0

I have seen that few developers have a problem in getting the total Sales order amount or sales quotation amount with Tax /discounts etc., in the preferred currency before invoicing because these are not stored into any specific tables.

The below form shows, where we can see the sales totals, Accounts Receivable->Sales Order-> Inquiries Menu->Totals

Now, this can be achieved through code using SalesTotals class. Check out the below code snippet.


SalesTotals salesTotals;
SalesTable salesTable;
container displayFields;
strtotalTax, amountWithoutTax, amountInclTax;

salesTable=salesTable::find('SO-1112345');
salesTotals SalesTotals::construct(salesTable, salesUpdate::All);
salesTotals.calc();
displayFieldssalesTotals.displayFieldsCurrency(salesTotals.currencyCode());

amountWithoutTax = conpeek(displayFields, TradeTotals::posBalance());
amountInclTax = conpeek(displayFields, TradeTotals::posTotalAmount());
totalTax = conpeek(displayFields,TradeTotals::posTaxTotal());

In the above way, we can get all the values available in the totals form in the Sales Order Form by changing the TradeTotals values.

We can get the values in the desired currency by providing a valid currency as a parameter to the displayFieldsCurrency method.

In the same way we can apply it to get the Sales Quotation totals also but instead of salestotals we need to use SalesQuotationTotals class.

Vendor Prepayment Functionality in Microsoft Dynamics AX 2012

$
0
0

Prepayments are a common business practice, with organizations issuing prepayments to vendors for goods or services before those goods or services are fulfilled. To minimize risk, you can track prepayments by defining the prepayment on a purchase order. Vendors can also create a prepayment invoice that is associated with a purchase order.
New prepayment functionality is available in Microsoft Dynamics AX 2012, making it easier for organizations to complete, manage and track prepayments to vendors. There are five steps involved with processing a prepayment for a purchase order, which include the following:
  1. Create the purchase order.
  2. Set up the prepayment.
  3. Post the prepayment.
  4. Make a payment.
  5. Settle the payment against the final invoice.

Create the Purchase Order

The first step toward simplifying the prepayment process is by creating a purchase order. Take a look at Figure 1 to see an example of a created purchase order.
Figure 1: Here is an example of a purchase order (so for example, PO 0000511 of $146,200 USD is set up for Vendor 3003)
Figure 1: Here is an example of a purchase order (so for example, PO 0000511 of $146,200 USD is set up for Vendor 3003).

Set up the prepayment

After a purchase order is created, you must then set up the prepayment that will be associated with it. To do that, click on the Purchase tab in the top ribbon, and then click Prepayment (see Figure 2).
Figure 2: To set up prepayment in a purchase order, simply click on the Purchase tab, and then click Prepayment
Figure 2: To set up prepayment in a purchase order, simply click on the Purchase tab, and then click Prepayment.
After clicking Prepayment, a window will pop up, asking for you to enter details regarding the prepayment (see Figure 3). In the Description field, enter the description of the prepayment that you’re creating, and then click the prepayment basis that you wish to apply.
With the prepayment basis, you have two options: Fixed or Percent. With the fixed option, you can apply a fixed dollar amount that you wish to apply to the purchase order amount. In Figure 3, we have entered a fixed amount with the value of $100,000 – so if we choose this prepayment option, $100,000 will be applied to the purchase amount.
With the percent option, you can choose to apply a certain percentage of the purchase order amount (see Figure 4). In Figure 4, we have entered 10% as the percent value, so 10% of the purchase order will be applied as prepayment. As you can see, the system calculates the 10%, showing the prepayment as $14,620, which is of course 10% of the total $146,200 purchase order amount.
Figure 3: One of the two prepayment options available in Dynamics AX 2012 is Fixed Amount. With a fixed amount, you can specify the dollar amount you wish to apply to your purchase order with your prepayment
Figure 3: One of the two prepayment options available in Dynamics AX 2012 is Fixed Amount. With a fixed amount, you can specify the dollar amount you wish to apply to your purchase order with your prepayment.
Figure 4: The other prepayment option that’s available is Percent Amount. With a percent amount, you can specify the percentage of the purchase order that you wish to apply to the whole purchase order with your prepayment
Figure 4: The other prepayment option that’s available is Percent Amount. With a percent amount, you can specify the percentage of the purchase order that you wish to apply to the whole purchase order with your prepayment.
For the purposes of this demonstration, we’ll keep the prepayment as 10% of the purchase order amount. After you define your prepayment values, enter a Prepayment Category ID from the dropdown, and then click Save (see Figure 5).
Figure 5: After you define the values that you wish to apply to your purchase order, save the prepayment record
Figure 5: After you define the values that you wish to apply to your purchase order, save the prepayment record.
If after creating a prepayment you decide you don’t want to apply it to the purchase order, you can remove it by simply selecting the Remove Prepayment option in the top ribbon (see Figure 6).
Figure 6: Remove a prepayment on a purchase order by simply selecting the Remove Prepayment option in the top ribbon
Figure 6: Remove a prepayment on a purchase order by simply selecting the Remove Prepayment option in the top ribbon.
After you have configured the prepayment you wish to apply to the purchase order, confirm the order by clicking the Confirm option.

Post the prepayment

After you set up the prepayment basis toward a particular purchase order, you can then post the prepayment. To do that, go to the Purchase Order header, then to the Invoice option, and click Prepayment Invoice (see Figure 7).
Figure 7: To post a prepayment, go to the Purchase Order header, then to the Invoice option, and then click Prepayment Invoice
Figure 7: To post a prepayment, go to the Purchase Order header, then to the Invoice option, and then click Prepayment Invoice.
After clicking the Prepayment Invoice, enter the invoice description and post the prepayment invoice.
Once the prepayment invoice is posted, check to make sure that the vendor transaction and vendor balance reflect the prepayment invoice transaction (see Figure 9).
Figure 9: Check to make sure that the vendor transaction and vendor balance correctly reflects the prepayment invoice transaction once a prepayment is posted
Figure 9: Check to make sure that the vendor transaction and vendor balance correctly reflects the prepayment invoice transaction once a prepayment is posted.

Make a payment

After creating the prepayment and posting the prepayment invoice, it’s now time to make a payment. To do so, first create a Payment Journal, mark the prepayment amount, and then post the journal.
Figure 10: When making a payment on a prepayment, you first create a Payment Journal, mark the prepayment amount, and then post the journal
Figure 10: When making a payment on a prepayment, you first create a Payment Journal, mark the prepayment amount, and then post the journal.
At this stage, it is important to also check the vendor transactions and vendor balance (to ensure that everything continues to match up correctly).
Figure 11: Make sure that when you make a payment on your prepayment, that the vendor transactions and vendor balance match up to ensure correct payment
Figure 11: Make sure that when you make a payment on your prepayment, that the vendor transactions and vendor balance match up to ensure correct payment.

Settle the payment against the final invoice

The final step of the prepayment process is to settle the payment against the final invoice. To accomplish this, first go to Purchase Order and Receive the Products, and then go to the Invoice section and click Invoice. When you’re on the opened form, click Apply Prepayment (see Figure 12).
Figure 12: To apply a prepayment, first go to Purchase Order and Receive the Products, and then go to the Invoice section and click Invoice. Click the Apply Prepayment option
Figure 12: To apply a prepayment, first go to Purchase Order and Receive the Products, and then go to the Invoice section and click Invoice. Click the Apply Prepayment option.
After clicking Apply Prepayment, a screen will open to show the prepayment amount that can be applied to the Invoice Amount (of the purchase order). The “Available application amount” field indicates the prepayment amount (see Figure 13).
Figure 13: After you click Apply Prepayment, a screen will pop up displaying the prepayment amount (in the “Available application amount” field) that you can apply to the Invoice Amount of the purchase order
Figure 13: After you click Apply Prepayment, a screen will pop up displaying the prepayment amount (in the “Available application amount” field) that you can apply to the Invoice Amount of the purchase order.
Then select the prepayment to be applied (or if you’ve set up multiple prepayments, you can select those as well), and then click Apply Prepayment (see Figure 14).
Figure 14: If you’ve set up multiple prepayment amounts, you are allowed to apply them to the purchase order (if you select them). Once the prepayment(s) are applied, click on Apply Prepayment
Figure 14: If you’ve set up multiple prepayment amounts, you are allowed to apply them to the purchase order (if you select them). Once the prepayment(s) are applied, click on Apply Prepayment.
After applying the prepayment, enter the invoice description and post the invoice (see Figure 15).
Figure 15: After you apply the prepayment, enter the invoice description and post the invoice
Figure 15: After you apply the prepayment, enter the invoice description and post the invoice.
After the prepayment has been applied and posted, check the open transaction that still needs to be paid to the vendor, and confirm the amount (see Figure 16). In our case, since we applied a prepayment that is 10% of our $146,200 purchase order (which equals $14,620), we see that we still owe $131,580 on the purchase order after our prepayment ($146,200 – $14,620 = $131,580).
Figure 16: After applying your prepayment, confirm that the remaining amount you owe on the purchase order is correct
Figure 16: After applying your prepayment, confirm that the remaining amount you owe on the purchase order is correct.
By using the Microsoft Dynamics AX 2012 prepayment functionality, you’re able to gain greater financial visibility and more cohesive organization of your financial processes. Also, with this enhanced insight, you support and sustain your financial relationships with vendors – crucial for boosting and maintaining business success.
If you would like more information on prepayment functionality in Microsoft Dynamics AX 2012, please email us at dynamics@ignify.com.
Partha Chattopadhyay is a Manager in the Microsoft Dynamics AX practice at Ignify. Ignify is a leading provider of Microsoft Dynamics ERP solutions to mid-market and Enterprise businesses. Ignify has been ranked as Microsoft Partner of the Year Winner in 2012, 2011 and 2010, and in the Microsoft Dynamics Inner Circle, Microsoft Dynamics Presidents Club in 2009. Ignify has offices and team members in Southern California, Northern California, Arizona, Tennessee, Illinois, Washington, Canada, Singapore, Malaysia, India, Philippines, and Jakarta.

Prepaid Purchase Orders Management in Microsoft Dynamics AX 2012 – [Vendor Prepayments]

$
0
0

Vendors asking prepayment for their orders could be a very common scenario as part of their business policies. When this scenario arises, your business/finance team should be able to create a purchase order and create and track a prepayment against this.
image
In Microsoft Dynamics AX 2009, it was not possible to make a prepayment related to a purchase order and these were always two separate manual processes. There was no transaction link between the prepayment for a purchase order and the actual purchase order.
AX 2012 brings in this small yet very useful functionality. In today’s I will explain about this functionality of AX 2012 and how can be used by an organization.
We will analyze an example where an organization orders 500 items from a vendor and vendor asks for a prepayment as this is a business policy for them. The purchase order prepayment process will basically flow through the below high level steps.
  1. Purchasing agent creates the purchase order and submits a request to AP coordinator to process prepayment.
  2. AP Coordinator/Manager sets up and processes the required prepayment.
  3. Settle the payment against the final invoice.
Purchasing agent creates the purchase order and submits a request to AP coordinator to process prepayment:
  • Create a new purchase order under Accounts Payable module for vendor 3107, Alpine Electronics. Let us make a note of their balance before we proceed with a prepaid PO processing for them.
image
  • Create purchase order header and PO line for item(1001) for 600 quantity.
image
  • Click the Purchase tab and click Prepay > Prepayment button.
  • Enter a suitable description for the prepayment for purchase order and enter the prepayment value. In our case, let us assume that vendor has requested 10% prepayment.
  • Enter 10% and verify that the prepayment remaining value which will be 10% of the total PO value. Note that you can also specify a fixed prepayment amount if vendors requests so.
image
Prepayments can be removed after it has been setup on a PO by clicking the Remove prepayment button. if business later cancels the prepayment.
image
*Note: The prepayment category ID is the procurement category against which the prepayment will be tracked
  • Now, Confirm the purchase order after saving the prepayment details.
image
Posting the Prepayment Invoice:
  • To do this, click the Invoice tab in the purchase order form and click Prepayment invoice button.
image
  • Now enter invoice number and click Post > post button to post the prepayment invoice.
image
  • Note the newly created vendor transaction and also take a note of the affected vendor balance. Recording of the prepayment invoice increases the vendor balance. In this scenario it is $4100.25(Vendor balance before prepayment invoice) + $87,720(Prepayment invoice amount).
image
image
AP Coordinator/Manager processes the required prepayment:
  • It’s now AP Manager’s task to make the payment for the prepayment which was requested for the purchase order.
  • Navigate to AP > Journals > create a new payment journal.
  • Click payment journal line and click Functions > Settlement button and select the prepayment invoice.
image
  • Print the check for vendor and post the payment. Make a note of the vendor transactions and the affected vendor balance also after this step. Vendor balance decreases after the payment has been made.
Settle the payment against the final invoice:
  • When the goods arrive and you receive the final invoice from vendor, settle the prepayment with it.
  • Navigate to Purchase order screen > Invoice tab and generate an invoice.
  • Click Apply prepayment button.
image
  • You will notice the prepayment record appearing here in this form. The “Select prepayments to apply” grid displays all the prepayments which could exist for the PO.
  • Also notice the invoice amount is $877200 and available application amount is $87,720 which is 10% of the invoice which was paid as a prepayment to the vendor.
image
  • Finally Select the prepayment and click Apply prepayment button. You will see that the “’Total amount of the prepayment that will be applied to the invoice will be 87720.$.
  • Make a note that one line gets added in the vendor invoice line.
image
  • Now, Post the purchase order invoice by clicking Post.
  • With the PO invoice posted, let us now analyze the financial voucher and the impact on vendor balance.
image
image
End to end linking of all related transactions and their tracking in an ERP system helps finance and accounting team in a great deal during transaction reconciliations. This also ensures reduction in accounting team’s efforts and time needed to spend in the ERP system.
Microsoft Dynamics AX 2012 ensures this.
Pretty straight forward and neat. Smile
Microsoft Dynamics AX-Powerfully Simple
Do not hesitate to contact me in case you need any clarifications regarding this.
Till next time!
Thanks
Sandeep

Opening external application(visual studio) or running external application from Dynamics Ax

$
0
0

Below is the job that can open visual studio from the x++ code. Through the same type of code any executable can be run through dynamics Ax.
static voidVisualStudioOpeneingJob(Args _args){System.Diagnostics.Process visualStudioProcess;//This process will start visual studio processSystem.Diagnostics.ProcessStartInfo visualStudioProcessStartInfo; //This process will contain the process argumentsstr visualStudioProcessArguments; // The variable that will be used to provide argument to the process
str visualStudioInstallDirValue;
str projectFullPath = //mentiond your project name here fully qualified path e.g @’C:\VisualStudioProjects\Name.csproj’;
visualStudioProcess = new System.Diagnostics.Process();
visualStudioprocessStartInfo = visualStudioProcess.get_StartInfo();
visualStudioProcessArguments = ‘\”‘ + projectFullPath + ‘\”‘; //+ ‘ /Command \” Edit.Goto 110\”‘ //You can also provide command lines commands here
visualStudioInstallDirValue = @’C:\Program Files (x86)\Microsoft Visual Studio 10.0\Common7\IDE\devenv’;
visualStudioprocessStartInfo.set_FileName(visualStudioInstallDirValue);
// Setting arguments
visualStudioprocessStartInfo.set_Arguments(visualStudioProcessArguments);
visualStudioProcess.Start();
}
Viewing all 181 articles
Browse latest View live


<script src="https://jsc.adskeeper.com/r/s/rssing.com.1596347.js" async> </script>