Quantcast
Channel: Microsoft Dynamics Ax
Viewing all 181 articles
Browse latest View live

ax 2012 how to get the warehouse telephone number through code

$
0
0
static Container CustVendorInfo(Common _CustVendTable)
{
    LogisticsElectronicAddress          LogisticsElectronicAddress;
    LogisticsLocation                   LogisticsLocation;
    VendTable VendTable;
    CustTable Custtable;
    str phone,fax,email,url;
    RecId  RecId;    
    ;
   
    switch(_CustVendTable.tableid)
    {
        case tableNum(Custtable) : CustTable = _CustVendTable ; RecId  = CustTable.postalAddress().Location;
            phone = Custtable.phone();
            fax   = DirParty::primaryElectronicAddress(Custtable.Party, LogisticsElectronicAddressMethodType::fax).Locator;
            email = Custtable.email();
            url   = Custtable.url();
            break;  
        case tableNum(Vendtable) : VendTable = _CustVendTable ; RecId  = VendTable.postalAddress().Location;
            phone = Vendtable.phone();
            fax   = DirParty::primaryElectronicAddress(Vendtable.Party, LogisticsElectronicAddressMethodType::fax).Locator;
            email = Vendtable.email();
            url   = Vendtable.url();
            break;  
    }
   
    select firstOnly LogisticsLocation
        where LogisticsLocation.ParentLocation      == RecId
        && LogisticsLocation.IsPostalAddress        == NoYes::No;
    if (LogisticsLocation)
    {
        while Select LogisticsElectronicAddress
            where LogisticsElectronicAddress.Location    == LogisticsLocation.RecId
        {
            switch(LogisticsElectronicAddress.Type)
            {
                case LogisticsElectronicAddressMethodType::Phone:
                    phone = LogisticsElectronicAddress.Locator;        
                    break;
                   
                case LogisticsElectronicAddressMethodType::fax:
                    fax = LogisticsElectronicAddress.Locator;        
                    break;
           
                case LogisticsElectronicAddressMethodType::Email:
                    email = LogisticsElectronicAddress.Locator;        
                    break;
                   
                case LogisticsElectronicAddressMethodType::URL:
                    url = LogisticsElectronicAddress.Locator;        
                    break;
            }
        }
    }
   
   
    return [phone,fax,email,url];
}

Change current company

$
0
0

Eitan Mizrahi
POSTED BY EITAN MIZRAHI ON 14 JUL 2013 5:47 AM
Hello,

In AX 2009,

How can I change in code current company (curext), and keep staying on that company as long as I am on the form.

Thanks :)

Reply
 Muhammad Afsar Khan
POSTED BY MUHAMMAD AFSAR KHAN ON 15 JUL 2013 2:35 AM VERIFIED ANSWER VERIFIED BY EITAN MIZRAHI
The other way is to use appl.setDefaultCompany('ceu'); but its also wrap all code to a single condition.

How to deploy all AX2012 report

$
0
0
There're 3 different ways to deploy Dynamics AX2012 reports:
Through AOT
AOT > SSRS Reports > Reports > right click on report > Deploy Element

Through Visual Studio
Open the report project > Right click on the project or solution node > Deploy

Through PowerShell
Publish-AXReport -ReportName *


Through AOT
- Go to AOT > SSRS Reports > Reports > (right click on report) > Deploy Element
- Right click on the report node
- Click "Deploy Element"

Deploy AX2012 report through AOT

Through Visual Studio
- Open the report project
- Right click on the project or solution node
- Click "Deploy"

Deploy AX2012 report through Visual Studio


Through PowerShell
- Go to: Start > Administrative Tools > Microsoft Dynamics AX 2012 Management Shell
- Then enter Publish-AXReport -ReportName *

This will deploy all AX2012 reports into report server, you might want to do this after the initial installation as the report server doesn't have all the report there yet. It takes about 20 minutes for me to deploy all the reports (that's on my Hyper-V image, if run on better spec server, it could be much faster).

If you want to deploy a specific report, just replace the wildcard (*) with the report name.
Eg. Publish-AXReport -ReportName SalesInvoice

*It is the report name under AOT > SSRS Reports > Reports > SalesInvoice, not the project name under AOT > Visual Studio Projects > Dynamics AX Projects > SalesInvoiceReport


Publish-AXReport -ReportName * will deploy all report (use wildcard to deploy full set of report)


Report deployment in progress


Report deployment in progress


Report deployment in progress


Report deployment completed


Report name should be the name under AOT > SSRS Reports > Reports > SalesInvoice,
not the project name under AOT > Visual Studio Projects > Dynamics AX Projects > SalesInvoiceReport

Shortcut keys in AX 2012

$
0
0
Breakpoints
Command
Shortcut key
Remove all breakpoints.
CTRL+SHIFT+F9
Insert or remove a breakpoint.
F9
Enable or disable a breakpoint.
CTRL+F9
Open the Breakpoints dialog.
SHIFT+F9

Compilation and Help
Command
Shortcut key
Open the Scripts menu.
Scripts icon
Open Help.
F1
Show method parameter help.
CTRL+SHIFT+SPACEBAR
Execute the current job.
F5
Compile.
F7
Compile and close a method.
F8
Stop method execution (break).
CTRL+BREAK
Insert a file.
CTRL+ALT+H

Delete
Command
Shortcut key
Delete from the cursor to the end of the line.
Use SHIFT+END to select to end of line and then DELETE
Delete word to the right of the cursor.
CTRL+DELETE
Delete the word to the left of the cursor.
CTRL+BACKSPACE
Delete the current line.
CTRL+X (with cursor in line, no selection)

Edit
Command
Shortcut key
Insert script.
<SCRIPT NAME>
Insert document header.
///
Comment selection.
CTRL+E, C
Uncomment selection.
CTRL+E, U
Convert selection to lowercase.
CTRL+SHIFT+U
Convert selection to uppercase.
CTRL+U
Display all methods and properties for a selected class.
CTRL+SPACEBAR
Copy selection.
CTRL+C (with text selected)
Copy line.
CTRL+C (with cursor in line, no selection

Find and Replace
Command
Shortcut key
Open the Find dialog.
CTRL+F
Open the Replace dialog.
CTRL+R
Start incremental search..
CTRL+I
Move to next incremental search match in method.
CTRL+I
Reverse the incremental search direction.
CTRL+Shift+I
Remove a character from the incremental search string.
BACKSPACE
Stop the incremental search.
ESC

Go To
Command
Shortcut key
Go to a specific line.
CTRL+G
Go to the next page.
PAGE UP
Go to the previous page.
PAGE DOWN
Go to the top of the code.
CTRL+HOME
Go to the bottom of the code.
CTRL+END
Go to the start of line.
HOME
Go to the end of line.
END
Move one word to the left.
CTRL+LEFT ARROW
Move one word to the right.
CTRL+RIGHT ARROW
Go to the method definition.
F12
Go to the next error message.
F4

Lookup
Command
Shortcut key
Look up a label.
CTRL+ALT+SPACEBAR
Show label text.
CTRL+L
Look up a definition.
F12
Show the syntax of a method or property.
CTRL+SPACEBAR

Save
Command
Shortcut key
Save the selected text to a separate file.
ALT+S
Close the current TAB, discarding all changes since the last save.
F6
Close and save the current code editor window.
F8
Close the current window.
CTRL+F4

Select
Command
Shortcut key
Select all.
CTRL+A
Cancel a selection.
ESC
Select columns.
ALT+MOUSE SELECT
Select a line.
ALT+L
Select one word to the left.
CTRL+SHIFT+LEFT ARROW
Select one word to the right.
CTRL+SHIFT+RIGHT ARROW
Select text from the cursor to the start of the line.
SHIFT+HOME
Select text from the cursor to the end of the line.
SHIFT+END
Select the previous page.
SHIFT+PAGE UP
Select the next page.
SHIFT+PAGE DOWN
Select text from the cursor to the top of the code.
CTRL+SHIFT+HOME
Select text from the cursor to the bottom of the code.
CTRL+SHIFT+END
Indent the selected text.
TAB
Remove indentation.
SHIFT+TAB
Select area/column/block
ALT+MOUSE SELECT
Cancel selection
ESC
Show white space
CTRL+SHIFT+S

Undo and Redo
Command
Shortcut key
Undo the last action.
CTRL+Z (previous ten actions)
Redo the last action after an Undo.
CTRL+Y (previous ten actions)

AOT
Command
Shortcut key
Open the AOT
CTRL+D
Open a new Development Workspace
CTRL+SHIFT+W
Open a new Application Workspace
CTRL+W
Save all
CTRL+SHIFT+S
Select all application objects in a node
Select one or more application objects under a top-level node, and then press CTRL+A
Open the editor for an application object
CTRL+SHIFT+F2
Open the editor for a query or table
CTRL+O
Open the Comparison tool
Select one or more application objects, and then press CTRL+G
Compile an application object
F7
Go to the previous node
UP ARROW
Go to the next node
DOWN ARROW
Move the node up
ALT+UP ARROW
Move the node down
ALT+DOWN ARROW
Expand the current node
RIGHT ARROW
Collapse the current node
LEFT ARROW
Select multiple items
CTRL
Cancel the selection of an additional item
CTRL+SPACEBAR
Open the Properties sheet
ALT+ENTER
Open the Import dialog box
Select one or more application objects, and then press CTRL+SHIFT+I
Open the Find dialog box to find an element in the AOT
CTRL+F
Open the Help documentation for an element in the AOT
F1

SSRS Report Detailed Trial Balance error “The field with ID '0' does not exist in table 'LedgerTrialBalanceStagingTmp'”

$
0
0
I've been trying to open a report in the General Ledger > Reports > Detailed trial balance. In the form, I input a parameter for Ledger account.MainAccount. When I click OK, I got an error:
Error executing code: The field with ID '0' does not exist in table 'LedgerTrialBalanceStagingTmp'.
Stack trace
(S)\Classes\RecordInsertList\add
(S)\Classes\LedgerTrialBalanceDP\populateTmpTransDetail - line 100
(S)\Classes\LedgerTrialBalanceDP\processReportDetail - line 28
(S)\Classes\LedgerTrialBalanceDP\processReport - line 32
(S)\Classes\SrsReportRunRdpPreProcessService\executeWithContract - line 102
(S)\Classes\SrsReportRunRdpPreProcessService\executeRDLClasses - line 38
(C)\Classes\SrsReportRunService\preRunReport - line 26
(C)\Classes\SrsReportRunImpl\preRunReport - line 12
(C)\Classes\SrsReportRunController\runReport - line 42
(C)\Classes\SrsReportRunController\run
(C)\Classes\SysOperationController\startOperation - line 10
(C)\Classes\SrsReportRunController\startOperation
(C)\Classes\LedgerTrialBalanceController\main - line 9
If I click ok and again click Select it shows me duplicate of last two line of range. I am using MS Dynamics AX 2012 R2. Any help in this situation.
Regards
BSugitayasa
share|improve this question
 
Can you tell us what you've tried so far? Share your research and debugging results with us. –  Jeroen May 7 '13 at 9:03
 
I've tried to debug. error occurred in class LedgerTrialBalanceDP in method populateTmpTransDetail(). Error refers to a table LedgerTrialBalanceStagingTmp, but I got there I did not find the clue, when a table will add to the RecordInsertList. Thanks advance. –  BSugitayasa May 7 '13 at 10:25
add comment
I had the same problem today, it's a bug. You just need to change the RecordInsertList initialization:
\Classes\LedgerTrialBalanceDP\populateTmpTransDetail, Line 64:
Original line:
recordInsertList = new RecordInsertList(tableNum(LedgerTrialBalanceTmp), true, true, true, true, true, _ledgerTrialBalanceStagingTmp);
Change to:
recordInsertList = new RecordInsertList(tableNum(LedgerTrialBalanceStagingTmp), true, true, true, true, true, _ledgerTrialBalanceStagingTmp);
Compile forward, generate incremental CIL, and it's done.
Cheers
share|improve this answer
 
Dear @Fabio,Thanks for the advice. I have tried and have been successful. About duplicate existing range problem on \Classes\DimensionProvider\addAttributeRangeToQuery also been successful in fix. See More discuss in community.dynamics.com/ax/f/33/p/101831/206828.aspx#206828 –  BSugitayasa May 14 '13 at 2:35 

Duplicating Financial Dimension on Dialog box in GG > Reports > Transactions > Detailed Trial Balance

$
0
0
This question is answered
Hello Experts,
It's a default report.
I have one report "Detailed Trail Balance" for the first time when I click select for the General Journal Account Entry [and select Financial Dimension Branch = 01] and click ok than again click select for another time. The dialog box shows me two lines of Range although I have define only one range and the second line is duplicated. If I click ok and again click Select it shows me duplicate of last two line of range.
I am using MS Dynamics AX 2012 R2. 
Any help in this situation.
Regards,
Ahmed
  • Any suggestion
  • Dear Experts,
    Is there any patch or hot fix from the Microsoft to resolve this issue.
    Regards,
    Ahmed
  • Dear Experts,
    another problem which I forget to share with you, i.e. when I run the report it shows me the following error.
    Error executing code: The field with ID '0' does not exist in table 'LedgerTrialBalanceStagingTmp'.
    Stack trace
    (S)\Classes\RecordInsertList\add
    (S)\Classes\LedgerTrialBalanceDP\populateTmpTransDetail - line 100
    (S)\Classes\LedgerTrialBalanceDP\processReportDetail - line 28
    (S)\Classes\LedgerTrialBalanceDP\processReport - line 32
    (S)\Classes\SrsReportRunRdpPreProcessService\executeWithContract - line 102
    (S)\Classes\SrsReportRunRdpPreProcessService\executeRDLClasses - line 38
    (C)\Classes\SrsReportRunService\preRunReport - line 26
    (C)\Classes\SrsReportRunImpl\preRunReport - line 12
    (C)\Classes\SrsReportRunController\runReport - line 42
    (C)\Classes\SrsReportRunController\run - line 6
    (C)\Classes\SysOperationController\startOperation - line 10
    (C)\Classes\SrsReportRunController\startOperation - line 12
    (C)\Classes\LedgerTrialBalanceController\main - line 9
  • Hi All,
    I also found a similar error.
    I've been trying to open a report in the General Ledger > Reports > Detailed trial balance. In the form, I input a parameter for Ledger account.MainAccount. When I click OK, I got an error
    Can anybody help me, how to open the report without getting this error?
    Thank you in advance,
    bsugitayasa
  • Hi Ahmed.
    For the error "The field with ID '0' does not exist in table 'LedgerTrialBalanceStagingTmp'" you just need to change the RecordInsertList initialization:
    \Classes\LedgerTrialBalanceDP\populateTmpTransDetail, Line 64:
    Original line:
    recordInsertList = new RecordInsertList(tableNum(LedgerTrialBalanceTmp), true, true, true, true, true, _ledgerTrialBalanceStagingTmp);
    Change to:
    recordInsertList = new RecordInsertList(tableNum(LedgerTrialBalanceStagingTmp), true, true, true, true, true, _ledgerTrialBalanceStagingTmp);
    Compile forward, generate incremental CIL, and it's done.
    Cheers
  • Class_DimensionProvider.rar
    Hi Ahmed,
    About the duplicated ranges bug, the problem is in\Classes\DimensionProvider\addAttributeRangeToQuery method. I'm attaching a XPO with the code fixed.
    Cheers
  • Dear Fabio,
    Thanks for the advice. I have tried and have been successful.
    About duplicate existing range problem on\Classes\DimensionProvider\addAttributeRangeToQuery also been successful in fix

    Cheers

How to: Use Roles and Privileges to Restrict Access to a Button [AX 2012]

$
0
0
Updated: September 28, 2011
Applies To: Microsoft Dynamics AX 2012 R2, Microsoft Dynamics AX 2012 Feature Pack, Microsoft Dynamics AX 2012
You can use the Security section of the AOT to restrict access to specific controls on a form. When a user has access to a form, the default is that the user has access to all the controls on the form. You can override the default by adding permissions nodes for individual controls.
For example, you can set the NeededPermission property on a button to the value Manual to start the process of restricting access to the button control.
You need to understand the following concepts before you can understand this topic:
  • How to create a form with a button control on it.
  • How to create a menu item for your form.
  • How to create a security privilege with an entry point node underneath.
This topic assumes you already have a form, and a node for a corresponding menu item under AOT > Security >Privileges > YourPrivilege > Entry Points. For more information, see Walkthrough: Design Permissions for a Form that is Started from a Menu Item.
By following these steps you can restrict access to the button control on the form.
  1. In the AOT, highlight the button control node at Forms > YourForm > Designs > Design > YourButton.
  2. In the Properties window for your button control, set the NeededPermission property to Manual.
    This enables you to drag the button node in the next step.
  3. Under the AOT node Forms > YourForm > Permissions > Read > Controls, add YourButton control. Do this by dragging the button node to this Controls node.
  4. In the Properties window for the new permission for YourButton control, set the EffectiveAccess property to Read.
In this section you test the security configuration for your control. For more information about the steps in this section, seeHow to: Test the Role-based Security Configurations under AOT Security.
You can test access to your control by following these steps:
  1. Manually assign an application user to YourTestRole using the System administration form.
  2. Sign on into the system as an application user.
  3. The Workspace window of an application user will contain your menu item.
  4. You should be able to open your form by clicking on your menu item. Notice that the button control appears on the form and you can operate the button.
  5. Sign off from the system as an application user.
  6. Manually remove YourTestRole from an application user using the System administration form.
  7. Sign on into the system as an application user again.
  8. When you open your form again you will notice that your button control no longer appears on the form.

How to install a Microsoft Dynamics AX hotfix

$
0
0


Collapse imageINTRODUCTION

This article provides links to documentation about how to install hotfixes for Microsoft Dynamics AX 2012. It also describes how to install hotfixes for Microsoft Dynamics AX 2009 and Microsoft Dynamics AX 4.0.

Note Make sure that you thoroughly review the Microsoft Knowledge Base article that documents a specific hotfix to determine the objects, the database tables, or the files that will be affected.

Collapse imageMore information

Hotfixes that are released for Microsoft Dynamics AX 2012

The detailed process for installing updates and hotfixes to Microsoft Dynamics AX 2012 is documented on TechNet, in the following section: Apply updates and hotfixes.

Hotfixes that are released for Microsoft Dynamics AX 2009 and for Microsoft Dynamics AX 4.0

Note The general process for installing updates and hotfixes to Microsoft Dynamics AX 2009 is documented in the following white paper: Servicing Microsoft Dynamics AX 2009.

Microsoft releases hotfixes for Microsoft Dynamics AX in the following formats:
  • Hotfixes are released as a compressed (.zip) file. The files that the .zip file contains replace existing files on the computer.
  • Hotfixes are released as a Microsoft Windows Installer update. These hotfixes contain a Setup.exe file.
Microsoft releases hotfixes for Microsoft Dynamics AX 4.0 in the following formats:
  • Hotfixes are released as Microsoft Windows Installer updates. These hotfixes contain a Setup.exe file. 
  • Hotfixes are released as DIS-layer files (AxDIS.aod) or as DIP-layer files (AxDIP.aod). DIS-layer changes address issues in SYS-layer code. DIP-layer changes address issues in GLS-layer code. 
  • Very rarely, hotfixes are released as .xpo files that contain code. The code is applied to existing objects, to database tables, or to both. 

General guidelines for hotfixes that replace files

Some Microsoft Dynamics AX hotfixes replace files on the computer. For instructions about how to install a hotfix that replaces files, carefully read the documentation that accompanies the hotfix download. The following are general recommendations for installing hotfixes that replace files:
  • Before you copy the files that are included in the hotfix to your computer, use your usual backup processes to back up the server files that are affected by the hotfix.
  • Test all hotfixes in a test environment to verify that your customizations are not adversely affected.
  • Have all users log off the Microsoft Dynamics AX client application. Stop the Application Object Server (AOS) instance before you rename and copy the hotfix files.
  • When label files are included in the hotfix, copy all the included label files to the Microsoft Dynamics AX application folder. The label files will have the following file name extensions:
    • .ali
    • .acd
    • .alc
    By default, the application folder has the following path:
    root directory\Axapta Application\appl\Standard
    Note In this path, root directory represents the hard disk drive and the main directory in which Microsoft Dynamics AX is installed.

Customized environments

If you customized your environment before you installed a hotfix, thoroughly review the Microsoft Knowledge Base article that documents the hotfix that you want to install. Any objects that are affected by the hotfix will be overwritten. This may cause customizations in those objects to be lost.

Database backups

If database tables are affected, create a full database backup before you apply the hotfix. For instructions about how to back up a database, see the Microsoft SQL Server documentation. Or, see the Oracle Database Server documentation.

Installation information

Hotfixes that are released for Microsoft Dynamics AX 2009

To install hotfixes that are released as an application update for Microsoft Dynamics AX 2009, follow these steps:
  1. Extract the files from the package.
  2. Open the kbxxxxxx.txt file in the hotfix package to identify which objects will be patched when the hotfix is installed.
  3. Exit all Microsoft Dynamics AX 2009 clients, and then stop the AOS instance.
  4. Back up the database.
  5. Back up the application folder.
  6. Restart the AOS instance, and then review the Application log on the server that is running the AOS service to make sure that the AOS instance starts correctly. The AOS instance rebuilds the application object index. The Axapd.aoi file contains the application object index.

    Note Depending on the server hardware that you are using, the startup of the AOS instance may time out before the process is completed. This issue occurs because the process has insufficient time to rebuild the Axapd.aoi file before the AOS tries to use the file.

    The AOS instance remains in a starting status until the *.aoi file rebuild is completed. At that point, the AOS instance has a "started" status. No additional steps are required. Wait for the rebuild to finish, and then review the Application log for an indication that the AOS instance starts. 
  7. Run the Axpatch.exe file for the application hotfix installation.
    1. Select the language in which to run the installation, and then click OK.
    2. When the installer wizard starts, click Next.
    3. Review the Microsoft Software License Terms, click to select the check box to accept the license terms if you agree, and then click Next.
    4. On the Select components page, the Application files option should be selected by default. Click Next.
    5. On the Select configuration page, indicate the correct configuration, and then click Next.
    6. On the Ready to apply hotfix page, click Install.
    7. When setup is complete, click Finish to exit the wizard.
  8. From a client, verify that you can connect to the AOS instance as the Microsoft Dynamics AX administrator.
  9. Validate the installation of the hotfix by doing the following:
    • Open the SysHotfixManifest class in the AOT.
    • Verify that the class contains a method that has a name that is the same as the article number of the installed hotfix.
  10. Use the code upgrade tool (“Code comparison”) to compare the SYP or GLP change with any VAR or CUS layers. If customizations exist, the partner's or customer's IT staff may be required to merge the hotfix into the customized system.

Hotfixes that are released as a Windows Installer update

Important The following actions must be performed:
  • The ObjectServer kernel file must be installed on each AOS server.
  • The Client kernel file must be installed on each client computer.
  • The NetBusinessConnector kernel file and the ComBusinessConnector kernel file must be installed on every computer that is running the Microsoft Dynamics AX .NET Business Connector and the Microsoft Dynamics AX Com Business Connector.
  • The ApplicationIntegrationServer kernel file is the BizTalk Adapter. Make sure that you install the ApplicationIntegrationServer kernel file together with the NetBusinessConnector kernel file when you update the BizTalk Adapter.
A Windows Installer update updates the following Microsoft Dynamics AX 4.0 client binary files:
  • The .exe file
  • The .dll files
These files are also known as the kernel files. To apply the Windows Installer update, follow these steps:
  1. Extract the files from the hotfix. The extracted files may contain the following folders:
    • ApplicationIntegrationServer
    • Client
    • ComBusinessConnector
    • NETBusinessConnector
    • ObjectServer
  2. Test the hotfix in a test environment. Then, schedule downtime.
  3. Exit all the Microsoft Dynamics AX software clients. Then, shut down the AOS instances that are connected to the production program file share.
  4. Back up the database, and then back up the application folder.
  5. Run the Setup.exe file that is included in each folder in the hotfix.
  6. Restart the AOS instance. Review the application event log on the server that is running the AOS service to make sure that the AOS instance starts correctly. The AOS instance rebuilds the application object index. The Axapd.aoi file contains the application object index.

    Note Depending on the server hardware that you are using, the startup of the AOS instance may time out before the process is complete. This issue occurs because the process has insufficient time to rebuild the Axapd.aoi file.
  7. Use the AOS instance to log on to a client by using the Microsoft Dynamics AX 4.0 Administrator account. Verify that you can successfully connect.

Hotfixes that are released as an .xpo file that contains code

Hotfixes that are released as an .xpo file contain code-level fixes that directly affect objects or database tables in Microsoft Dynamics AX.

Important Before you continue, examine each .xpo file for the objects or tables that will be changed. Note any customizations to your current environment that may be affected. We highly recommend that you apply all hotfixes in a test environment before you apply the hotfixes to your live system.  
  1. Log on to Microsoft Dynamics AX by using the Microsoft Dynamics AX Administrator account. Make sure that no other users are logged on to Microsoft Dynamics AX.
  2. Open the Application Object Tree dialog box. To do this, use one of the following methods:
    • On the Standard toolbar, click Application Object Tree.
    • On the keyboard, press Ctrl+D.
    • On the File menu, point to Open, and then click Application Object Tree.
  3. In the Application Object Tree dialog box, click Import on the toolbar.
  4. Click Browse, and then locate the .xpo file.
  5. In the Open dialog box, click the .xpo file, and then click Open.
  6. Click OK to complete the import process.

    Note You may have to complete a forward compile or a full Application Object Tree (AOT) compile process.

How to install hotfixes that are released as DIS-layer or DIP-layer files

  To install hotfixes that are released as DIS-layer or DIP-layer files, follow these steps: 
  1. Extract the files from the hotfix package.
  2. Before you copy the files that are included in the hotfix to your computer, use your usual backup processes to back up the application folder and the server files that are affected by the hotfix.
  3. Test the hotfix in a test environment. Then, schedule downtime when no other users are on the system.
  4. Exit all the Microsoft Dynamics AX software clients. Then, shut down the Application Object Server instances that are connected to the production program file share.
  5. Copy the AxDIS.aod file and the AxDISen-us.ald file into each application folder where the other .aod files exist. By default, this folder is in the following location:
    \application\appl\standard
    Note In this step, always use the copy function. Do not use the move function. When you move a file, the permissions of the source folder will be taken for this file. When you copy a file, it will take the permissions of the target folder.
  6. Make a backup copy of the Axapd.aoi file by renaming the file. Or, delete the Axapd.aoi file in each application folder.
  7. Restart the AOS instance. Review the Application log on the server that is running the AOS instance to make sure that the AOS instance starts correctly. The AOS instance rebuilds the application object index. The Axapd.aoi file contains the application object index.

    Note Depending on the server hardware that you are using, the startup of the AOS instance may time out before the process is complete. This issue occurs because the process has insufficient time to rebuild the Axapd.aoi file.

    The AOS instance will remain in a starting status until the .aoi file is rebuilt. At that point, the AOS instance will have a "started" status. No additional steps are required. Wait for the rebuild to finish, and then review the Application log for an indication that the AOS instance started.
  8. Use the AOS instance to log on to a client computer by using the Microsoft Dynamics AX 4.0 Administrator account. Next, connect to this AOS instance by using the client software to verify that you can successfully connect. Finally, verify that the changes were detected by Microsoft Dynamics AX and that they are visible in the AOT.
  9. If an upgrade checklist appears, complete the checklist to make sure that there will be no additional issues. If no upgrade checklist appears, the DIS or DIP layer is not recognized. If the DIS or DIP layer is not recognized, use one or more of the following methods:
    • Create a new application folder. Then, copy all the files from the existing application folder to the new application folder.
    • Change the AOS instance configuration to use the new application folder. To do this, follow these steps:
      1. Click Start, click Run, type Control Admintools, and then click OK.
      2. Double-click Microsoft Dynamics AX Configuration Utility.
      3. On the Application Object Server tab, select the new application folder that you created in the application instance list.
      4. Apply the configuration, and then restart the AOS instance.
      5. Repeat step 8.
  10. After the checklist is completed, recompile the whole application.
  11. If you are using multiple application folders and multiple AOS instances, stop all AOS instances, and then restart all AOS instances.

Collapse imageReferences

For more information about import options for an .xpo file, see the Microsoft Dynamics AX Developers Guide.

The third-party products that this article discusses are manufactured by companies that are independent of Microsoft. Microsoft makes no warranty, implied or otherwise, about the performance or reliability of these products.


Table Permission error on executoin of the report

$
0
0

I have a custom table and a SSRS report using this table on the executon of the report user is getting following error:
User 'ADMINIST' is not authorized to select a record in table 'LabelGroupDetailsTmp'. Request denied.
Cannot select a record in Product Label Group Table (LabelGroupDetailsTmp).
Access Denied: You do not have sufficient authorization to modify data in database.
i user is given the Admin rights in the system there is no error and report displays correctly.
i cannot find any way to fix this? any suggestions?


  • Hi Maxim. Looks like you don't have permissions to the table in question and/or that custom table isn't part of a Privilege. Add your table to the proper privilege and your report should run.

Security Permissions Properties for a SSRS Report [AX 2012]

$
0
0

Security Permissions Properties for a SSRS Report [AX 2012]

This topic has not yet been rated Rate this topic
Updated: March 18, 2011
Applies To: Microsoft Dynamics AX 2012 R2, Microsoft Dynamics AX 2012 Feature Pack, Microsoft Dynamics AX 2012
This topic lists and describes the many permission related properties that exist on subnodes under the Permissions node under the SSRS Reports node in the AOT.
The following list shows the position of the Permissions node under the SSRS Reports node in the AOT:
  • Reports
    • YourSSRSReport
      • Designs
        • RoleCenter
          • Permissions
            • Tables
            • Server Methods
            • Associated Forms
This section describes the properties for the AOT node at Reports > YourSSRSReport > Designs > RoleCenter >Permissions > Tables > YourTable.
Property
Required
Description
Table
Yes
The name of the table.
EffectiveAccess
Yes
The permission value. The value can be one of the following:
  • Read
  • Update
  • Create
  • Correct
  • Delete
  • NoAccess
The permission values for the EffectiveAccess property represent a hierarchy. Read is the weakest permission, and Delete is the strongest. Delete permission includes every other permission. Create permission includes Update and Read.
You can set the permission value to NoAccess to prevent all access to the table.
ManagedBy
Optional
This property is reserved for use by automation tools.
This section describes the properties for the AOT node at Reports > YourSSRSReport > Designs > RoleCenter >Permissions > Server Methods > YourServerMethod.
Property
Required
Description
Class
Yes
The name of the server class.
Method
Yes
The name of the secure server method tagged with the SysEntryPointAttributeattribute.
EffectiveAccess
Yes
The permission value. The value can be one of the following:
  • Invoke. The server method can be called.
  • NoAccess. The server method cannot be called.
SystemManaged
Yes
Indicates whether this permission was added through automatic inference. The value can be one of the following:
  • Yes. This permission was added through automatic inference.
  • No. This permission was created manually.
ManagedBy
Optional
This property is reserved for use by automation tools.
This section describes the properties for the AOT node at SSRS Reports > YourSSRSReport > Designs > RoleCenter >Permissions > Associated Forms > YourAssociatedForm.
Property
Required
Description
Form
Yes
The name of the form.
AccessLevel
Yes
The permission value. This field can contain one of the following values:
  • Read
  • Update
  • Create
  • Correct
  • Delete
  • NoAccess
The permission values for the EffectiveAccess property represent a hierarchy. Read is the weakest permission, and Delete is the strongest. Delete permission includes every other permission. Create permission includes Update and Read. You can set the permission value to NoAccess to prevent all access to the form.
SystemManaged
Yes
Indicates whether this permission was added through automatic inference. The value can be one of the following:
  • Yes. This permission was added through automatic inference.
  • No. This permission was created manually.
ManagedBy
Optional
This property is reserved for use by automation tools.

AX 2012 Excel Add-in - RPC Issue

$
0
0


I hope everyone is doing well, and into the Dynamics World, on this fine Tuesday. We will continue our focus on EP tomorrow, but today, I wanted to spend a little time and write about a specific issue when using the Excel Add-in for Microsoft Dynamics AX 2012. What I'm talking about, can happen in a few different possibilities. Specifically however, and more to the direct error message. If you have Failed records when using the Excel add-in and the error message for each record is very generic, you should then move towards looking at theApplication Event Log, where the Excel Add-in is being executed. 


Within the Application Log, you will most likely see an RPC Exception 1702 or 1700 or 1704. Now the Excel Add-in is suppose to be connecting and communicating through WCF protocol for the Query Service, and other such services? Why RPC? Well there is a part of the .Net BC still used, from what I've found - needs clarification - with this process. 

So how do we reach this error? Well most likely something has changed about a table your trying to access, or a Data, ie: Query or Service, that your trying to consume. For example you might have added a new import staging table to your instance, saw it fine in the Add Data, Add Tables list. 


However now that you go to publish the data, from which you have built the excel table with - all records fail? This is a sign, that a Full CIL needs to be executed on the target instance in which the Excel Add-in is pointing to. This has been the fix for such issues, I've come across - every single time! 

In short, running into errors with the Excel Add-in, specifically RPC errors in the Application Event log, then perform a full CIL compile on the target instance. Doing so should get you past such issues, and should allow you to proceed using Excel Add-in and your changed or new table - for loading data. 

That's all for right now, I will leave you with a link to the past post I did about the Excel add-in.: AX 2012 - Excel Add-in Revisited. We will continue the EP and BI paths, as well as I have a slew of highlights, book reviews, and spotlight post coming soon. Along with a new interview from a Microsoft Executive, to help close out FY12 for Microsoft. So check back soon, and often. Till Next Time! 

Microsoft Dynamics AX 2012 Excel Add-in

$
0
0
With the release of Microsoft Dynamics AX 2012, the lines between the Rich Client, the Portal as well as Microsoft Office are going to be blurred. This is out-of-the-box ability, that replaces a lot of older ways for doing things.

One such topic, is the old Microsoft Excel Export / Import Wizard for Microsoft Dynamics AX. You can see this, in the Microsoft Dynamics AX 2009 menu system, here.:


With the release of Microsoft Dynamics AX 2012, this no longer exists! For some, I'm sure this will be a little shock, however this is a good thing.

The older Excel Import, honestly was very slow and if you had any records of any size, then you just really would rather create X++ scripts to import data.

Now, with Microsoft Dynamics AX 2012, and the new Excel Add-in for Microsoft Dynamics AX, scripts are a thing of the past. Let me say, this new process is very fast, and is designed so that a developer or architect is really not needed to import a lot of data, into AX.

To help show this process, I have created the following walk through that shoudl give an idea of what it takes to work with the new Dynamics AX Add-in for Excel, and get data into Microsoft Dynamics AX 2012 using this new, and great tool!

First, you have to launch Microsoft Office Excel 2010, and of course have the Excel Add-in installed. I'm going to assume this is already in place, and lets say, for the sake of keeping this simple, that I need to add some Delivery Mode data.

This data, lives in the DlvMode table within the Microsoft Dynamics AX AOT. So to get started, lets click on the Connection button, from the ribbon, and make sure we are in the company account and instance we care about.


(Server specific information, blanked out on purpose.)


We see, that we have the ability to override here, and point to what AOS instance we want to connect too, as well as within that what company entity.

Now moving forward from here, lets go and add the DlvMode table, by clicking on the add data, then add table.


Once we select to Add tables, then we can select the DlvMode table, and actually use the Filter field at the bottom, so we only see that table to select. Also notice the fact, that the process created a new worksheet, in this workbook, just for our DlvMode AX table.


Here we can add and remove fields, using the Field Chooser, on the ribbon. Here I've added a few fields, just to give you an idea.


Now moving forward, I will only have the key field Mode of Delivery as it is required, and then Description field.


I then took and added new rows, which gave me three records within the table, of the Excel worksheet. From here, I added my three new DlvModes.

At this point, we now have the data we need, and want to get this into Microsoft Dynamics AX 2012 instance. With this, we simply take and Publish Data, then Publish All. In doing this, we could have selected only one record to publish, but for now lets just publish all of them.

With doing this, we see the following worksheet that was generated, that shows the status of the process.


Having this, we can see that everything went great, and was able to upload the data. Also, we now see, on the DlvMode worksheet, that our new data, and the existing data that was already in the DlvMode table, now appears.


Going into Microsoft Dynamics AX 2012, we can still hit Ctrl+D, and it will open the new Developer workspace. Here we can expand the AOT, and go to our DlvMode table. Right click, and table browse, and see that our data we just created, exists within Microsoft Dynamics AX 2012.


So with the release of Microsoft Dynamics AX 2012, a lot fo great new things come as part of it. More native Office integration, with very little effort, and very little technical knowledge needed.

That's all for now, but this is very exciting stuff, and we are just getting starte within the great new release.

Till next time!

Update: I wanted to make sure an update this post, so that you would have the latest information about the Excel Add-in, in case you hit this post, from a search engine. Make sure and check out the revisited post for the Excel Add-in located here: AX 2012 - Excel Add-in Revisited

"Visit the Dynamics AX Community Page today!"

10 Comments:

OpenID piyush said...
How is Excel Addin licensed? Is it tied to Rich Client License or Lightweight User(EP user) license?
5:23 AM
Blogger brandon said...
This will actually use the Lightweight User License, from what I understand.

All services will use the lightweight user license, and that is what the Excel Add-in is based on, therefore it uses that license model.

Hope this helps!

-Brandon
6:47 AM
OpenID piyush said...
Hi Brandon,

Thanks for the info. It will help us make an important decision about our AX implementation.

Thanks again,
Piyush
12:51 AM
Anonymous Patrick said...
We have an installation with every tier on its own machine. When Excel is called on the client-machine and we click on "Connection" we get a popup with the error message "Object reference not set to an instance of an object". When we do the same on the application server machine it works. The office add ins are installed on both machines. Have you had or heard of this problem?
6:58 AM
Anonymous Anonymous said...
I am working with this now. Only thing is when I click Publish Data, I find that Dynamics Ax is not updating with changes.

There must be a configuration that I should change? Can you please advise?

TIA
12:53 AM
Blogger GEB said...
All working in the latest VPC Image as above, with Dynamics Ax tab appearing in Microsoft Excel. Under "Add Data" I see I have the Budget transactions are update-able and updating - from Excel to Ax when I "publish".

However under "Add Tables", I find I can display data but I cannot "publish" back to Dynamics Ax. Is there a configuration per table I need to investigate?
3:57 PM
Anonymous Anonymous said...
Hi Brandon. Great write-up. Everything went well for me except when I push the Publish Data button, my only option to select is "Publish Options". "Publish All" and "Publish Selected" are disabled. Is there a security issue possibly?? Thanks
4:41 PM
Anonymous Mat Grisham said...
Brandon,

Excellent job as always. I did get hung up at one point and I thought that I should pass along something that helped me out.

You have to turn off the Field Chooser before you can refresh the fields or pulish the data up to AX. Seems pretty obvious once you figure it out but it just wasted an hour of my time.

Thanks,

Mat
8:40 AM
Anonymous Xander said...
Nice article, but have you tried importing vendors using the Excel add-in?
I keep getting the error about surrogate key expansion :(
Any suggestions?
Thanks.
7:51 AM
Blogger Joanna D said...
Hi there Brandon

I added a table (Countries), selected the fields to be displayed, refreshed and got all the records. All good up to here..

Then, I add a new row, save and press "Publish all" to get the new row uploaded but that fails. The following error message shows up:

"An error occurred. The data in the workbook and the behavior of any add-ins may not be correct. Consider contacting your system administrator about this problem.

Class 1004745 is not a document class".

Any idea what this error means?
Did I miss any configuration?

Thanking you in advance,
Joanna

Getting Individual Dimension Combination Values–Using Views [AX 2012]

$
0
0
In my previous post, I had illustrated how we can get individual dimension combination values using DimensionStorage class. In this post, I will provide another job that utilizes a view to get individual values for a ledger dimension.
The view that has been used in DimensionAttributeLevelValueAllView. Here is the job
static void sgxIndividualDimensionValuesUsingView(Args _args)
{
    GeneralJournalAccountEntry          generalJournalAccountEntry; //Table that stores ledger transactions
    DimensionAttributeLevelValueAllView dimAttrView; //View that will display all values for ledger dimensions
    DimensionAttribute                  dimAttr; //Main dimension attribute table
    int i;
   
    setPrefix(‘Ledger dimension breakup’);
    while select generalJournalAccountEntry
    {
        i++;
        if (i > 100)
            break;
       
        setPrefix(int2str(i) + “. “ + DimensionAttributeValueCombination::find(generalJournalAccountEntry.LedgerDimension).DisplayValue);
        while select DisplayValue from dimAttrView   
            where dimAttrView.ValueCombinationRecId == generalJournalAccountEntry.LedgerDimension
            join BackingEntityType from dimAttr
                where dimAttr.RecId == dimAttrView.DimensionAttribute
        {
            switch (dimAttr.BackingEntityType)
            {
                case tableNum(DimAttributeMainAccount):
                    info(strFmt(“Main Account: %1″, dimAttrView.DisplayValue));
                    break;
               
                case tableNum(DimAttributeOMBusinessUnit):
                    info(strFmt(“Business Unit: %1″, dimAttrView.DisplayValue));
                    break;

                case tableNum(DimAttributeCustTable):
                    info(strFmt(“Customer: %1″, dimAttrView.DisplayValue));
                    break;

                case tableNum(DimAttributeOMDepartment):
                    info(strFmt(“Department: %1″, dimAttrView.DisplayValue));
                    break;

                case tableNum(DimAttributeHcmWorker):
                    info(strFmt(“Worker: %1″, dimAttrView.DisplayValue));
                    break;
            }   
        }
    }
   
}

Here is the output.
image
 
3 Comments
Posted by  on June 15, 2012 in AX 2012

How to debug x++ code from Enterprise Portal

$
0
0
Posted by Torben M. Philippsen on December 16, 2013
This article is mainly to support my own memory on how to configure things and being able to debug x++ code when executed from Enterprise portal (EP).
In order to being able to debug x++ executed from EP you need to follow these few steps:
  1. Log on to the server runnning the AOS
  2. Open the Microsoft Dynamics AX Server Configuration utility. To open Start –> Control Panel –> Administrative Tools –> Microsoft Dynamics AX 2009 Server Configuration.
  3. If you are not allowed to alter the existing configuration, create a new one that supports debugging.
    Click Manage then Create configuration. Give a name to the new configuration in the Create Configuration window then click OK
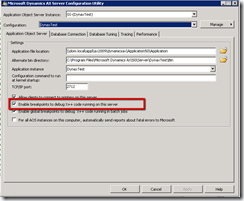
    On the Application Object Server tab, select Enable breakpoints to debug code X++ code running on this server. Click onApply button.
    ServerConfiguration
  4. Click on the OK button to close the configuration window. You will get a message that indicates AOS is going to be restarted.’>Click on OK button to close the configuration window. You will get a message that indicates AOS is going to be restarted.
  5. Actually the debugger works on the server where IIS is running and Enterprise Portal is hosted. I used a single system and all the things are on the same system. If you are accessing a system remotely using Terminal Services then from the Start menu click Run. Type mstsc /consolein the Open text box and click OK
    This opens a console session in Terminal Services. Console session is required to debug Ax EP
  6. Open the Services window for the system. To open it Start –> Control Panel –> Administrative Tools –> Services.
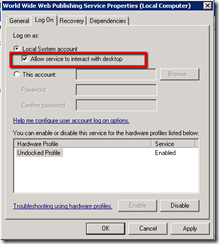
    Right-click the World Wide Web Publishing Service and click Properties.
    Click the Log On tab
    Select Allow service to interact with desktop as shown below
    ServicesProperties
  7. Open the web.config file located in :\Inetpub\wwwroot\wss\VirtualDirectories\\, here the port number of the Enterprise Portal site. If you forgot the port then there is a way to check it out. Open Ax client then Administration main menu –> Setup –> Internet –> Enterprise Portal –> Web sites, here you can see the port
  8. Locate out the compilation element then set the debug attribute to true.
    Save the changes.
    Reset IIS (shouldn’t be necessary but I always do this just to make sure)
  9. Open the Microsoft Dynamics AX Configuration utility. To open it Start –> Control Panel –> Administrative Tools –> Microsoft Dynamics AX 2009 Configuration 
  10. Set the Application Object Server Instance drop-down menu to Business Connector (non-interactive use only). 
  11. If you are not allowed to alter the existing configuration, create a new one that supports debugging.
    Click on Manage button then click Create configuration. In the Create Configuration window, name the new configuration then click OK button.
    On the Developer tab, select Enable user breakpoints to debug code in the Business Connector and Enable global breakpoints to debug code running in the Business Connector or client then click on Apply button
  12. Click on OK button to close the configuration window
  13. Open the Microsoft Dynamics AX client
    On the Tools menu, click Options to display the Options window.
    On the Development tab, select When Breakpoint from the Debug mode list box, and then click Apply. This enables debugging mode on the client
    OptionsMenu
  14. Close the options window.
  15. Set the breakpoint of your choice in the x++ code
  16. Open the Debugger window manually. To open debugger manually click on Tools > Development Tools > Debugger 
  17. Now execute the web form where the method has been invoked. It should work now and You should hit you breakpoint – nice:-)

Windows autentication problem on Dynamics AX WCF service

$
0
0
Posted by Torben M. Philippsen on January 3, 2011
Over the past days I have been involved in a critical issue related to a Dynamics AX 2009 WCF service that used windows authentication on a Windows server 2008 box (IIS 7.0).
When trying to browse the service I was prompted for login credentials, but even though proper credentials were provided, I was not correctly authenticated (and neither was any of the clients that was supposed to consume the service) and a new login prompth just showed up. Looking in the eventviewer, in the security section, I was able to identify that a login attempt using my user account has been made and that it actually succeeded.
The funny thing – that wasn’t funny at all, was that how could it be that the eventviewer stated, that the login attempt was successfull when IIS still kept prompting me for credentials???
It somehow seemed that login credentials wasn’t properly passed on to the WCF service…
Analyzing the server setup further showed that a distributed environment had been configured. This pointed me in the direction of some Kerberos settings that hadn’t been properly configured.
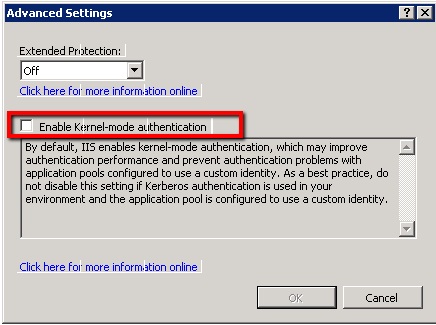
The solution turned out to be quite simpel – the only thing I had to do was to disable “enable kernel-mode authentication” – this is what i did:
  • In the IIS manager right click the website or application where Windows Autentication has been configured
  • In the “features view” double click “autentication”. You will see a list of autentication profiles and their corresponding status.
  • Right click “windows autentication” and select “advanced settings”
  • Disable “enable Kernel-mode authentication”
    disable Kernel-mode
    disable Kernel-mode autentication
Be carefull… As the information box states, this should only be done when using a non custom identity. In my case, the problem related to a Dynamics AX WCF service. Such a service is always configured to use a domain account identity and therefore the “Kernel-mode” could be disabled.
For some reason unknown to me, the Kerberos ticket was not properly distributed to all involved servers – and due to that I was unable to logon to the WCF service. Disabling “Kernel-mode authentication” solved that problem and clients are now able to consume the service.
Update 24.01.2012
Today this woraround didn’t work – apparently I was facing a new problem and I had to have a colleague assist me. Fortunately he knows some tricks:-)
With reference to this article http://support.microsoft.com/kb/926642 (method 1) solved the problem – even though that my issue was on a server 2008 box – here’s a screendump:
For further references on troubleshooting and/or configuring kerberos, please check out this post:

Export to Excel with AX 2012 R2 – Nothing Happens

$
0
0
With the launch of the next latest and greatest version of AX (2012 R2) a few new problems may occur specifically around the integration with MS Office. To give a little bit of background on the subject you should be aware that with the Release of AX 2012 R2, AX now supports Windows Server 2012, Windows 8, SQL Server 2012, Office 2013, Sharepoint 2013, .Net 4.5, and Visual Studio 2010. While these certainly are some great improvements and provides flexibility for AX 2012 to be functional with the newest offerings from Microsoft, there are a couple bugs that still exist.
The one particular bug I wanted to talk about today was the system no longer exporting data from AX to excel. (Please note generating an SSRS report and then exporting to excel works fine, but the actual export of list pages, grids, or tables from AX was not working). Besides the data not being exported to excel there was no error message so it was difficult to try and track down the root cause of the issue or communicate the issue with the AX community. You would see the client “blink” like it was trying to process something and then nothing would happen. The system did not lock up, and was resopnsive however excel never opened and no data appeared.
The environment that was not working was running Windows Server 2008 R2, with MS Office 2010 installed alongside AX 2012 R2. After trying a number of different users, environments, and separate SQL servers nothing was working at all. We also looked at ways to access the virtual machine as well and this was not fixing the error. We did notice that a select few people were able to export to excel but they were running windows 8 and a localized version of AX with Office 2013. We then copied the configuration file to a Windows Server 2012 VM with Office 2013, published the image and suddenly all users were able to export to Excel. This seems to have done the trick and all users are able to export to Excel.
I’m not sure if upgrading to R2 requires Office 2013 (and potentially Windows Server 2012/Windows 8) to use the office add-ins but you should be aware of this in the upgrade process. I know there are a lot of other features in AX 2012 R2 that specifically require Office 2013 but I’m not aware if this is a dependency for the upgrade. If you are reading this and are having issues with the exporting to Excel then try if you can different Operating Systems or try upgrading to Office 2013.

Using Controller Class in Developing SSRS Reports in Microsoft Dynamics AX 2012

$
0
0

Overview

Controller class is used to control the report execution as well as preprocessing of the report data. The SSRS reporting framework uses this class to modify the report dialogs, calling the SQL Server reporting services, as well preprocessing parameters for the report.
Following are the scenarios where Controller class can be used:
  1. Modifying a report query based on the input data
  2. Modifying report contract data based on the input data
  3. Control a report parameters dialog
  4. Open different reports/designs from the same menu item based on the input data
  5. Reports that are opened from a form
To create a controller class, extend it with SrsReportRunController.

Prerequisites

  1. Microsoft Dynamics AX 2012
  2. Reporting services extensions must be installed in Dynamics AX

Sample Controller Class

  1. Create a new class. Open AOT → Classes
  2. Right Click on Classes and select New Class. Name it as SSRSDemoController.
  3. example of creating a new class in Dynamics AX


  4. Open the Class declaration by right clicking on it and selecting View code.
  5. example of viewing code in AOT class AX
     
  6. Now write the following code:
  7. Create a new method and write the following code:
  8. Examples of Controller Class Usage

    Based on different scenarios, different methods are overridden as shown in the following examples:
    1. Modifying report query based on the input data

  • Used in those scenarios where a report query needs to be modified based on the caller args parameters or recorded before the report parameter dialog is rendered.
  • Override prePromptModifyContract method to modify the report query as shown below:
Note: prePromptModifyContract is called by report controller before the parameter dialog is shown to the User.
  • Modifying report contract data based on the input data

    • Used in those scenarios where report contract parameters need to be modified based on the caller args prior to the execution of the report.
    • Override preRunModifyContract method to modify the report contract as shown below:
    Note: preRunModifyContract is called by report controller before the report is run.
  • Control report parameters dialog

    • In some scenarios, a report parameter dialog should not be visible to the end user. Controller class is also used to control the visibility of the report parameter UI.
    • Add the following code in the main method of the controller class before startOperation method call to hide/show the report parameter UI:
  • Open different reports from the same menu item based on the input data

    • It is used in those scenarios where different reports or different designs of a same report need to be opened from a same menu item depending upon the caller args.
    • Write the following code in main method to achieve this scenario:
  • Reports that are opened from a form

    • Controller class is also used when reports are opened from a form and are needed to show selected record details.
    • Use either prePromptModifyContract method or preRunModifyContract method to achieve this scenario.

    Developing SSRS report using Query in Microsoft Dynamics AX 2012

    $
    0
    0

    Overview

    There are a multiple of methods to develop SSRS reports in Dynamics AX. This tutorial will guide you through the process of developing SSRS reports using an AOT query.

    Pre-requisites

    1. Microsoft Dynamics AX 2012
    2. Visual studio 2012
    3. SQL Server report server must be configured
    4. Reporting services extensions must be installed in Dynamics AX

    Steps

      1. First of all we need an AOT query which will fetch data from AX and display it in a report. For this tutorial, I am using an existing query in AX which displays a list of customers.
      2. CustTableListPage query will be used in this tutorial. To find this query, open AOT àQueriesàCustTableListPage.
      3. The development of the SSRS report is done in Visual studio. So a new project needs to be created in Visual studio.
      4. Open Visual studio. Go to File à New à Project.
      5. In the section Installed templates select Microsoft Dynamics AX and then select Report Model in the right pane. Name the project “QueryBasedDemo“. Press OK.


      6. A new project will be created as shown below:

      7. Now add a new report in the project by right clicking on the project QueryBaseDemo à Add àReport.


        1. A report will be added to the project with the name “Report1″. Rename the report toQueryBasedDemo.
        2. Now double click the report to open it.

      8. The description of the individual node is given below:
        1. Datasets: Datasets retrieve data from the AOT query. It acts as a bridge between AX and the SSRS report. Only the fields added in the datasets can be used in a report.
        2. Designs: It defines the layout of the report.
        3. Images: It contains the images that you want to display in the SSRS report.
        4. Data Methods: It contains the business logic which can then be used in the report.
        5. Parameters: It is used to apply filtering to the data in a report.
      9. First of all, we will create a dataset. Right click Datasets àAdd Dataset to create a new Dataset. Name it “CustTable”.


      10. Select the data source and open the properties window. Make sure the Data Source Type is set toQuery. Then select the Query field. An ellipse button appears. Click it to open a dialog.

      11. This dialog lists all the queries present in the AOT. Select CustTableListPage and press Next.

      12. Select the fields you want to display in the report and press OK. Only the selected fields in this dialog can be shown in the report.

      13. There are two types of designs that can be created in a SSRS report:
        1. Auto Design: Visual studio automatically creates a design based on the dataset provided. Auto design is the preferred method because it is easy and usually fulfills the requirements for the majority of scenarios.
        2. Precision Design: It is used when you need custom placement of fields or the layout of the report is too complex.
      14. In this demo we will use Auto Design. Now right click the Designs nodeàAdd àAuto Design. A new design is added. Rename it to Design. It is recommended that you set the name of the Design to either ‘Design’ or ‘Report’
      15. Now drag CustTable form the Datasets node and drop it on the Design node. A table will be created which contain all the fields present in the data set. These fields will appear in the same order in the report. So if you want to arrange the fields, right click the field and select either move up or move down.
      16. The final design will look as shown below


      17. Now we have to define the layout of the report. Visual studio provides built in templates. Select the Design and open the properties window. Select ReportLayoutStyleTemplate in the LayoutTemplatefield. Give a suitable title to the report.
      18. Select the CustTableTable under the Design node and open the properties window. SelectTableStyleAlternatingRowsTemplate in the Style Template field.

      19. Report is now completed can be viewed. To preview the report, select the Design node, right click it and select preview. A preview window opens.

      20. Select Report tab. The report appears as shown below:

      21. To view this report from AX, it needs to be added in the AOT and deployed at the report server.
      22. Open the solution explorer and right click the project. Select Add QueryBasedDemo to AOT. This will add the report to the AOT. It will also add the project in the AOT with same name so if you want to modify the report in future, you can use that project.

      23. Now open AOT in AX. Go to SSRS reports à Reports à QueryBasedDemo. Right click the QueryBasedDemo Report and select Deploy Element
      24. A success message will appear if the report is successfully deployed.
      25. To open the report in AX, a menu item is required. Create a menu item that will open the report from AX.
      26. Go to Menu items à Output. Right click Output and select New Menu Item
      27. Set the following properties on the menu item as shown below.
      28. Right click the newly created menu item and select Open to view the report
      29. A parameter form will open. If you want to add parameters to report, you can add it by clicking Select. Press Ok to continue.
      30. The report is displayed as shown below.

    How to prompt a user with a query window

    $
    0
    0
    This seems pretty straight forward but I've been asked it a few times so I'll write about it: "How can I display an interactive query window to the user in code that looks like the Advanced Query Tool?"

    This can be done by taking the QueryRun value and running its method queryRun.prompt() which will return a Boolean value. If the user hits enter, the returned value will be true. If the user cancels out, the value will be false. For this reason, we would want to put this prompt in an if block:

    Query query = new Query();
    QueryBuildDataSource qbds;
    QueryRun queryRun;
    ;

    qbds = query.addDataSource(tableNum(CustTransOpen));
    qbds.addRange(fieldNum(CustTransOpen, AccountNum));

    queryRun = new QueryRun(query);

    if (queryRun.prompt())

         // Run code
    }

    Get query ranges (for user info on report)

    $
    0
    0
    Hi,
    I am trying to create an util class to be used on our reports so the user can see the query ranges on the report header. The code below works for a query for only shows the ranges that are already on the query. If the user adds ranges to the querie I can not get these values. Any ideas?
    Thanks
    static void getQueryRanges(Args _args)
    {
      Query                   query;
      QueryRun                queryRun;
      QueryBuildDataSource    qbd; 
      QueryBuildRange         range;
      int                     cnt, i,j;
      DictTable dictTable;
      DictField dictField;
      str fieldLabel;
      ;
     
      query = new query(queryStr(smmSalesCustItemStatistics));
      queryRun = new QueryRun(query);
      queryRun.prompt();
      query = queryRun.query();
     
      for(i = 1; i <= query.dataSourceCount(); i++) 
      { 
        cnt = query.dataSourceNo(i).rangeCount();     
        dictTable = new DictTable(query.dataSourceNo(i).table());  
        for (j=1 ; j<=cnt; j++)
        {                 
             range = queryRun.query().dataSourceNo(i).range(j);
             dictField = new DictField(query.dataSourceNo(i).table(), fieldname2id( query.dataSourceNo(i).table(), range.AOTname()));
             if (range.value())
             {
                info(strfmt("%1, %2. Range = %3",dictTable.label(), dictField.label(), range.value()));
             }
        }
      }
    }
    • I think user input are defined as filters in the query.
      try this:
      static void getQueryRanges2(Args _args)
      {
       Query query;
       QueryRun queryRun;
       QueryBuildDataSource qbd;
       QueryBuildRange range;
       QueryFilter filter;
       int cnt, filtercnt, i,j, k;
       DictTable dictTable;
       DictField dictField;
       str fieldLabel;
       ;
       query = 
      new query(queryStr(smmSalesCustItemStatistics));
       queryRun = 
      new QueryRun(query);
       queryRun.prompt();
       query = queryRun.query();  
      for(i = 1; i <= query.dataSourceCount(); i++)
       {
          cnt = query.dataSourceNo(i).rangeCount();
          filtercnt = 
      0;    if(!query.dataSourceNo(i).embedded())
          {
              filtercnt = query.queryFilterCount(query.dataSourceNo(i));
          }
          dictTable = 
      new DictTable(query.dataSourceNo(i).table());     for (k=1; k<= filtercnt; k++)
          {
              filter = query.queryFilter(k, query.dataSourceNo(i));
              dictField = 
      new DictField(query.dataSourceNo(i).table(), fieldname2id(query.dataSourceNo(i).table(), filter.field()));
              info (
      strFmt("%1, %2. Range = %3", dictTable.label(), dictField.label(), filter.value()));
          }
          for (j=1; j<=cnt; j++)
          {
              range = queryRun.query().dataSourceNo(i).range(j);
              dictField = 
      new DictField(query.dataSourceNo(i).table(), fieldname2id( query.dataSourceNo(i).table(), range.AOTname()));
              
      if(range.value())
              {
                  info(
      strfmt("%1, %2. Range = %3",dictTable.label(), dictField.label(), range.value()));
              }
          }
       }
      }

    • You need the actual query used in the report (ReportRun.query()), not just the query as defined in AOT.
      Martin "Goshoom" Dráb | UK/Czech rep. | Goshoom.NET Dev Blog
      Troubleshooter 5 Problem Solver 5 Troubleshooter 4 Problem Solver 4 Level 4 Level 3 Microsoft Dynamics AX Community Contributor Microsoft Dynamics AX MVP Community Moderator for Microsoft Dynamics AX
    • I think user input are defined as filters in the query.
      try this:
      static void getQueryRanges2(Args _args)
      {
       Query query;
       QueryRun queryRun;
       QueryBuildDataSource qbd;
       QueryBuildRange range;
       QueryFilter filter;
       int cnt, filtercnt, i,j, k;
       DictTable dictTable;
       DictField dictField;
       str fieldLabel;
       ;
       query = 
      new query(queryStr(smmSalesCustItemStatistics));
       queryRun = 
      new QueryRun(query);
       queryRun.prompt();
       query = queryRun.query();  
      for(i = 1; i <= query.dataSourceCount(); i++)
       {
          cnt = query.dataSourceNo(i).rangeCount();
          filtercnt = 
      0;    if(!query.dataSourceNo(i).embedded())
          {
              filtercnt = query.queryFilterCount(query.dataSourceNo(i));
          }
          dictTable = 
      new DictTable(query.dataSourceNo(i).table());     for (k=1; k<= filtercnt; k++)
          {
              filter = query.queryFilter(k, query.dataSourceNo(i));
              dictField = 
      new DictField(query.dataSourceNo(i).table(), fieldname2id(query.dataSourceNo(i).table(), filter.field()));
              info (
      strFmt("%1, %2. Range = %3", dictTable.label(), dictField.label(), filter.value()));
          }
          for (j=1; j<=cnt; j++)
          {
              range = queryRun.query().dataSourceNo(i).range(j);
              dictField = 
      new DictField(query.dataSourceNo(i).table(), fieldname2id( query.dataSourceNo(i).table(), range.AOTname()));
              
      if(range.value())
              {
                  info(
      strfmt("%1, %2. Range = %3",dictTable.label(), dictField.label(), range.value()));
              }
          }
       }
      }

    • Thanks!
    Viewing all 181 articles
    Browse latest View live


    <script src="https://jsc.adskeeper.com/r/s/rssing.com.1596347.js" async> </script>