Quantcast
Channel: Microsoft Dynamics Ax
Viewing all 181 articles
Browse latest View live

AX 2012 – Business Operation Framework - Create Batch without using RunBaseBatch Framework - Part I

$
0
0
Introduction:
You can develop components / write business logic and later can be hosted as services on AOS with help of Windows communication foundation. These services later can be used by or integrated with the third party applications in order to communicate with Dynamics AX.
BOF Artifacts:
Data Contract Class:
By name only you can identify that this class is going to hold input parameters and query. In simple terms these are fields/controls which we add on ‘Dialog’ to get input from user like FromDate, query criteria’s through select button.
To identify class as Data Contract, we need to use [DataContractAttribute] as below,
And for parm methods, [DataMemberAttribute]
Note:Thumb rule, if you have 10 fields on ‘Dialog’ then you should have 10 parm method.
Service Operation Class:
This class contains main business logic for which you designed/create ‘Data Contract’ class.
UI Builder Class:
BOF automatically generates ‘Dialog UI’ based upon Data Contract class, but if we wanted to access dialog fields at run time for validations like ‘enabled/allowEdit/Lookup’ then we need to create separate class for user interface.
Let us follow below steps in order to create batch class without using ‘RunBaseBatch’ framework, instead we make use of new BOF framework.
Step1:
Create Data Contract class as below,
  1. [DataContractAttribute]
  2. class Tutorial_TestDataContract
  3. {
  4. TransDate transDate;
  5. CustAccount custAccount;
  6. }
For each variable, create parm method and add [DataMemberAttribute] as below,
  1. [DataMemberAttribute]
  2. public TransDate parmTransDate(TransDate _transDate = transDate)
  3. {
  4. transDate = _transDate;
  5. return transDate;
  6. }
//
  1. [DataMemberAttribute]
  2. public CustAccount parmCustAccount(CustAccount _custAccount = custAccount)
  3. {
  4. custAccount = _custAccount;
  5. return custAccount;
  6. }
Step 2:
Once you done with data contract class,  create class to write business logic which will make use of above input parameters. It’s like ‘run’ method of any batch class where we write actual business logic.
  1. class Tutorial_TestBatchServiceOperation extends SysOperationServiceController
  2. {
  3. }
Create ‘new’ method as below
  1. public void new(identifierName _className = "", identifierName _methodName = "", SysOperationExecutionMode _executionMode = 0)
  2. {
  3. super();
  4. this.parmClassName(_className);
  5. this.parmMethodName(_methodName);
  6. this.parmExecutionMode(_executionMode);
  7. }
Create ‘Construct’ method as below
  1. public static Tutorial_TestBatchServiceOperation construct()
  2. {
  3. ClassName className;
  4. MethodName runMethodName;
  5. SysOperationExecutionMode execMode = SysOperationExecutionMode::Synchronous;
  6. Tutorial_TestBatchServiceOperation testBatchServiceOp;
  7. className = classStr(Tutorial_TestBatchServiceOperation);
  8. runMethodName = methodStr(Tutorial_TestBatchServiceOperation, runMyLogic);
  9. testBatchServiceOp = new Tutorial_TestBatchServiceOperation(className,
  10. runmethodName,
  11. execMode);
  12. testBatchServiceOp.parmDialogCaption("Tutorial SysOperation Batch");
  13. return testBatchServiceOp;
  14. }
//Method which will act as entry point to your business logic
//You can compare this method to 'run' method of any class
  1. public void runMyLogic(Tutorial_TestDataContract _data)
  2. {
  3. ;
  4. info(strFmt("You entered %1, %2", _data.parmCustAccount(), _data.parmTransDate()));
  5. }
Finally main method to make class to run
  1. public static void main(Args args)
  2. {
  3. Tutorial_TestBatchServiceOperation testBatch;
  4. testBatch = Tutorial_TestBatchServiceOperation::construct();
  5. testBatch.startOperation();
  6. }
Step3:
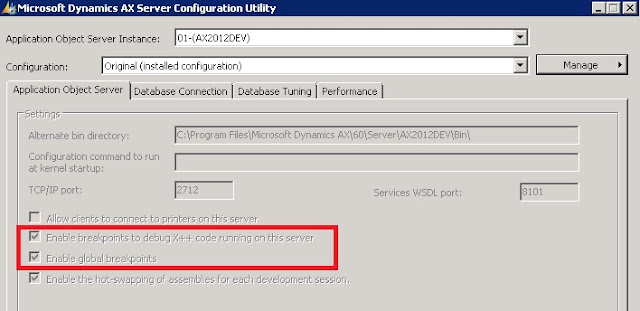
It’s very important to run ‘Incremental CIL Generation’ since above class will get executed on AOS.
Step4:
Run above class ‘Tutorial_TestBatchServiceOperation ‘ and you can see similar/familiar user interface for batch class
image
Click ‘Ok’ and you will get output as below
image
In next part will try to address how to access fields on dialog at run-time to control validations like ‘allowEdit/enabled’ etc….
Untill then ‘Happy Batching :) ‘

Enterprise Portal With SharePoint 2013 Installation & Configuration For Microsoft Dynamics AX 2012 R2

$
0
0
In this blog, I will talk about how to install and configure the Enterprise Portal for Dynamics Ax 2012 R2.
Before installing the enterprise portal, we have to check compatibility of the system, and install valid prerequisite before which is essential for the Dynamics Ax 2012 R2 Enterprise Portal.

Let’s start inspection of system requirements.

  • Open the Microsoft Dynamics AX 2012 R2 setup.
  • Click on “validate system requirements” option.

  • Check the “Enterprise Portal” checkbox from the list of components and then click on validate button.
  •  Install the Pre-requisite listed below in the result.

     
The essential prerequisite for Enterprise Portal is SharePoint Foundation/Server. Here I am installing SharePoint 2013 Foundation. 

  • Download the following Prerequisites & install it manually:
  • sqlncli.msi
  • Windows6.1-KB2506143-x64.msu
  • dotNetFx45_Full_x86_x64.exe
  • Windows6.1-KB974405-x64.msu
  • Synchronization.msi
  • MicrosoftIdentityExtensions-64.msi
  • setup_msipc_x64.msi
  • WcfDataServices.exe

  • Install software prerequisites from the setup of SharePoint Foundation 2013, it will configure “Application server and Web IIS” after that it will automatically install the Windows Server AppFabric and its updates...

     
  • If after installation, the AppFabric server installation shows any error then do as follows…
My computer \ Properties \ System \ Advanced System Settings \ Environment Variables \ System Variables
PSModulePath - C:\Windows\system32\WindowsPowerShell\v1.0\Modules\;c:\Program Files\AppFabric 1.1 for Windows Server\PowershellModules
  • Once the installation will be finished, it will automatically open the SharePoint Products Configuration Wizard, cancel the product configuration wizard and then install “KB2768000” update for SharePoint 2013.  

    After that you can start the SharePoint product configuration wizard, you can start it from
Start > All Programs > Microsoft SharePoint 2013 Products > SharePoint 2013 Products Configuration Wizard
  • Select the new server farm for SharePoint, which is creating a new server farm in the system and then add our server into the new server farm, or else you can connect with any existing server farm by using the passphrase of that server farm.

     
  • Specify your database server name, Username and Password
     
  • Specify your custom port number or you can use the system generated port number as well, choose NTLM as an authentication provider

     
  • It gives summary of the configuration settings, which will be applied, click on the NEXT button and it will start the configuration process
 
  • It will take a little long time to configure the SharePoint product

  • Specify the farm security passphrase, which is used when you want connect another server with this farm
     
  • Hit the FINISH button and SP 2013 will be configured  

  • It will create a new “Config” database, “Admin content” database & other required databases in SQL server for SharePoint like below image. 


After clicking on finish, it will open the configuration wizard in your default browser.

  • Before the configuration of product in the IIS manager, the default SharePoint 80 site is not exist, refer below image
  • Now START the wizard in the browser, which is open after FINISH the product configuration wizard
  • Specify existing or create new management account and do NEXT
  • Specify the title & description of your team site or you can also skip the below step & click on OK button
  • Do FINISH the wizard


  • Now you can see the default SharePoint 80 site on the IIS manage after completing all the configuration wizards. The configuration wizard that helps you to create & configure SharePoint 80.
  • SharePoint 80 site would appear as such below in the browser  
After that open the SharePoint central admin

  • Open manage service on order
  • In that find claims to windows token service, if it is in stop status then start it.
  • After that restart the PC.

Install the EP from 2012 R2 setup.

  • Open the setup of Microsoft Dynamics AX 2012 R2

     
  • Select Add or Modify Component
  • Select Enterprise Portal from component list & do NEXT

     
  • After validation on requirement click NEXT

     
  • Specify a user name and a password for the business connector

       
  • It will use the default SharePoint 80 to create the Enterprise Portal site for Dynamics AX
 
  • Again it will validate the requirement for the Enterprise Portal, Once that finishes do NEXT

     
  • Now click on the Install button and it will start installing the Enterprise Portal for Microsoft Dynamics AX 2012 R2

      
    The installation may take some time

       
  • Finish the installation

Your installation of Enterprise portal with SharePoint 2013 is installed successfully in your system, Now you have to do is assign proper ROLE to the user and setting up the ROLE CENTER the that USER. Other side you can open your Enterprise portal site on the browser with valid credentials

Cheers…

Linking Dynamics AX and SharePoint to Create Your Own Document Management System

PowerShell and AXModel files

$
0
0
In AX 2012 there is a very high chance that you have to work with the new AXModel files.

You may receive an ISV solution, or a Microsoft hotfix and you would like to know what is inside. If you have installed the management extensions, you can go to Start menu > Administrative tools > Microsoft Dynamics AX 2012 Management Shell to open PowerShell to access the AX-specific utilities.

We have a hotfix in our example, and would like to see what objects are inside, which may cause a conflict with out customizations. You can run the following command to get more details from our AXModel hotfix:

Get-AXModel -File 'D:\kb2652504.axmodel' -Details

This would return 3 array values, namely Manifest, Summary and Elements. Now to extract more information, you may specify additional criteria in the following way:

$elements = (Get-AXModel -File 'D:\kb2652504.axmodel' -Details).Elements
$elements | Select-Objects Path

The output would list all AOT objects which are within the AXModel file.

Deleting duplicate records in Table through code in X++

$
0
0
static void DeleteDuplicate(Args _args)
{
Set fieldset = new set(types::Integer);

// create dictindex from unique index 

DictIndex dictIndex = new dictIndex (tablenum(PurchTable), indexnum(PurchTable,PurchIdx));

;

// these are fields from index

// add them to set

fieldset.add(fieldnum(PurchTable ,OrderAccount));

ReleaseUpdateDB::indexAllowDup(dictIndex);

// set allow duplicates

ReleaseUpdateDB::deleteDuplicatesUsingIds(tablenum(PurchTable),0,fieldset);

//reenable duplicates

ReleaseUpdateDB::indexAllowDup(dictIndex);

info("Deletion done");


}

AX 2012 CIL - How does it work?

$
0
0
Hi There,

On this post I would like to talk about a bit more about the CIL and what happens in the background. Recently I had to go through a process to find a CIL error I got after deploying a service. You can read my post solving the error "The CIL generator found errors and could not save the new assembly" for more information on this.

After digging a bit more on the CIL errors, I started researching on how exactly the NetModule files are generated under the XppIL folder and why. In addition, I also was intrigued by the source files and their relationship to debugging services and or batch jobs in Visual Studio. 

Just for the record, I’m not an expert on this, and the following information has been taken from different sources and from my own experience in the past few hours being “exposed” to the services virus (it is kind of addictive).


So, what is CIL? CIL stands for Common Intermediate Language and it works together with the CLI or Common Language Infrastructure, which is basically a set of rules on programming languages that will compile with the CIL. I created a diagram to help me understand this concept on a visual way. 

Please note that I took the diagram from a book, but I modified it to my own needs.


As you can see, now we have the ability to compile P-Code to CIL, and therefore AX 20212 is able to run X++ code directly into the CIL, which is much faster the P-Code compiler we had before. 

As you probably know, we have two types of CIL compilations, the incremental CIL and thefull CIL compilation. The major difference between the two of them is that the incremental CIL would compile only the objects that were modified since the last incremental compilation. For what I have learned, the full CIL generation is mandatory when we do modify anything on the XppIL folder.

On the XppIL folder, I noticed that we have a bunch of files there. These files are NetModule type files and they only contain type metadata and compiled code. It is important not to confuse a NetModule type file with .NET assemblies, as these contain and assembly manifest and managed code. 


Now the really interesting portion of this is that within the XppIL folder there is a folder named “source”, and within this folder we find a bunch of files with the .xpp extension, which have x++ source code and are used to debug CIL code in Visual Studio when working with services and batches. 


Further, another interesting point to this is that the “existence” of the source folder is directly related to our server configuration when choosing to enable debugging on the server. 


IL Compiles Explained

$
0
0
I've been asked several times what a Full or Incremental IL
Compile is in AX 2012.  If you have that same question here is some
background information.  IL stands for Intermediate Language it is short
for CIL - Common Intermediate Language.  When you write code in Visual
Studio (VS) you can write in many different languages, Visual Basic, C#, F# -
there are lots of choices.  In VS when you build or compile your project
those languages are all mapped down to a different language - the Common
Intermediate Language.  That means if you are writing in Visual Basic your
if/else statement in Visual Basic becomes whatever the equivalent is in
CIL.  The Common Language Runtime (CLR) that ships with .NET understands
the Common Intermediate Language and knows how to execute that code.  The
CLR does not need to understand all of the different languages (like C#, VB or
F#) it needs to only understand the one language they all get mapped down to,
CIL. 

In AX you program in X++ and the equivalent of AX's CLR is
the kernel.  When you build or compile your X++ code it traditionally gets
mapped down to a p-code language that the kernel understands and knows how to
execute.  In AX 2012 for certain classes that is what has changed.
Now when you compile the X++ code gets mapped down to the Common Intermediate
Language.  Then the CLR understands what the code says and executes it -
the kernel is not needed.

In AX 2012 there are two different kinds of compiles you can
run: a full or an incremental compile.  A full compile goes through all of
the X++ code in your AX environment and compiles the classes that run in batch
and service classes down to CIL.  A full IL compile takes a lot of memory!
You'll need at least 4 gig of memory free on the machine and I'd get more if
you can.  If you are trying to run a full IL compile and your system keeps
crashing, you need more memory.  An incremental compile maps all of the
service classes and classes running in batch to CIL that have changed since you
last ran a IL compile.  While you are doing development work you generally
only need to do an incremental compile since when your system was installed
part of the checklist involves running a full compile.

If you are having problems doing an incremental compile I
would dig into whatever errors the compiler is giving you, you probably have
something wrong in your code.  When you build your code with the X++
compiler (the compile button on the toolbar) that compiler is less stringent
about what qualifies as a compile error than the IL compiler is.  If the
X++ compiler compiles successfully but when you go to the Build > Generate
Incremental CIL option it fails, you likely have an issue in your code.
Look at which line the error message says is wrong in the description field of
the output and not at the line field.

Lastly if you get IL compilation errors you should stop and
figure them out before you proceed.  If your code does not compile, you
will run into issues where you have modified a class but your modifications are
not being used or when you call a service it does not see your changes.
Your changes are not being seen because they have not yet been compiled down to
IL code and therefore the CLR does not see them and is not trying to execute
them.

How to: Open Visual Studio with a Specific Configuration [AX 2012]

$
0
0
You can configure Visual Studio to open with a specific Microsoft Dynamics AX client configuration. This causes Application Explorer to point to the designated configuration. A configuration is a group of startup settings that are used by a client. For more information, see Manage a client configuration
To open a specific configuration, you use the /AxConfig switch with a parameter of either a configuration name or the path and file name of a configuration file (.axc file). If your configuration name or configuration file name contains spaces, be sure to enclose the parameter in quotes. If no parameter is specified, then the default configuration is used.
If you are working with reports, the Visual Studio integration uses the active local client configuration to establish the connection. Examples that require a Reporting Services configuration include deploying a report or selecting a query as a data source. To point to the correct AOS in this scenario, create a copy of the configuration file in the Visual Studio integration folder.
TipTip
If you point Visual Studio to an invalid configuration or a configuration that has been deleted and then try and open it, Visual Studio will open but the Application Explorer pane will display the message AOS Disconnected.
This topic shows you how to configure Visual Studio to open with a client configuration from a shortcut or from the command line. It also describes how to set the configuration for Microsoft Dynamics AX reporting scenarios.

Prerequisites

To complete this scenario you will need:
  • Microsoft Dynamics AX with Visual Studio Tools installed
  • Visual Studio 2010
  • At least one Microsoft Dynamics AX client configuration

To Open Visual Studio with a Specific Configuration from a Shortcut

  1. On the client computer that is running Visual Studio, open the Start menu, right-click Visual Studio 2010, and select Properties.
  2. Update the Target field and add the /AxConfig switch with either the name of the client configuration or the name of the client configuration file as shown in the following examples:
    "C:\Program Files\Microsoft Visual Studio 9.0\Common7\IDE\devenv.exe" /AxConfig ContosoDev
    or
    "C:\Program Files\Microsoft Visual Studio 9.0\Common7\IDE\devenv.exe" /AxConfig z:\Config\ContosoDev.axc
    If you run the Visual Studio executable with a parameter of /?, then it will show you all the available switches you can use.
    NoteNote
    When pointing to a configuration file, you can use a Universal Naming Convention (UNC) file location such as \\Server\Configurations\ContosoDev.axc.
  3. Click OK. When you click the Visual Studio shortcut, it opens and Application Explorer points to the specified client configuration. The name of the configuration appears at the top in the root node of Application Explorer.

To Open Visual Studio with a Specific Configuration from the Command Line

  1. You can open Visual Studio with a client configuration from the command line. To do so, click Start > Run, type cmd and then click OK.
  2. Navigate to the directory that contains the Visual Studio IDE executable, for example, C:\Program Files (x86)\Microsoft Visual Studio 10.0\Common7\IDE. Then type one of the commands shown in the previous procedure (without the quotes), for example, devenv.exe /AxConfig ContosoDev.

To Create a Specific Configuration for Reports

  • To create a configuration for Reporting Services, run the Microsoft Dynamics AX configuration utility as an administrator, and then click Manage > Save configuration as file, and give the configuration a name likeMicrosoft.Dynamics.AX.ReportConfiguration.axc. The file must be saved in the PrivateAssemblies folder in the Visual Studio IDE installation directory, like the following:
    C:\Program Files (x86)\Microsoft Visual Studio 10.0\Common7\IDE\PrivateAssemblies.

Types of MAP in dynamics AX

$
0
0

There are two types of Maps available in dynamics AX

1. X++ Maps: it can be used as a temp data store for the given scope of a process. This takes us less over head, and is much quicker than a TempTable.
Map class allows you to associate one value (the key) with another value. Both the key and value can be any valid X++ type, including objects. The types of the key and the value are specified in the declaration of the map. The way in which maps are implemented means that access to the values is very fast.
Below is a sample code that sets and retrieves values from a map.


static void checkItemNameAliasDuplicate(Args _args)
{
inventTable inventTable;
Map map;
MapEnumerator mapEnumerator;
NameAlias nameAlias;
int counter = 0;
;

map = new Map(Types::String, Types::Integer);

//store into map
while select inventTable
{
nameAlias = inventTable.NameAlias;
if (!map.exists(nameAlias))
{
map.insert(nameAlias, 1);
}
else
{
map.insert(nameAlias, map.lookup(nameAlias) + 1);
}
}


//retrieve from map by using MapEnumerator
mapEnumerator = map.getEnumerator();
while (mapEnumerator.moveNext())
{
nameAlias = mapEnumerator.currentKey();
info(strfmt("%1,%2",mapEnumerator.currentKey(),mapEnumerator.currentValue()));
}
}

How to display/show the inventory dimensions as parameters on SSRS reports [Dynamics AX 2012, X++]

$
0
0
Today, I am going to help you how to display the inventory dimensions [product dimensions, storage dimensions, Tracking dimensions] on SSRS reports as parameters. Not clear? Please see the Report parameters screen below.
All the inventory dimensions are available to be selected on report parameters below. You will see this view in almost all inventory reports and other module reports.
image
Well, Let me explain how to achieve this and retrieve the values in the data provider class
Its very simple, we need to make use of the contract class for this inventory dimensions view.
Standard has got a InventDimViewContract class with all the parm inventory dimensions methods and we can use these methods later in the DP classes for the selected inventory dimensions by the user on the report parameters screen.
Create an Object for InventDimViewContract in your contract class as shown below [Please note: I am using ProdPickListContract] as an example below
image
Then add a new parm method to the contract as shown below.
[DataMemberAttribute('InventDimViewContract')]
public InventDimViewContract parmInventDimViewContract(InventDimViewContract _inventDimViewContract = inventDimViewContract)
   
    inventDimViewContract = _inventDimViewContract;
    return inventDimViewContract;
}
That’s it, by adding the above discussed,we will get the inventory dimensions on the parameters screen.
Now, the question is how do we get the selected dimensions from the user. Its simple again.
In your data provider class, mainly in processReport method, get the object of the contract class and call theparmInventDimViewContract() method, this object will help you to retrieve the inventory dimensions selected by the user by using parm methods in it. [Example : ParmViewConfigId(), parmViewInventBatchId() etc]. Please refer to screen shot below.
image
You can use these selected inventory dimensions values based on your requirements. The above screen shot is just an example of retrieving the values.

Query to get data less than date in ax 2009/ ax 2012

$
0
0

X++ Code to get the Ranges / Criteria from Query

 
Following Job illustrates how we can get the criteria / ranges specified by the user in the run-time Query criteria dialog.
static void Query_getRanges(Args _args)
{
    Query                   query = new Query();
    QueryRun                queryRun;
    QueryBuildDataSource    qbd;
    CustTable               custTable;
    QueryBuildRange         range;
    int                     cnt, i;
    ;

    qbd = query.addDataSource(tablenum(CustTable));

    queryRun = new QueryRun(query);

    queryRun.prompt();   // To Prompt the dialog

    cnt = queryRun.query().dataSourceTable(tablenum(CustTable)).rangeCount();
//custGroup = this.query().dataSourceTable(tablenum(CustInvoiceJour)).range(1).value();

    for (i=1 ; i<=cnt; i++)
    {
        range = queryRun.query().dataSourceTable(tablenum(CustTable)).range(i);
        info(strfmt("Range Field %1, Value %2",range.AOTname(),range.value()));
    }

    while (queryRun.next())
    {
        custTable = queryRun.get(tablenum(CustTable));
        info(strfmt("Customer %1, Name %2",custTable.AccountNum, custTable.Name));
    }
}
 

Query to get data less than date

 
private Query buildQuery(Query _query,StartDate _date)
{
    if(!tDate)
        tDate = systemDateGet();
    if(tDate)
    {
        _query.dataSourceTable(tablenum(DNemplContract)).addRange(fieldnum(DNemplContract, StartDate)).value(strFmt("<= %1", tDate));
      //  _query.dataSourceTable(tablenum(DNemplContract)).addRange(fieldnum(DNemplContract, //StartDate)).value(queryValue(tDate));
 
    }
        return _query;
}

Get the underlying SSRS Report Query, reset query , add your own ranges and execute report [Dynamics AX 2012, X++]

$
0
0

Friends,
Below is the small code snippet to get the underlying query of the SSRS report, reset query, prompt the parameters form, add our own ranges and execute the report. You can customize the job as per your requirements. Below I have used CustBaseData.Report report and added my own range on customer group.
static void SR_ResetQueries_executeReport(Args _args)
{
    #define.reportName(‘CustBaseData.Report’// report Name
    QueryBuildRange queryBuildRange;
    QueryBuildDatasource queryBuildDatasource;
    SRSReportRun srsReportRun;
    Query reportRunQuery;
    srsReportRun = new SRSReportRun(#reportName);
    srsReportRun.init();
    srsReportRun.resetQueries(); // reset the query
    reportRunQuery = srsReportRun.reportQueries().lookup(srsReportRun.currentQueryKey());
    if (srsReportRun.isInitialized() && srsReportRun.prompt()) // prompt the parameters form
    {
        queryBuildDatasource = SysQuery::findOrCreateDataSource(reportRunQuery, tablenum(CustTable));
queryBuildRange = SysQuery::findOrCreateRange(queryBuildDatasource,  fieldnum(CustTable, CustGroup));
        queryBuildRange.value(‘INT’);
        queryBuildRange.status(RangeStatus::Hidden);
        srsReportRun.saveSettings();
        srsReportRun.executeReport();
    }
}

Display SSRS report based on customer/Vendor specific language [Dynamics AX 2012]

$
0
0

Friends,
Common requirement is to show the reports in customer’s language [example : Quotations, sales confirmations, invoices, Free text invoices, Return order acknowledgements , Agreements,  Purchase order confirmations etc].
This was easily achievable in Dynamics AX 2009 reports by using
element.design().languageID(custConfirmJour.LanguageId); // language id
Well, how do I achieve the same thing  in AX 2012 SSRS Reports? image
Its simple , we still have one liner code only in AX 2012image
We need to use the controller classes, runPrintMgmt() method or preRunModifyContract() method which changes the contract class before report is run and am leaving this to you based on the requirements.
this.parmReportContract().parmRdlContract().parmLanguageId(custConfirmJour.Language);
Below is the screen shot for reference:image
image

Parameters Overview [AX 2012]

$
0
0
Applies To: Microsoft Dynamics AX 2012 R2, Microsoft Dynamics AX 2012 Feature Pack, Microsoft Dynamics AX 2012
Parameters are used to filter the data that is displayed in a report, connect related reports together, and control report presentation. For example, you can write an expression to change the font based on a parameter that was passed to the report. This topic provides guidance about how to define parameters in a report model, the types of parameters that you can use in a Microsoft Dynamics AX report, and information about how to group and order report parameters.

Parameters in a Report Model


You can use Model Editor to define a report. Model Editor is a tool provided by the Visual Studio tools for Microsoft Dynamics AX. You will see two kinds of parameters in Model Editor as shown in the following illustration:
Model Editor Screenshot with Parameters
You can add a dataset to a report to bind the report to data. A dataset can be bound to a query, business logic, report data provider, AX enum provider, or an OLAP data source. For more information, see Guidance for Choosing the Data Source Type. When you add the dataset, dataset parameters are added to the report model. The dataset parameters are in the Parameters node under the dataset. Dataset parameters are the parameters that are generated for that dataset. You do not have to modify the dataset parameters unless you have to modify the report parameter that the dataset parameter is referencing. Report parameters are in the Parameters node at the report level. Report parameters are the parameters that the end user of the report sees when they run the report. Some report parameters are created by the reporting framework, such as a report parameter for each dataset parameter and the system parameters. Also, you can manually define report parameters.
Dataset parameters become relevant in a scenario where you reference the same report parameters from multiple dataset parameters. When you define a dataset, the applicable dataset parameters are generated for the report. Each dataset parameter references a report parameter in the Report parameter property. If you define a report that has more than one dataset that references the same field, then you may want to configure the dataset parameters to reference the same report parameter.
For example, assume you have two datasets, each bound to a different query with a range set on the InvoiceID field. In Model Editor, two dataset parameters and two report parameters are generated for the two datasets as shown in the following screen shot.
Model Editor Screenshot Illustrating Parameters
The end-user of the report will be prompted two times for the InvoiceID parameter. You can delete one of the report parameters for InvoiceID and set the Report parameter property for both dataset parameters for InvoiceID to the remaining InvoiceID report parameter. The report that is generated would prompt the user for the value of the range and filter data from both datasets based on the single report parameter value. For more information seeWalkthrough: Referencing a Report Parameter from Multiple Datasets in a Precision Design Report.

Types of Parameters


Parameters are static unless you explicitly make them dynamic.
  • Static parameters are bound to a dataset and let the end user filter report data based on the fields you defined as report parameters. For more information, see How to: Define a Report Parameter.
  • Dynamic parameters allow the end user of the report to add more filters based on any of the fields from the report data. For more information, see How to: Define a Report with Dynamic Filters.
This section references report names as examples. For information about how to access the reports in Visual Studio tools for Microsoft Dynamics AX, see How to: Access a Report for Edit. The following table describes how adding datasets bound to various data source types will create different types of parameters:
Dataset parameter
Description
Query parameter
You create a query parameter when you add a dataset that is bound to an AOT query with a range. A dataset parameter and report parameter are created in the report model for each range set in the AOT query. When you create a query in the AOT, the query is defined by using the SysQuery class. Enterprise Portal (EP) cannot process reports that use SysQuery parameters so the parameters must be added explicitly for EP.
The following list describes how setting the Dynamic Filters property is used to indicate whether the query parameters should be static or dynamic.
  • static range parameter is created in the report model when you bind a dataset to a query that has a range specified, and the Dynamic Filters property on the dataset is set to False. A dataset parameter and report parameter are created in the report model for each query range. The parameters are named the same as the field that the range is based on for the AOT query. The end-user will be prompted to provide a value for the parameter to filter the report based on the range, but they will not be able to add more fields to filter on. The ProjBeginningBalances report contains examples of static range parameters. The ProjBeginningBalancesCostSalesDS dataset is bound to the ProjBeginningBalancesCostSales query and the Dynamic Filters property is set to False. The query has a range set on theVoucher field. A static range parameter called Voucher was generated when the dataset was added to the report model.
  • dynamic range parameter is created in the report model when you bind a dataset to a query that has a range specified, and the Dynamic Filters property on the dataset is set to True. One dataset parameter that references a report parameter is created to pass any of the filters to Reporting Services that the end-user adds. The naming convention for the dataset parameter and report parameter is[DatasetName]_DynamicParameter. Most of the reports that are included with Microsoft Dynamics AX that are bound to a query also have the Dynamic Filters property set to True and a dynamic parameter was added for them. An example of a dynamic range parameter can be found in the AssetAcquisition report.
For more information, see Using Queries to Access Report Data.
Business logic parameter
You define a business logic parameter in a data method by using C# or Visual Basic. The parameters specified in the data method signature are reflected in the report model when you build the solution that contains the data method. The following list describes the common scenarios to use a data method as a source of report data:
  • You want to perform processing logic on report data after it is retrieved from a source other than Microsoft Dynamics AX.
  • You want to use web services to access report data that is from a source other than Microsoft Dynamics AX.
You can use a dataset bound to a data method when the report data is something other than Microsoft Dynamics AX. Therefore, you will not find examples of these types of reports included with Microsoft Dynamics AX. For more information, see Using Business Logic in Report Data Methods to Access Report Data.
Report data provider (RDP) parameter
An RDP class is an X++ class that is used to access and process data for a report. You would use an RDP class when the following conditions are true:
  • You cannot query directly for the data that you want to display on a report.
  • The data to be processed and displayed is from Microsoft Dynamics AX.
You define the parameters that an RDP class references in a data contract class. Many of the reports that are included with Microsoft Dynamics AX are bound to an RDP class. For an example, see the AgreementConfirmation report and the many parameters defined for the AgreementConfirmation report in the AgreementConfirmationRDPContract class. For more information, see Using Report Data Provider Classes to Access Report Data.
AX enum provider parameter
You can expose enum types on a report in a friendly drop-down list. For example, if you create a report to show data based on the BankAccountType enumeration, the end user would see a Bank account typeparameter and select whether Checking or Savings data should display on the report. One option is to create a range on a query to expose an enum parameter in the Microsoft Dynamics AX client. However, if you want the report to be run from Enterprise Portal, you must use an AX Enum Provider to define the parameter. For more information, see Using AX Enum Provider to Access Report Data.
Online analytical processing (OLAP) parameter
You can access multi-dimensional analytical data on a report when you bind a dataset to an OLAP data source. The WorkflowPerformance report contains examples of OLAP parameters. For example, the Moduleparameter was defined as an attribute in the Workflow cube and the values that the end-user sees in the parameter drop-down list are members of the Module attribute.
Dataset parameters are bound to a specific report parameter. A report parameter is created for each dataset parameter. The report parameters are the parameters that are displayed on a report. The following table describes report parameter types that can be created in addition to the report parameters that correspond to each dataset parameter:
Report parameter
Description
Filter parameter
To add a filter parameter, you add a report parameter, add a report filter in an auto design report, and then set the filter Expression property to the report parameter. This prompts the end user of the report to provide a parameter value that will be used to filter the report data. These parameters enable interactive, client-side data filtering in a report. Since filters are applied on the client, there is no round-tripping required that results in a performance improvement to the report. For more information, see How to: Define a Report Filter.
System parameter
System parameters are added to the report model when you add a dataset to the report. System parameters are based on metadata for the company name, user context, language, and report context. System parameters are prefixed with AX_, for example, AX_CompanyName. The system parameters are internal parameters, not visible to the end-user, and primarily used by the reporting framework except for the following exceptions:
  • AX_CompanyName – to control the company as a parameter, make the parameter visible. For more information, see How to: Create a Company Parameter in a Report.
  • AX_RenderingCulture – to control the rendering culture as a parameter, make the parameter visible to let the end user of the report to select a culture, for example EN-US.
  • AX_ReportContext – to determine which type of client the report is running on, for generating the correct drill through. For more information, see How to: Add a URL Drill Through Action on a Report.
Additional ways to define parameter drop-down values:
  • Unbound parameter – You can display a set of values as a report parameter that is not from a dataset. You provide a set of value/label pairs for each item that you want to include as an available value. For more information, see How to: Define a Report Parameter.
  • Cascading parameter – Cascading parameters provide a way to manage large amounts of report data. You can define a set of related parameters so that the list of values for one parameter depends on the value chosen in another parameter. For example, the first parameter is independent and might present a list of product categories. When the user selects a category, the second parameter depends on the value of the first parameter. Its values are updated with a list of subcategories in the chosen category. When the user views the report, the values for both the category and subcategory parameters are used to filter the report data.

Grouping and Ordering Parameters


You can control the grouping and ordering of report parameters on a report. You can use either a data contract class or Model Editor to do this.
You use X++ code editor and a data contract class to define the grouping and order of report parameters when you want to maintain consistent formatting when you reuse the data contract in another report. You define a data contract class in the X++ code editor for a dataset that is bound to a report data provider (RDP) class. You can specify one or more groups of report parameters, the order of the groups, and the order in which the report parameters appear in a print dialog box. For more information, see How to: Group and Order Report Parameters by Using a Data Contract Class.
You use Model Editor to define the grouping and order of report parameters when the scenario is complex, such as when you want to use multiple nested groups. The order that the report parameters are listed in a group is the order that the end user will see them on the report. This makes the grouping and order in Model Editor easy to see as you define the report.. The grouping and order of report parameters that you specify in Model Editor take precedence over the grouping and order that you defined in the data contract. For more information, see How to: Group and Order Report Parameters by Using Visual Studio.

How to format your number the CLR style

$
0
0
Converting (real) numbers to a string representation is a common requirement. There are different roads that lead to Rome, I'll show you some alternatives, which all have one thing in common: They all use Format.

You can use num2str to convert your real numbers to a string, or you can use Format.
Example, controlling the number of decimals showed:  (decimal point acts as decimal separator)

1
2
3
4
5
6
7
static void FormatExamples(Args _args)
{
    real        mynumber=123.4;
    String30    mynumberstr = System.String::Format("{0,0:#.00}", mynumber);
    ;
    info(strfmt("Your number is %1", mynumberstr));
}

You can use the Format command to add leading zeros also.
Example:

1
2
3
4
5
6
7
static void FormatExamples(Args _args)
{
    real        mynumber=123;
    String30    mynumberstr = System.String::Format("{0,0:00000}", mynumber);
    ;
    info(strfmt("Your number is %1", mynumberstr));
}

Notice that you can also use rounding like this as well.  Besides this basic function, we can actually do some conversions.
You can use Format to convert to hexadecimal for example.
Example:

1
2
3
4
5
6
7
static void FormatExamples(Args _args)
{
    int        mynumber=255;
    String30   mynumberstr = System.String::Format("{0,0:X}", mynumber);
    ;
    info(strfmt("Your number in Hex: %1", mynumberstr));
}

How to: Explode BOM through X++

$
0
0
1.Create a new Temporary Table with the following properties
PropertieValue
NameTmpBOMExplode
TableTypeInMemory
FieldExtended Data Type
BOMQtyBOMQty
ItemIdItemId
ItemNameItemName
LevelInt
RefItemIDItemId
It should look like this:
TmpBOMExplode
2.Create a new Class, I will call it BOMDesign, and Modify classDeclaration.
1
2
3
4
classBOMDesign
{
    TmpBOMExplode tmpBOM;
}
3.Create a method to create the parent Item.
1
2
3
4
5
6
7
8
9
10
11
12
13
14
15
16
privateintInsertParentItem(ItemId _itemId, int_level)
{
    InventTable inventTable;
    ;
 
    //Gets the parent information and then insert on TmpBOMExplode Table with level 0.
    selectfirstOnly inventTable whereinventTable.ItemId == _itemId;
 
    tmpBOM.ItemId = _itemId;
    tmpBOM.ItemName = inventTable.itemName();
    tmpBOM.Level = _level;
    tmpBOM.BOMQty = 1 ;
    tmpBOM.insert();
 
    return_level+ 1 ;
}
4.Create a method that verifies if the current Item is also a BOM Item.
1
2
3
4
5
6
7
8
9
10
11
12
13
14
15
16
17
boolean hasChild(ItemId _itemId)
{
    BOMVersion  bomVersion;
    ;
 
    //Check if the item is also a BOM item.
    selectfirstonly bomVersion
            wherebomVersion.ItemId == _itemid
            && bomVersion.Active
            && bomVersion.FromDate <= systemdateget ()
            && (!bomVersion.ToDate || bomVersion.ToDate >= systemdateget ());
 
    if(bomVersion.RecId)
        returntrue;
 
    returnfalse;
}
5.Now, create the method which will explode the Item recursively, every time it calls itself we have to increase the level number.
The Level number is useful if you want to create a Tree Control later.
1
2
3
4
5
6
7
8
9
10
11
12
13
14
15
16
17
18
19
20
21
22
23
24
25
26
27
28
29
30
31
32
33
34
35
36
37
38
39
40
41
42
43
44
voiditemExplode(ItemId _ItemId, int_level = 0, BOMQty _bomQty = 1)
{
    BOM         bomTable;
    InventTable inventTable;
    BOMVersion  bomVersion;
    ;
 
    //Insert parent Item
    if(_level == 0)
        _level = this.InsertParentItem(_ItemId, _level);
 
    //Verifies if the Item exists in BOMVersion Table.
    //The item must be active and not expired.
    selectfirstonly bomVersion
            wherebomVersion.ItemId == _itemid
            && bomVersion.Active
            && bomVersion.FromDate <= systemdateget()
            && (!bomVersion.ToDate || bomVersion.ToDate >= systemdateget());
 
    if(bomVersion.RecId)
    {
        //Every item on BOMVersion has a BOMId which is used to show
        //which products belong to a BOM Item.
        While selectbomTable
            wherebomTable.BOMId == bomVersion.BOMId
            joininventTable
            wherebomTable.ItemId == inventTable.ItemId
        {
            //Insert the items that compose the BOM Item with level 1.
            tmpBOM.ItemId = bomTable.ItemId;
            tmpBOM.ItemName = inventTable.itemName();
            tmpBOM.RefItemId = bomVersion.ItemId;
            tmpBOM.BOMQty = bomTable.BOMQty / bomTable.BOMQtySerie * _bomQty;
            tmpBOM.Level = _level;
            tmpBOM.insert();
 
            //This method is used to check if the BOM Item is composed by
            //another BOM Item, case true it will call the method recursively
            // with level 2.
            if(this.hasChild(bomTable.ItemId))
                this.itemExplode(bomTable.ItemId, _level+ 1, tmpBOM.BOMQty);
        }
    }
}
5.Main method used to test Class.
1
2
3
4
5
6
7
publicstaticvoidmain(Args args)
{
    BOMDesign bomDesign = newBOMDesign();
    ;
 
    bomDesign.itemExplode( 'D0001', 0 );
}
6.I have temporarily changed the TableType to regular so I can see the results.
TmpBOMExplodeTable

Current session id

$
0
0
You can retrieve the current client session id by using the following function: SessionId().

So, for example in a job, to show the current session id

static void ClientSessionJob(Args _args)
{ ;
info(strfmt('This client session id is %1',int2str(SessionId())));
}

You can use this function together with the class xSession to collect more info.
The class xSession is responsible for retrieving various session information. Like the logon date and time:

static void LogonDateTime(Args _args)
{ xSession xSession;
;
xSession = new xSession(SessionId());
info(strfmt('The logon date and time were %1',DateTimeUtil::toStr(xSession.loginDateTime())));
}

Or the current AOS server name you're logged onto:

static void CurAOSServerName(Args _args)
{ xSession xSession;
;
xSession = new xSession(); 
info(strfmt('Current AOS server name logged onto is %1',xSession.AOSName()));
}

Instantiate the class xSession without a session id to get info for the current session.

The user id used to create the session is also available. But there is an alternative for this one:

static void ClientUserId(Args _args)
{ ;
info(strfmt('Current logged on user id %1',curUserId()));
}

Issue when you run the report Vendor invoice turnover with a user who is not a member of role System Administrator, the report displays empty lines.

$
0
0
When you run the report Vendor invoice turnover (Accounts payable - Reports - Statistics - Invoice - Vendor invoice turnover) by user who is not a member of role System Administrator, the report displays empty lines.
Only users with role system administrator assigned get data on the vendor invoice turnover report. Users with other roles get a report with multiple pages without anything on it.
Unfortunately, we are not able to deliver a KB as a resolution for this issue. AX product group has decided to resolve this issue in the future release of the product.
Recommendation for scenario resolution is the following:
Prerequisite


User is set up:

- as member of “Domain User” and ”Remote desktop Users” permission and not
member of “System Administrator”

- with “Accounts Payable Manager” role (or Accountant role)
Resolution


In AOT > Security > Roles, select VendInvoiceAccountsPayableManager
(same applies to role LedgerAccountant)
Select
Permissions
In
Tables, Add VendInvoiceVolumeTmp
Right
click > Properties
Table
= VendInvoiceVolumeTmp
EffectiveAccess
= Delete
ManagedBy
= Manual

“Microsoft provides programming examples for illustration only, without warranty expressed
or implied, including, but not limited to, the implied warranties of
merchantability or fitness for a particular purpose. This message assumes that
you are familiar with the programming language that is being demonstrated and
the tools that are used to create and debug procedures.”

Unretrieved values on the company info Table in AX 2012R2

$
0
0
Stack trace: Field ‘IsConsolidationCompany’ in table ‘CompanyInfo’ has not been explicitly selected.
Solution:
————
go to db edit dbo.dirpartytable.isConsolidateCompany from null to 0

Tutorial: AX 2012 - Invalid field access or Accessing unretrieved fields

$
0
0
Read the post all the way until the end - there's an ask for you guys there!

As many of you have already seen in the new AX 2012 release, there are a lot more tables present in the application, because we went through an exercise of normalizing the data model.
Another feature that was added at the same time was the Table Inheritance, allowing to sub-class tables and add additional fields reusing some of the behaviors of the base table.

All of it is great! The only problem with it is that it comes at a price - we now need to retrieve a lot more data and do a lot more joins between tables. So we tried to mitigate that by using field lists where possible and adding AdHoc query support, which basically eliminates unneccessary joins between tables from the hierarchy, if fields from these tables are not selected.

We have also implemented a number of things that allow us to clearly see if the field was selected in the user interface, the APIs needed for doing the same, as well as special handling for invalid field access.

This tutorial contains a form, which showcases the different aspects of data access in cases described above.
You can download the project with the tutorial from my SkyDrive.

On the first tab, we have the standard "On hand" view, which in the data model is a join between InventSum and InventDim, with group by clauses on selected fields, in this case, ItemId from InventSum and InventLocationId from InventDim, and aggregation on the AvailPhysical column.
As you can see from the screenshot below, the rest of the InventDim fields are shown asUnretrieved. So, naturally, accessing one of them from code, for example, should not be a legal operation.
To verify that statement, there are 2 buttons on the form, the Incorrect and the Correct was of accessing the field. Clicking on the first one simply tries to read the value out of the InventSiteId field, while the second one uses the API method TableBuffer.isFieldDataRetrieved() to first verify if the field can actually be accessed.

Note, that in the below example, both buttons will work, as in, there won't be any errors shown to the user. When accessing the field, even though it is not retrieved to the client, the value will be treated as the default value for that type, that is, an empty string.

In order to verify that we do not access fields in an invalid way like above, we have introduced a parameter, that will throw an exception if a field that was not retrieved is being accessed.

In order to enable this validation, you need to update the below shown parameter in the Server configuration form (Located under System administration \ Setup \ System). After changing the value (note, that it is per AOS) you need to restart the AOS for the changes to take effect.


Now, if you try to use the first button (under Incorrect) from above, you will get a stack trace, notifying you that the specified field was not retrieved.


We suggest that when testing your modifications in the application, you always have that flag enabled, so as to avoid unpleasant and hard-to-find bugs later on in the production environment.


On the second tab of the Tutorial form, the same type of information is presented, only this time the output is actually based on a new table inheritance structure I created.


The base table, GenericBall, contains 2 characteristics of any ball. SoccerBall is extending it and adding an additional characteristic (for the sake of the example, let's assume Brand is only relevant to soccer balls). This is basically a very simple table inheritance structure.

In the form, however, I am only selecting to view the Brand field from SoccerBall, not selecting the other 2 fields from the base table. As expected, they show up as Unretrieved in the user interface.
However, there is one difference in how Scsc tables are handled - and that is, they will always throw an exception when you try to access one of the unretrieved fields.
The two buttons above the grid demonstrate that. Try it out, enabling/disabling the server configuration parameter shown above.


That's pretty much all there's to it. Let me know if you have any questions.

Now, I have one thing to ask you all too.
We in the AX Test team have done our best to find invalid field access problems before the release, but if you find one using the approach above, please log it either through the standard Microsoft channels (partner/ MsConnect/ etc.), or as a comment directly under this blog post.

Thank you!
Viewing all 181 articles
Browse latest View live


Latest Images

<script src="https://jsc.adskeeper.com/r/s/rssing.com.1596347.js" async> </script>
<script src="https://jsc.adskeeper.com/r/s/rssing.com.1596344.js" async> </script>